If you are facing an issue while doing a right-click on the StartMenu then this windows 10 guide will help you to fix the issue. Some users were reported that the right click on the StartMenu is not working properly after the windows update. While some users reported that sometimes the right-click is working fine and sometimes it’s giving an issue. Right-Clicking on the start menu gives you WinX menu options.
Right-click is not working on StartMenu:
If you are affected by the above-mentioned issue then follow the recommended resolution methods below to fix this issue.
Restart the File Explorer:
Restarting the file explorer will fix the common UI issues in the desktop, taskbar, Action center, start menu, and File Explorer.
Press Ctrl + Shift + Esc and click on the Task Manager.
Click on the More Details if the Task Manager is small.
Then locate the Windows Explorer and click on it, now at the bottom right corner, you can see the Restart. 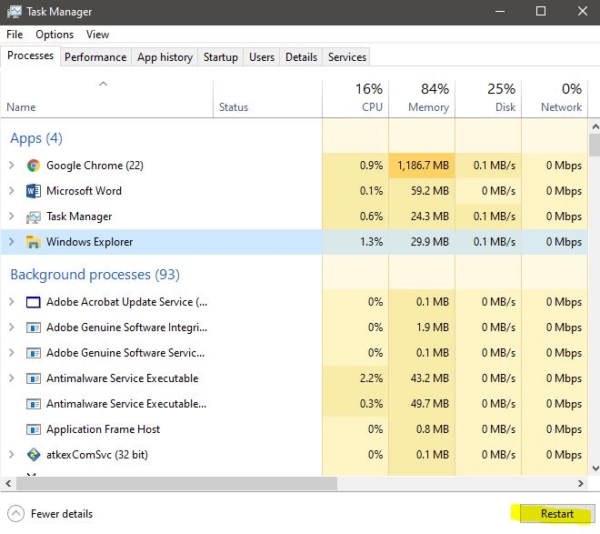
Modify the Registry Value:
Note: Modifying the Registry is risky, and it causes irreversible damage to your OS Installation Follow the steps correctly. Friendly advice Before Modifying Registry Creating Restore Point is recommended.
Open the Run command by pressing Windows + R and type Regedit and hit enter, this will open the registry editor.
Now Navigate to the following path
HKEY_LOCAL_MACHINE\SOFTWARE\Microsoft\Windows\CurrentVersion\ ImmersiveShell\Launcher
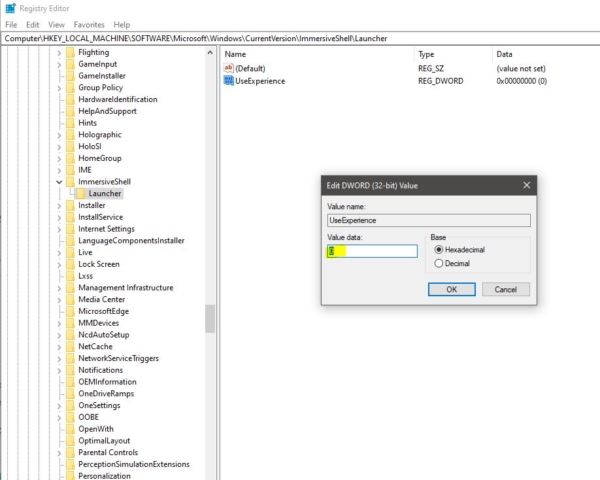
From the Left-hand side click on the Launcher Registry Key and from the right-hand side right-click on an empty area and choose New > DWORD (32-bit) Value. 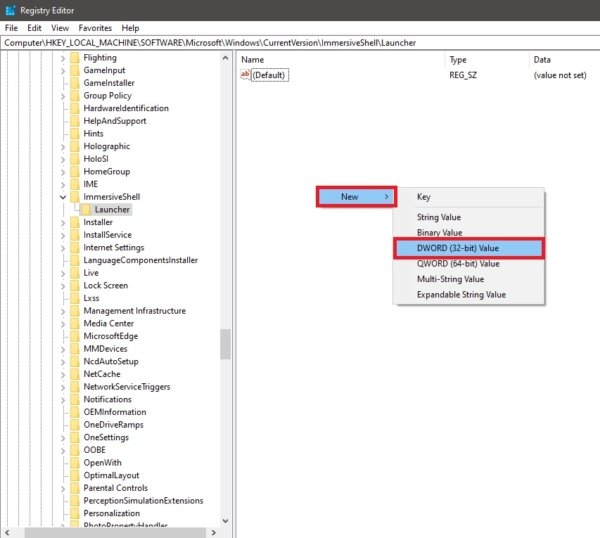
Using PowerShell:
Open PowerShell in elevated mode.
And type the below-mentioned Cmdlet.
PowerShell -ExecutionPolicy Unrestricted
This command will allow you to run the script in PowerShell. Once you verified the execution policy then copy-paste the below-mentioned cmdlet.
Get-AppXPackage -AllUsers | Foreach {Add-AppxPackage -DisableDevelopmentMode -Register “$($_.InstallLocation)\AppXManifest.xml”}
Ignore the warning message if you got any. After the command execution restart the system once and check for the issue.
Using WinX Folder:
The WinX Folder contains all the customized shortcuts which are displayed in the Quick Access Menu. Replacing this folder’s contents will resolve this issue. If you have any other computer then you can navigate to the following location or just open run command and copy-paste the below-mentioned location path and hit enter. %USERPROFILE%\AppData\Local\Microsoft\Windows\WinX Once you open the WinX folder, you’ll notice 3 different Group Folders named Group 1, Group 2, Group 3. 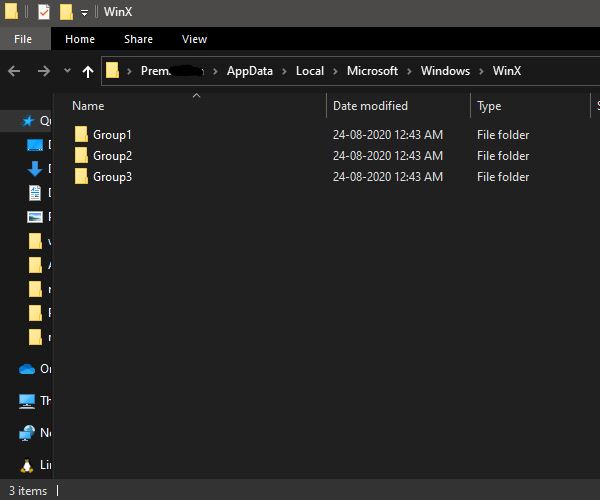
Recreate User Profile:
If you are a domain login user then recreating the user profile will fix this issue. Follow the link here to check how to delete the user profile and recreate it. If you are using a local user account then you can follow the below-mentioned steps to recreate the user profile.
Open Run command and type lusrmgr.msc and hit enter, this command will open the Local users and Groups console.
Now click on the users and Right-click and create a new administrator account.


