If you are unable to turn on the Memory Integrity feature in Windows 11 Defender security, then this article is intended to help you to fix this issue. Before Proceeding first will see about Memory Integrity and Core Isolation feature in Windows Security.
What is Core Isolation?
Core Isolation is a Windows Defender security feature, which comes along with the Windows Operating system. This feature isolates the important core process of the Windows Operating system from malicious software by isolation them in the separate memory. It runs all the Important Core processes in a virtual environment.
What is Memory Integrity?
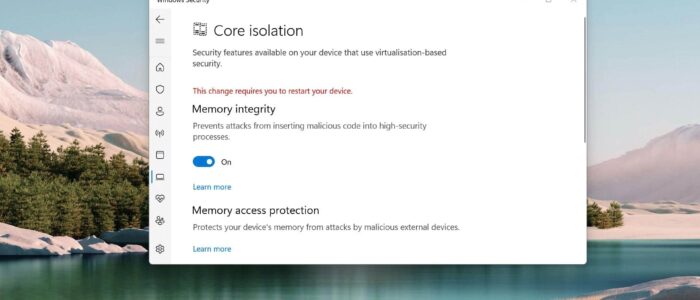
In Windows 11 Memory Integrity is a Windows Security feature that is an inherent part of Windows Security. Memory Integrity is referred to as HVCI Hypervisor-Protected Code Integrity and it is a Virtualization based security. HVCI and VBS provide stronger protections against malware trying to exploit the Windows Kernel, and it improves the thread model of Windows. VBS leverages the Windows Hypervisor to create an isolated virtual environment and HVCI protects this Virtual environment. This makes it difficult to run the malicious program to use low-level drivers to hijack your computer. Memory integrity is designed to prevent attacks from inserting malicious code into high-security processes. By default, in Windows 10/11 this Memory Integrity is enabled, if you want you can disable the Memory Integrity. Recently some users reported, in most Insider preview builds, this memory integrity feature is turned off, and while enabling they received an error like Memory Integrity Can’t be turned on in Windows 11.
If you are facing similar issues, then this article will guide you to fix Memory Integrity Can’t be turned on error in Windows 11.
Fix Memory Integrity Can’t be turned on:
The Possible reason for the memory integrity issue could be due to the incompatible drivers or Windows cannot load the drivers required for the device. Follow the below-mentioned solutions one by one to fix this issue.
Solution 1: Enable the Virtualization:
Memory Integrity and Core Isolation is a virtualization-based technology, so make sure the Virtualization is enabled on your computer. In Windows, you can check whether the virtualization is enabled or not by using the Task Manager.
Open Task Manager by pressing Ctrl + Alt + Del and choose Task Manager.
Under Task Manager click on the Performance tab and choose CPU. Under the CPU section, you can see the Virtualization details.

If the Virtualization showing disabled, then go to BIOS and enable the Virtualization.
After enabling Virtualization, try to enable the memory integrity feature. Mostly this will fix the issue. if not then Proceed to the next resolution.
Solution 2: Remove unwanted drivers or Update all the device Drivers:
First Update all the device drivers, there are several ways to update all the device drivers, follow the steps from the link to update all the drivers at once.
And if you are unable to enable the Memory integrity, or the Memory integrity toggle button is greyed out, then you can see the Review Incompatible Drivers option below the toggle button.

By clicking on the Review Incompatible Drivers you can see the list of drivers which is causing the issue. Go to Device Manager and find the appropriate drivers and uninstall it.

After that restart the system once and check. Mostly this will fix the issue.
Read Also: List of Common BIOS keys for all Brand Laptops


Sorry but tried all of these and ultimately, it says I can’t delete the offending drivers because “something” is using them. I’ve removed AND disabled the items I think are a problem, there is NO software related to them because it was removed, sooo…. Microsoft is filled with people who take delight in chaos.
See https://youtu.be/NzoMmeaeVzI I followed what he said to do and lo and behold, it worked! Memory Integrity is up and running!!!!!
I totally agree! I am having the same issue. My computer was normal until August 31, 2022 after an MS update. Thanks MSN!
Try going to Device Manager. Under ‘View devices by driver’ find your incompatible driver causing the issue with Memory Integrity being grayed out. Once you located your errant driver, right click on it. Then check uninstall and force remove. This worked for me. I saw this on https://youtu.be/NzoMmeaeVzI
> Once you located your errant driver, right click on it. Then check uninstall and force remove.
What if the driver is needed for printing, etc? Any alternative to uninstalling the incompatible drivers?