Windows 10 comes up with a lot of advanced features, Automatic maintenance mode has a special role in that. It’s a feature that helps to check and keep your computer healthy. In details, it’s like a maintenance activity that runs through the application or process that helps and maintains the health and performance of a Windows PC. In this article, we will guide you through what is automatic maintenance mode in brief and how to start, Stop, Schedule, and Disable Automatic Maintenance in Windows 10.
What is Automatic Maintenance mode?
Automatic Maintenance mode is a kind of task scheduler which runs sets of programs and task on daily basis at 2.00 AM by default. These activities will only run when your system is switched on and idle, and in windows 10 there is one more advance feature included for Automatic Maintenance, if your system is connected to a Power source and the power button was on, the windows 10 will automatically run the maintenance mode and again put the system to sleep. There is a list of tasks included in maintenance Activities such as disk optimization and defragmentation, system and apps updates, security and malware scans, diagnostics, and other tasks with the sole purpose of keeping your device healthy and running at peak performance. These tasks are different from one system to another. If you are a software developer, you can create your own task and add to this feature.
How long this Optimization process can Run?
This process can only run for one hour a day. One Hour is the maximum Hour if the process can’t able to complete within one Hour the activity will get paused and resumed on the next day schedule. the only exception is when there are tasks marked as critical, in which case, they will continue to run until they’re complete even if you’re actively using the device. We all Know windows update is an important task, this will run even outside of this maintenance mode. So you can’t use this method to Stop the Windows Update. If your system is not switched on or you are working on, then schedule to run maintenance tasks will be postponed until a later time when tasks won’t impact performance or energy efficiency. This article explains how to start, Stop, Schedule, and Disable Automatic Maintenance in Windows 10.
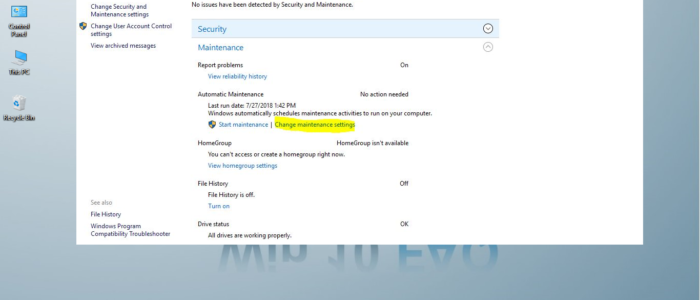
Start Automatic Maintenance in Control Panel
- Go to the control panel and switch the view to Large Icons.
- Click on Security and maintenance settings expands the Maintenance tab.
- Now click on the Start Maintenance.

Stop Automatic Maintenance using control panel
- Go to the control panel and switch the view to Large Icons.
- Click on Security and maintenance settings expands the Maintenance tab.
- Now click on the Stop Maintenance.

Start Using command Prompt
- Open Command Prompt in elevated mode.
- Copy and paste the command below in the elevated command prompt, and press Enter.
MSchedExe.exe Start 
Stop using Command Prompt
- Open Command Prompt in elevated mode.
- Copy and paste the command below in the elevated command prompt, and press Enter.
MSchedExe.exe Stop 
Start Using PowerShell
- Open PowerShell in elevated mode.
- Copy and paste the command below in the elevated PowerShell, and press Enter.
MSchedExe.exe Start 
Stop Using PowerShell
- Open PowerShell in elevated mode.
- Copy and paste the command below in the elevated PowerShell, and press Enter.
MSchedExe.exe Stop 
Disable Using Registry Editor
Automatic Maintenance mode is one of the useful features in windows. Each and every computer needs maintenance to run smoothly, you can’t disable the automatic maintenance mode directly, and disabling this maintenance mode is not the right choice. But if you are facing any performance issue, Blue screen error, or any application crashes you can disable this mode by modifying the registry file.
- Use the Windows key + R keyboard shortcut to open the Run command.
- Type Regedit, and click OK to open the Registry.
- Browse the following path:
HKEY_LOCAL_MACHINE\SOFTWARE\Microsoft\Windows NT\CurrentVersion\Schedule\Maintenance
- Right-click the newly created key, select New, and click on DWORD (32-bit) Value.
- Name the key MaintenanceDisabled and press Enter.

- Double-click the newly created DWORD and set the value from 0 to 1.
- Click OK.

- Restart your computer.
- To revert this setting back follow the above steps and modify the DWORD Value back to 0.
How to Schedule Automatic Maintenance on Windows 10?
This maintenance Mode is fully automatic even though it’s automatic we can control its some of the features through settings. In windows 7 there is no proper way to schedule the automatic maintenance mode but in windows 10 there are various aspects of feature included.
- Open Control Panel, Click on System and Security.
- Click on Security and Maintenance. Expand the Maintenance section to reveal the Automatic Maintenance options.
- Click the Change maintenance settings link.

- Use the Run maintenance tasks daily at the drop-down menu to select the time you want your system to perform the automated maintenance tasks.
- If you don’t want your device to wake up at night automatically, make sure to clear the Allow scheduled maintenance to wake up my computer at the scheduled time option.

- Click the OK button.
Once you complete these steps, your computer will perform maintenance daily at the time you specified for a maximum period of one hour. However, if you’re actively using your device, Windows 10 will skip the schedule and try again at a later time. If you want to run maintenance immediately, you can click the Start maintenance option within the “Maintenance” section in Control Panel but using this option will continue to run tasks even if you’re actively using your device.