Windows Update is used to keep Microsoft Windows and several other Microsoft programs updated. Updates often include feature enhancements and security updates to protect Windows from malware and malicious attacks. You can also use Windows Update to access the update history that shows all the updates that have been installed on the computer through the Windows Update service. There are number of ways to stop this Windows Update service, stopping the Windows Update service is not the perfect solution. And this may end up in causing super vulnerability to your system. There may be a lot of discussion on the internet, about stopping updates in windows 10 either good or bad. Some said it’s very annoying and taking all of my internet bandwidth and some said it’s very important because of security reasons. But you have to make choice. This Post explains how to Limit Windows Update bandwidth without Affecting your day to day work on the internet.
Windows 10 has a mechanism to dynamically measure and optimize the bandwidth your device uses to download and upload system updates, as well as for apps acquired from the Store, and numerous other products to make sure these activities don’t interrupt your experience. However, the delivery optimization mechanism can only analyze the network activity of your device, and it’s not aware of the bandwidth usage on other computers on the local network. As a result, if you have a limited connection to the internet, other devices may experience noticeable speeds reduction during update activities.
Starting with the Windows 10 Fall Creators Update (version 1709), Microsoft is addressing this issue by introducing new options that allow you to limit the bandwidth your device uses to download and upload updates. There are three methods to do bandwidth throttling to limit background upload and download speed in windows 10.
Let’s jump into the step-by-step guide to do this.
- Limit Windows Update bandwidth using Update setting
- Limit Windows Update bandwidth using the Registry edit
- Limit Windows Update bandwidth Using Group Policy
How to Limit Windows Update bandwidth using Update setting?
There is an option given in windows 10 Fall creators Update (1709) to optimize the bandwidth usage. It is a very direct method and easy to set.
- Open Settings.
- Click on Update & Security.

- Click the Advanced options

- On “Advanced Options,” click the Delivery Optimization link.

- On “Delivery Optimization,” click the Advanced options link.

- Under “Download settings,” check the Limit how much bandwidth is used for downloading updates in the background

- Use the slider to specify (in percentage) the amount of bandwidth you want your device to use.
- Under “Upload settings,” check the Limit how much bandwidth is used for uploading updates to other PCs on the Internet
- Use the slider to set (in percentage) the amount of bandwidth you want to dedicate for uploads.
- If you want to limit the amount of data your device uploads per month, you can also check the Monthly upload limit
- Use the slider to set the upload limit in gigabytes.
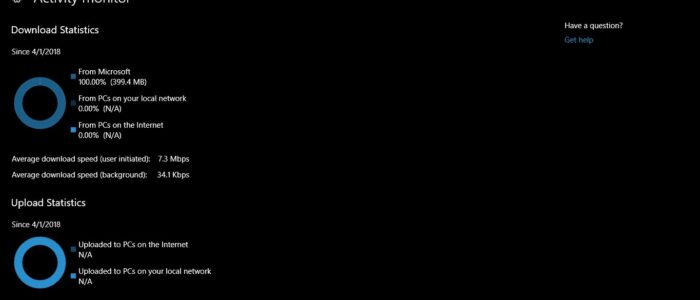
- You can view the status activity monitor to check the upload and Download status.
- Open Settings.
- Click on Update & Security.
- Click the Advanced options link.
- On “Delivery Optimization,”
- Click the Activity monitor link.

- Find More about status activity monitor Here.
How to Limit Windows Update bandwidth using Registry edit?
Before Using this method you should know about BITS, So what is BITS in windows? BITS also Known as Microsoft Windows Background Intelligent Transfer Service. It is a process that transfers files (downloads or uploads) between a client and server and provides progress information related to the transfers. BITS is most commonly used by Windows to download the Windows Updates to the client’s local system. By default, BITS transfers files in the background using only the idle network bandwidth in an attempt to preserve the user’s interactive experience with other network applications. This potentially can be an issue for those users who have a fast network adapter (10 Mbps) but are connected to the network via a slow link (56 Kbps). This is mainly because BITS will compete for the full bandwidth instead of using only the available bandwidth on the slow link – BITS has no visibility of the network traffic beyond the client. In simple words, BITS can eat up a great amount of the network bandwidth to carry out the background download process leaving the users with issues like slowness. The answer to this problem is to use a system policy configuration to block BITS from using the bandwidth. The same trick can also be applied to the users who do not face bandwidth concerns but simply want to limit their data downloads to certain times of the day. You can stop this service directly through windows services.
Goto Run command by pressing Windows + R and type services.msc,
Once the services window appeared search for Background Intelligent Transfer Service,
Now you can stop this service Directly, But stopping the service will stop the Transfer of files in the background using idle network bandwidth. If the service is disabled, then any application that depends on the BITS such as Windows Update or MSN Explorer, Will be unable to automatically download Programs and Other information.
To totally block, limit, or do both follow the steps below as suggested by Microsoft Answers:
Open Registry Editor and go to this location: HKEY_LOCAL_MACHINE\Software\Policies\Microsoft\Windows\BITS
- Right-click on a blank spot on the left side and select New > DWORD Value as shown below-
- You have to create the following DWORDS and give them appropriate values:

- EnableBITSMaxBandwidth
- MaxBandwidthValidFrom
- MaxBandwidthValidTo
- MaxTransferRateOffSchedule
- MaxTransferRateOnSchedule.

- To Enable the BITS first give 1 as a DWORD value for EnableBITSMaxBandwidth and 0 Disable.
- Then You have to set the Time period for Maximum bandwidth, During this Time Period, the BITS will take the entire Bandwidth.
- Set railway timing value for MaxBandwidthValidFrom and MaxBandwidthValidTo.
- So apart from these timing, the maximum should be limited to that set the DWORD value as 2 KBPS
 These settings will block BITS completely between the hours shown, and beyond those hours BITS will use only 2 KBPS of the entire network bandwidth. These values can be customized by the users based on their own preference.
How to Limit Windows Update bandwidth using Group Policy?
If you are not using Windows 10 Fall creators Update then this method will be suitable for you. In widows build version 1703 you can optimize the Windows Update bandwidth using Group Policy Editor.
- Press Windows key + R keyboard shortcut to open the Run Then Type gpedit.msc and click OK to open the Local Group Policy Editor.
- Browse the following path:
Computer Configuration > Administrative Templates > Windows Components > Delivery Optimization 
- Double-click on the Maximum Download Bandwidth (percentage)policy (the equivalent to the “Download settings” option in the Settings app).
- Select the Enabled
- Under “Options,” enter the download bandwidth in percentage.

- Click Apply.
- Click OK.
- Now go back to the main page of Delivery Optimization, There search for Download Mode and Double-click the Download Mode policy.
- Select the Enabled
- Under “Options,” use the “Download Mode” drop-down menu, and select the LAN (1)option (the equivalent to “PCs on the local network” option in the Settings app).
 Important: You only need to configure this option and follow the remaining steps if you want to allow your device to upload updates to other PCs on the internet.
- Click Apply.
- Click OK.
- Double-click the Max Upload Bandwidth (in KB/s)
- Select the Enabled
- Under “Options,” specify the bandwidth speed you want to dedicate for uploads – unlike the download settings, you must specify this option in kilobits per second.
- Click Apply.
- Click OK.
This setting will More applicable for personal PC and Laptops, If you are trying to configure an Organization’s PCs you will get an error “Some settings are managed by Your Organization”. Find More about Configuring Delivery Optimization Here.