Most of the Users reported the latest error from Windows 10 after the migration. This error appeared like Element Not Found. when users try to access Settings, Universal apps, and other options, sometimes you will also get this irritating error when you try to open any image/photo of .jpg file format. Windows 10 “Element not found error” can directly influence the functionality and efficiency of the Windows 10 system, and you get unable to access Settings, Universal apps. This leads us to the irritation we cant open any default apps from the Windows 10 system.
Error Appearance: ‘Element Not Found’
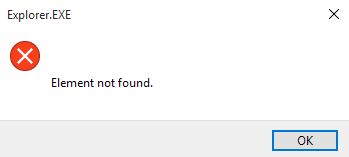
Screenshot: Related Error Like This in Windows10: Element Not Found is a relatively common error on Windows, and in this article, we’re going to cover the following issues:
- Element Not Found Windows 10 pictures – This error message usually occurs when you try to view pictures on your Windows 10 PC. The issue is most likely caused by your default photo viewer app, and to fix the problem, you just need to replace default photo viewer application.
- Element Not Found Microsoft Edge – This error can appear in Microsoft Edge as well, and it’s most likely caused by file corruption. However, you should be able to fix it using one of our solutions.
- Element Not Found Explorer.exe – Sometimes this error message can appear while using File Explorer. However, you can fix the problem simply by restarting the explorer.exe process.
- Element Not Found Windows 10 update – Many users reported this problem after a Windows update. However, you can fix the issue simply by finding and uninstalling the problematic update.
- Element Not Found jpg – Element Not Found error is relatively common with jpg images, but it can also appear with other files. If you have this problem with your PC, be sure to try some of our solutions.
In this Post, I Tried to Include all the Possible solutions.
General Solution: Reset your PC
If you feel your system is buggy or you faced any strange errors you can go for resetting your PC. Resetting the PC is a feature in windows 10 in this feature windows reset itself to the factory default state. What is windows reset actually doing to your system. Once you click on windows reset the windows boot into the recovery environment. RE formats the windows partition and installs a fresh copy of windows 10 or whatever version of OS you use. Reset your PC
Solution 1: Lenovo Software Uninstall.
Mostly this error frequently occurred for those who use Lenovo Laptop. If you’re using a Lenovo laptop, you should know that certain Lenovo software can cause this issue, so the best solution is to remove this software from your laptop. As per the Lenovo forums, the software which is causing this error is CAPSOD and One Key Theater. You can directly uninstall from the programs and features but Sometimes you might need to remove all files associated with the problematic software. Doing this task manually is an advanced process, but there are tools such as IOBit Uninstaller or Revo Uninstaller, that can remove the problematic software along with all associated files and registry entries. As my suggestion user Revo Uninstaller for this. Open Revo and choose the program and scan for leftover registry files. And do all selection and delete it. Once you removed those softwares the issue won’t occur again. This method is only for Lenovo laptop users.
Solution 2: Uninstall recent Update
Some users reported after the recent update they noticed an Element Not Found Error to appear. In order to avoid this issue, you want to uninstall all the recent updates from the Installed Updates.
How to Uninstall Recent Updates?
Open Settings. Click on Update & security.
Click on Windows Update.
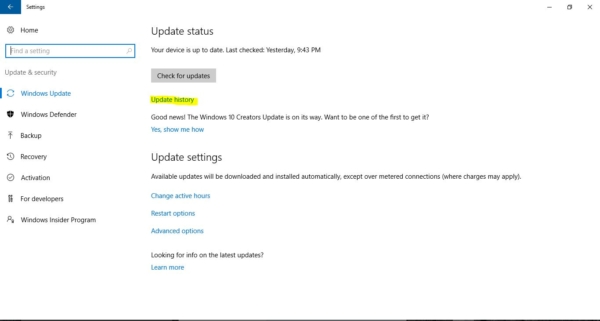
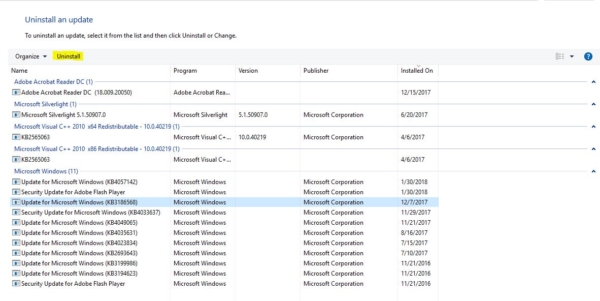
Click the Update history On Update history, you can view which updates were installed successfully and which are those failed updates with a timestamp, which can help you pinpoint which update is causing the problem. Click the Uninstall updates Microsoft hasn’t moved everything to the Settings app, so you’ll now be taken to the Uninstall an update page on Control Panel.
Select the update and click the Uninstall Click Yes to confirm the uninstall.
Click Restart Now to reboot your computer and complete the task. Depending on the update you’re trying to uninstall, the process may take a few minutes.
Solution 3: Temporarily disable your antivirus
Sometimes your antivirus can interfere with your system causing the Element Not Found error to appear. To check if your antivirus is the problem, be sure to disable it and try running the application again. If that doesn’t work, you might have to uninstall and switch to a different antivirus solution. So if you are using an antivirus disable it temporarily and check.
Solution 4: Restart Explorer.exe
This is simple and has worked successfully in solving element not found error. Below find out what you need to do to restart explorer.exe
- Restart your PC and when Windows 10 starts press CTRL+Shift+Esc key to open Task Manager.
- In the Processes tab, look for explorer.exe (Windows Explorer)
- Just simply select and right-click it and select End Task.
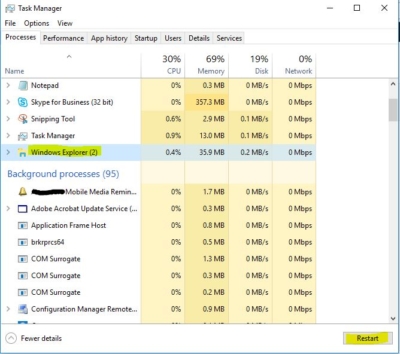
- Up next go to File>New Task.
- This will open a Run window. Now you have to just type explorer.exe into it and hit Enter to run it.
Solution 5: Run the SFC
Follow the below steps:
- Open Command Prompt.
- Select “Run as Administrator”.
- Type “sfc /scannow” without quotes and hit Enter.
Now check for the issue.
Solution 6: Run the DISM Tool.
If the issue persists, I would have you run the DISM tool to check the system’s health and will try to restore the files.
- Click on ‘Start‘.
- Enter ‘Command prompt’in the Search box.
- In the list of results, swipe down on or right-click Command Prompt, and then tap or click ‘Run as administrator’.
- In the Administrator: Command Prompt window, type the following commands. Press the Enter key after each command:
DISM.exe /Online /Cleanup-image /Scanhealth DISM.exe /Online /Cleanup-image /Restorehealth Scan and Restore might take few minutes be patience. Find More about DISM.
Solution 6: Use an alternative app
This issue mostly occurs when we try to open any image in the default windows application. In this case, try to open the app in a different picture app. So how to change the defaults app in windows 10?
- Click on the Start menu. It’s the Windows logo in the bottom left of your screen.
- Click on Settings.
- Click on System.
- Click on Default apps.
- Now click on Photo Viewer and select your default apps as a windows Picture Viewer. If you didn’t see Windows Picture Viewer Download it from the windows store.
- Now your default Picture Viewer is changed, Mostly this method will resolve the issue.


