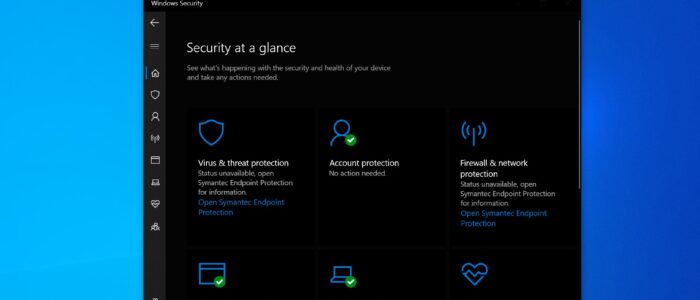
Windows Defender is the Antivirus which is inbuild in windows 10, Windows Defender is the next generation protection component of Microsoft Defender Advanced Threat Protection (Microsoft Defender ATP), Windows Defender comes with the most advanced feature, which starts from the design a panel displaying its various modules and their status. You can find the seven protecting areas of windows defender below.
- Virus & threat protection – This feature runs scans, detects threats, and downloads updates to help identify new viruses and malware. On version 1709, this section also offers configuration settings for controlled folder access.
- Account Protection – When you sign in to Windows, the new Account Protection pillar protects your identity. You will be encouraged to set up Windows Fingerprint, Hello Face, or PIN sign-in. If applicable, Account Protection will also notify you if Dynamic Lock has stopped working because your PC’s Bluetooth is inactive.
- Firewall & network protection – In this area, you will be able to manage the Windows Defender Firewall settings. You can also monitor what’s happening with your Internet connections and networks.
- App & browser control – This feature allows you to use Windows Defender Smart Screen, which can protect your computer against potentially dangerous files, sites, apps, and downloads. Moreover, it provides a customization exploit protection feature.
- Device Security – You can get a better insight into the security features integrated with your Windows computer. You can access this area to manage your PC’s built-in security features. Moreover, you can use it to generate security status reports.
- Device performance & health – Access this page to get reports on your computer’s performance and health. This feature can also help you keep your PC clean and up-to-date with the latest version of your operating system.
- Family options – If you’re a parent, you can use this feature to manage your children’s online experience.
From these seven protecting areas, Scanning the computer is the part of the virus and Protection feature, Which is very important for any antivirus, Once the defender is enabled the system scan will happen automatically, Sometimes at the time of scanning you will receive the error from Defender that the “items are skipped from the scanning”. This error is mainly caused by incomplete scan areas. The Network scan is not enabled on your machine. Network scan is the part of the Virus and protection feature, This article will Guide you to enable the Network scanning in Windows Defender on Windows 10.
Enable Network Scanning in Windows Defender:
In three Methods you can enable the Network scanning in windows Defender, First, make sure windows defender is enabled on your machine. Using PowerShell Using Group Policy Editor Using Registry Editor The above-mentioned error occurs during both the Quick and Full scan, using these methods you can enable or disable network scan.
Enable Network Scanning using PowerShell
Open PowerShell in administrative mode and type the following command and hit enter.
Set-MpPreference –DisableScanningNetworkFiles 0
You won’t receive any output after executing this command, Mostly this will fix the issue, if you want to disable replace the 0 to 1.
Using Group Policy Editor:
Open Run command by pressing windows + R and type gpedit.msc and hit enter this will open the Group Policy editor.
Now Navigate to the following path
Computer Configuration > Administrative templates > Windows components > Windows Defender Antivirus > Scan

Expand the Windows Defender Antivirus, From the left-hand side click on Scan and from the right-hand side look for Scan Network Files Policy settings.

Double-click on Scan Network Files Policy Settings and Enable the Policy.
Then click Ok, Restart the system once to make it effective.

As I mentioned above by default this scan Network files will be set to Disable in Windows 10.
Using Registry Editor:
Open Run command by Pressing Windows + R and type the regedit and hit enter, this will open the registry editor.
Now Navigate to the following path.
Computer\HKEY_LOCAL_MACHINE\SOFTWARE\Policies\Microsoft\Windows Defender
Right-click on the Windows Defender and create a New > Scan Registry key, Click on Scan and from the left-hand side.

And from the Right-hand side, Right click on the empty space and choose New > DWORD and Name the DWORD DisableScanningNetworkFiles.
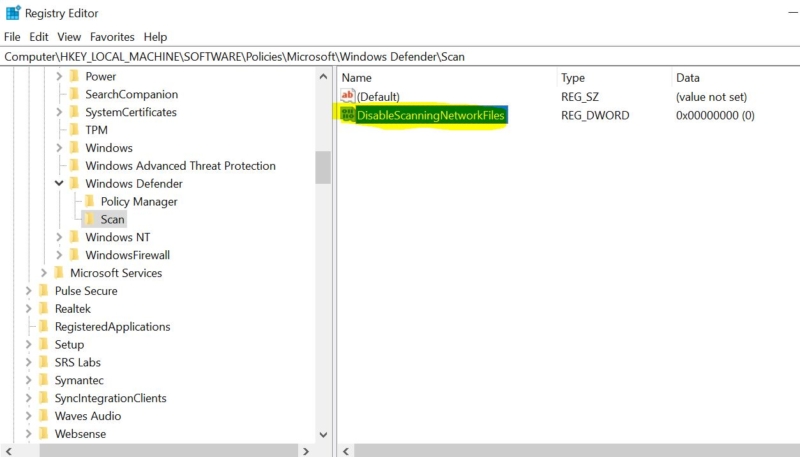
Double-click on DisableScanningNetworkFiles and set the value to 0, to Enable the Scanning.

Click on Ok and restart the system to make it effective.
Read Also:
How to Disable Non-critical notifications from Windows Security?
How to scan individual Files and Folders using Microsoft Defender?
How to Update Windows Defender Virus signature using Command Prompt?
How to Scan for Virus using Command prompt in Windows 11?
How to use Multiple Internet connections at same time in Windows 11/10?