In Windows Format is a term to delete all the data and setting up a new file system. The most popular file system to support Windows is NTFS but FAT32. For example, if you are going to format a HDD partition then you must choose NTFS, because NTFS is supported by the Windows Operating system. For Formatting any USB flash Drive we use the FAT32 file system. Usually Formatting a partition is usually done from the Disk Management tool. You can also use several methods to format a drive like Command Prompt, Third-Party software, and PowerShell. In this windows guide, we’ll walk you through to Format USB Flash Drive using PowerShell.
Format USB Flash Drive Using PowerShell:
Windows PowerShell is a powerful tool that is developed by Microsoft for purposes of task automation and configuration management. This is based on the .NET framework and it includes a command-line shell and a scripting language. Windows PowerShell is designed especially for the system administrators. If you are a windows administrator and if you know PowerShell very well and you can simplify and automate tedious and repetitive tasks by creating scripts and combining multiple commands together. Today we are going to see how to format USB flash Drive using PowerShell.
Open PowerShell in admin mode and Type the following command to perform a quick format on the flash drive.
Format-Volume -DriveLetter G -FileSystem NTFS
Make sure to replace the G with your flash drive letter and mention the File system, this cmdlet performs full format, it will take lot of time to complete.
To perform a Quick format, Enter the below-mentioned command and hit enter.
Format-Volume -DriveLetter G -FileSystem NTFS -Full -Force
This cmdlet will perform the format with full force, with all applied settings specified.
How to Clean and format flash drive?
You can also Do clean and format a removable drive with PowerShell Commands.
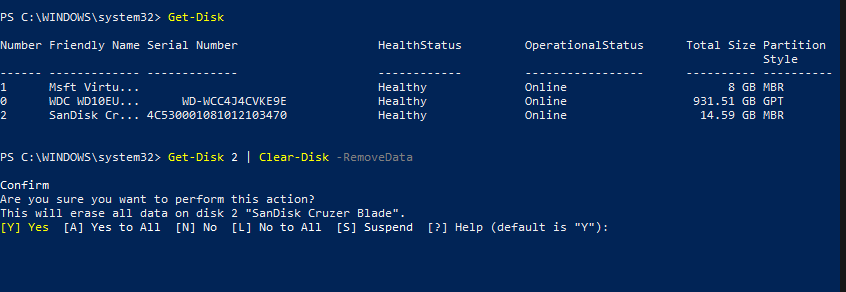
Open PowerShell as admin mode, Type the following cmdlet to view the flash drive you want to fix, and press Enter Get-Disk This command will list out all the partitions including the flash drives. Note down the disk number.
Type the following command to delete the volume and press enter.
Get-Disk 2 | Clear-Disk –RemoveData Note:
Replace your disk number instead of number 2. Type Y to confirm, If you need any other option choose other, [Y] Yes [A] Yes to All [N] No [L] No to All [S] Suspend [?] Help (default is “Y”): Now Create a New Partition,
Type the following command to create a new partition and press Enter
New-Partition -DiskNumber 2 -UseMaximumSize
Note: Replace your disk number instead of number 2. Now Type the following command to perform a quick format and assign a drive letter. And hit Enter.
Get-Partition -DiskNumber 2 | Format-Volume -FileSystem FAT32 -NewFileSystemLabel Flash Drive
Note: Replace Disk Number 2 to your disk number and change the file system to “NTFS,” “FAT32,” or “exFAT,” Give new file system label. And final to assign a new letter to the dive, type the following command to assign a new letter to the dive and press enter.
Get-Partition -DiskNumber 2 | Set-Partition -NewDriveLetter E
Note: Replace the disk number and New drive letter to as your wish.
After completing these steps, similar to Command Prompt, PowerShell will remove any information in the USB flash drive to fix problems, including data corruption, write protection, and unrecognized drives. Then it’ll create a new partition and configure a compatible file system to store files from your Windows 10, macOS, or Linux machine (depending on your configuration).


