Cloudflare, Inc. is a U.S. company that provides a content delivery network, DDoS mitigation, Internet security services, and distributed domain name server services, sitting between the visitor and the Cloudflare user’s hosting provider, acting as a reverse proxy for websites. Recently Cloudflare announced their own fastest DNS server 1.1.1.1 which directly Competing with google Open DNS service. As per the dnspref report, Cloudflare won first place, and the Google open DNS service moved one step back. 
How fast is this Cloudflare New DNS server?
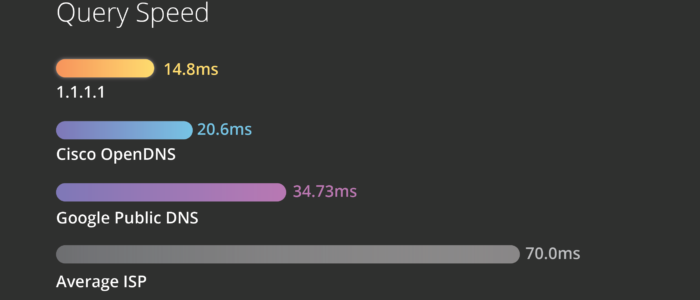
At first, a DNS server is a sort of a middleman between you and the website that you are trying to reach. It is the server that finds, for example, where Gmail is by associating Gmail.com with an IP address. Usually, when you get an internet connection from a company like Airtel, or use 4G or 3G from a company like Jio, they automatically provide you with a DNS server. Depending on how fast is a DNS server, your internet connection will also feel fast or slow. As per their claims, Cloudflare has the fastest DNS service with a global response time of 14ms. The numbers are 20.64ms for OpenDNS and 34.51ms for Google, according to DNSPerf. The reduced latency makes websites load faster because it takes less time to resolve an IP address. The use of DNS doesn’t have any impact on your actual internet bandwidth. The main important part of Cloudflare DNS server is privacy the fours 1s DNS service supports features like DNS-over-TLS and DNS-over-HTTPS. Thus, it makes harder for the internet providers to track your internet activity. The system is designed to wipe all the DNS query logs after 24 hours. 1.1.1.1 supports both Protocols.
How to set DNS settings in windows?
- Open Control Panel.
- Click on Network and Internet.
- Click on Network and Sharing Center.
- On the left pane, click on Change adapter settings.
- Right-click the network interface connected to the internet, and select Properties.
- Select Internet Protocol Version 4 (TCP/IPv4)from the list.
- Click the Properties
- Click the Use the following DNS server addresses
- Type your preferred and alternate DNS server addresses in the field in our case need to type 1.1.1.1 in Preferred and Alternate keep Google DNS server 8.8.8.8

- Click apply and Ok.
How to change DNS setting in MAC?
- Open System Preferences. Instead of clicking through numerous menus, the fastest way to get where you want to be is just by searching for “DNS servers” at the top right. That’ll take you to the right screen, where you can click the + symbol to add above mentioned DNS and Try.
Find more about Cloudflare here.