In Windows Active hours is a Windows Update feature that tells Windows when you are using your PC. And during that time Windows won’t automatically restart your device to install Windows updates. Once you set the active hours, windows will not restart your computer during that time to install an update. Microsoft allows you to set active hours up to 18 hours max per day, you can choose the time frame based on your work schedule. During active hours windows will silently download the Windows update in the background and install it, but it won’t restart the system during the active hours. If you are actively using the system even outside of active hours, windows still won’t restart your computer to install updates. In Windows 10/11 you can set the active hours using Windows settings. But Some organizations restrict their users to set the active hours using Windows settings. If you are not able to access the windows settings, then you can use the alternative methods to Set active hours. This article will guide you to Set active hours using Registry and gpedit.
Set active hours using Windows Settings:
Open Windows Settings by pressing Windows + I and from the left-hand side click on Windows Update.
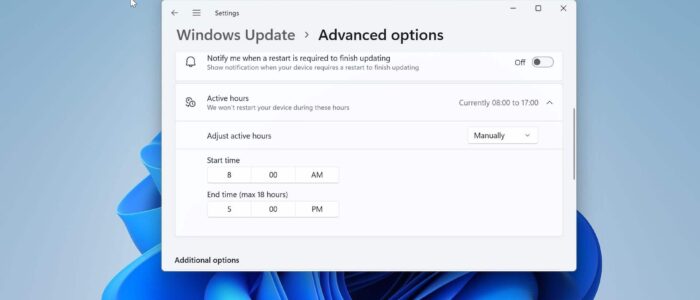
Under Windows Update, click on Advanced options.

Under Advanced options, you can see the Active hours option. Click on the drop-down menu, and now you can see the Adjust active hours.
There will be two options under Adjust active hours, Choose Manually to set the time period. If you choose Automatically Windows will adjust the time based on your activity.

Choose Manually to set your own time frame for active hours. Microsoft allows a maximum of 18 hours off-limit per day.

Set active hours using Registry:
Open the Run command by pressing Windows + R and type Regedit and hit enter, this command will open the Registry editor console.
Now navigate to the following registry path.
Computer\HKEY_LOCAL_MACHINE\SOFTWARE\Microsoft\WindowsUpdate\UX\Settings
You can use the same path for Windows 10 also, from the left-hand side click on the Settings registry key and from the right-hand side look for the following two DWORD’s.
ActiveHoursStart
ActiveHoursEnd
Double click on the DWORD’s to set the Start and End values. While editing just choose the Decimal Value and set the time in 24 hours format and click on OK.

Close the registry editor and restart the system once.
Using Group Policy Editor:
Open the Run command by pressing Windows + R and type gpedit.msc and hit enter, this command will open the Group Policy Editor.
Now navigate to the following path.
Computer Configuration > Administrative Templates > Windows Components > Windows Updates > Manage end user experience
From the left-hand side click on Manage end user experience, and from the right-hand side look for the policy named Turn off auto-restart for updates during active hours.

Double click on the Policy and open policy settings, Choose Enabled, and set the active hours.

Click on Apply and OK.