Microsoft released its major Operating System Windows 11 after 6 years, Windows 11 is rolled out on October 5, 2021. Microsoft announced that Windows 11 is free to Upgrade for existing Windows users. But to upgrade to Windows 11, the system has to meet the minimum system requirements. This rules out millions of existing Windows 10 devices from upgrading to Windows 11 with full support. The minimum system requirements include TPM, Secure Boot, and Processor. Most of the systems got ruled out due to the Processor requirements. Even though you fulfill all the Minimum system requirements, like boot mode and the TPM, still most of the users are facing the hardware isn’t compatible error from the PC Health Checkup tool (Your Processor isn’t supported for Windows 11). Because Microsoft has altered its minimum hardware requirements, and the most surprising thing is the CPU changes. Microsoft announces that Windows 11 will officially support 8th Gen and newer Intel core processors, alongside Apollo Lake and newer Pentium and Celeron Processors. And recently Microsoft announce that even though your system doesn’t meet the minimum system requirements, still you can install windows 11. And there are many ways to install Windows 11 on unsupported device, recently Rufus introduced an option to skip the minimum system requirements while creating the Windows 11 bootable media. So, using Rufus you can easily create Windows 11 bootable USB which will skip the Minimum system requirements check while installing Windows 11. This article will guide you to create Windows 11 bootable USB for unsupported device using Rufus.
Create Windows 11 bootable USB for unsupported device using Rufus:
To create a Windows 11 Bootable USB first you need to download the Stable build of Windows 11 ISO. Click on this link and download the Windows 11 ISO.
Next Download the Rufus software from this link and connect the USB Drive to your system. Launch the Rufus software in elevated mode.
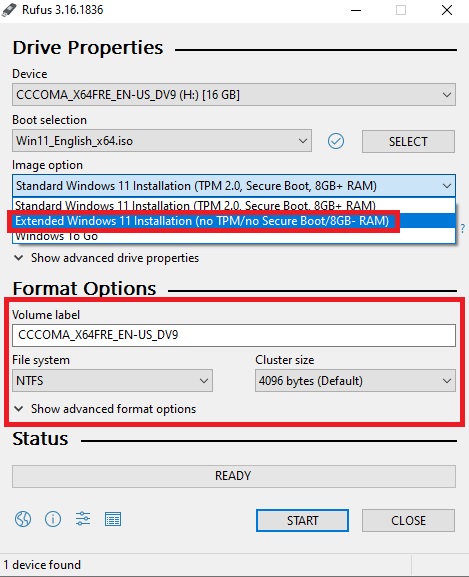
Once you Launched the Rufus software, under Boot Selection choose Disk or ISO image and then click on SELECT and choose the Windows 11 ISO.
Next under the image option drop-down menu, choose the Extended Windows 11 Installation (no TPM/no SecureBoot, 8GB + RAM).

Then select the Partition scheme as GPT and Target system UEFI (non CSM), Change the Volume label if you want, and leave the other settings as default.
Click on Start, this will format the USB drive and copy the Windows 11 installation files, Once the copying is done, you can use this USB drive to install Windows 11 without minimum system requirement checks.
That’s it.
Read Also:
Microsoft Says That you can Install Windows 11 on Unsupported devices
Easy Method: Create Windows 11 to Go USB Drive


Thanks you for your instructions
Can i use this method for upgrading instead of clean installating