Mapped drives are shortcuts to a specific network location or folder on another computer or server. By mapping a network drive, you can easily access and manage files and folders on remote locations without having to physically connect to the server or computer. This is especially useful in workplaces where multiple users need access to the same set of files. Linking a shared network folder or drive is easy in Windows operating systems, If you’re experiencing issues with mapped drives disconnecting automatically on Windows 11, there are several potential solutions you can try to fix this issue. This article will guide you to fix Mapped drive disconnects automatically on Windows 11.
Fix Mapped drive disconnects automatically on Windows 11:
Follow the below-mentioned resolution methods, to fix Mapped Drive disconnects automatically issue on Windows 11.
Solution 1: Disable Fast Startup
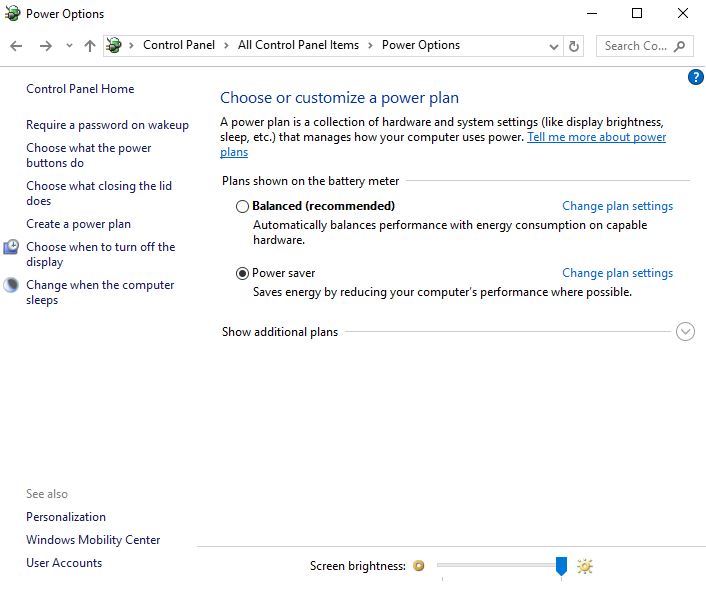
Open the Control Panel (icons view), and click on the Power Options.
Click on the Choose what the power buttons do link on the left side.
Click on the Change settings that are currently unavailable link at the top.
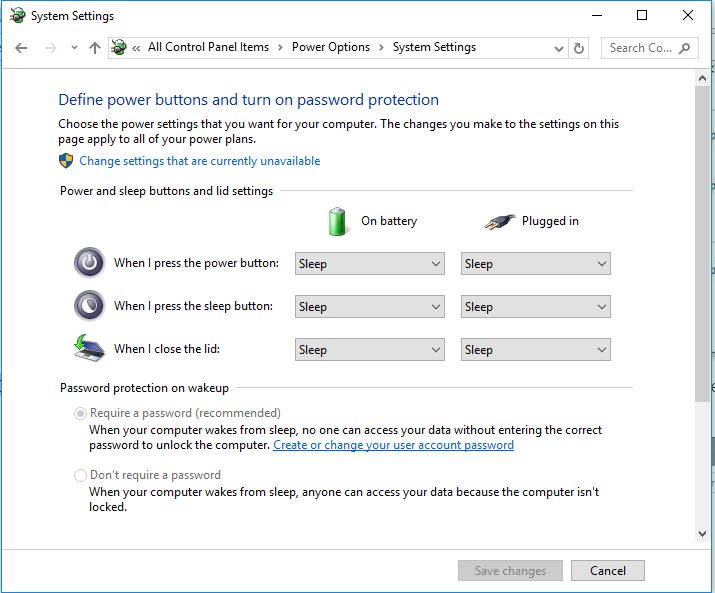
If prompted by UAC, click on Yes.
Under Shutdown Settings, Uncheck the Turn on fast startup box.

Click on the Save Changes button
This will disable the Fast Startup, restart your system once, and check if the error persists.
Solution 2: Disable the Offline Files feature on your system.
The offline Files feature in Windows allows you to access network files even when there is no network. You can access your files even when the system is offline, but sometimes, this may cause conflicts, which lead to unexpected behavior. Sometimes this will increase the system resource usage, disabling the Offline files feature can help resolve these issues. Follow the steps below to disable the Offline Files feature in Windows 11.
Open Run command by pressing Windows + R and type “control” and hit enter, this command will open the command prompt.
Click on the View by drop-down menu and choose “Large icons”, Look for “Sync Center”, and open it.

Under Sync Center, from the left-hand side click on “Manage Offline files”, click on the “Disable offline files” option, and click on OK.

Restart your system once to make the changes effective.
Solution 3: Disable the Auto-disconnect feature using the command prompt
Disconnecting this feature will prevents Network Disconnects, the Idle network connections to the server will not drop, which can help prevent mapped drives from disconnecting automatically.
Open the Command prompt in elevated mode, type the following command, and hit enter.
net config server /autodisconnect:-1
This command disables the automatic disconnection of idle network sessions on the server.
Solution 4: Disable the Auto-tuning Network
Auto Tunning Network feature in Windows is designed to improve the Performance of the network by dynamically optimizing the size of the TCP receive Window. Sometimes this may cause issues with certain network configurations or applications. Follow the steps below to disable the Auto-tuning Network feature in Windows 11.
Open Command Prompt in elevated mode and type the following command and hit enter.
netsh int tcp set global autotuninglevel=disabled
This command will disable the Auto-Tunning Network feature. to enable it back type the following command.
netsh interface tcp set global autotuninglevel=normalThis will enable the Auto-Tunning Network feature.
Solution 5: Enable Reconnect at Sign-in
Make sure the mapped drive is set to reconnect automatically during sign-in, by default this option will checked when you map any network drive. If its not mapped follow the steps below to connect the drive automatically sign-in.
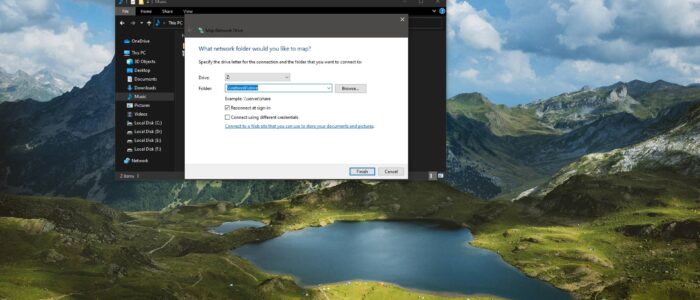
Open File Explorer by pressing Windows + E and go to this PC, and choose Map Network Drive.
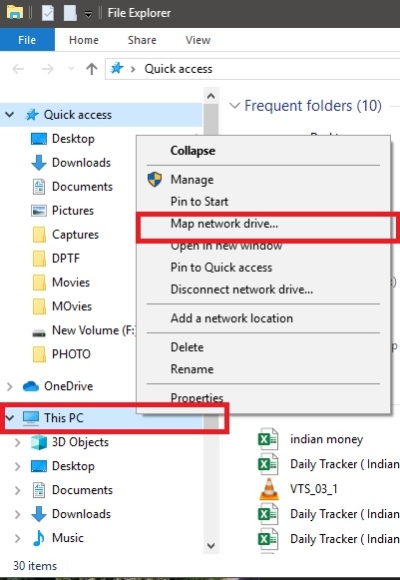
Now you will get a separate window for Mapping a Network drive.
There you can assign a separate Drive letter. Enter folder location from the network drive. Or you can browse it like a other folder, browsing is little difficult. So better to enter the network drive location.
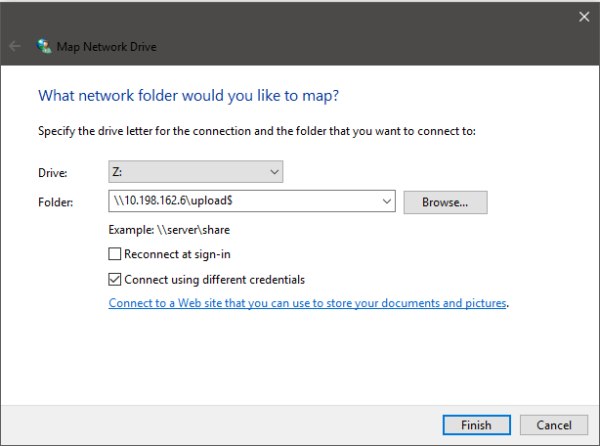
If you want the network drive to be permanent then check the option Reconnect at sign-in. this option will keeps your network drive permanent after the restart also. This will automatically remap after the restart.
Solution 6: Clear your Credentials Manager
Open run command by pressing Windows + R and type control and hit enter, this will open the control panel.
Set view by to large icons from the top right corner. Click on Credential Manager
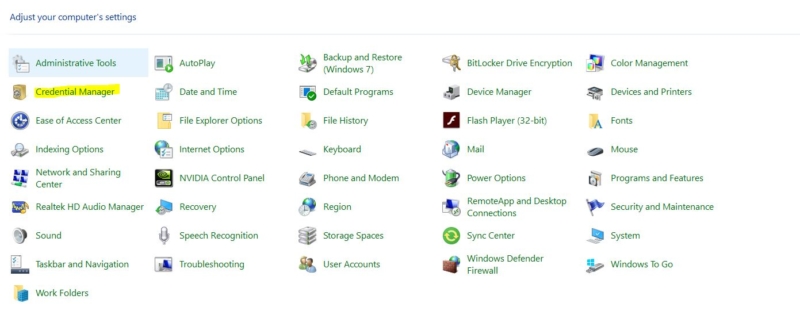
Click on Windows Credentials, and remove all Windows Credentials, click on the drop down menu and choose Remove.

Or if you want to edit the current credentilas,click on edit and enter the new credetials. Once you updated the credentils, check the issue is reoccurring or not.
Read Also:
Update Login Credentials for Mapped Network Drives on Windows 10
How to Clear Mapped Drive Cache in Windows?
Remove Map Network Drive from Context menu in Windows 11

