If you are windows 10 user then you might defenitly notice this issue, If you having significant amount of memory installed on your windows 10 machine then only a part memory is used in total amount of RAM in windows. open task manager to see In use memory currently used by the windows. Sometimes this issue is caused by Hardware Reserved memory by windows. This Post will guide you to Disable Reserved Memory in Windows 10.
Run dialog box type msinfo32 and Press Enter.
In the System Information window that opens, look for System type in the right pane.
If next to System type the value is x86 then you have a 32 bit Windows 10 installed. If it is x64 then you have a 64 bit Windows 10 installed.
Now let’s start with the solutions.
Table of Contents
ToggleSolution 1: Modify RAM Usage while Boot
This option in Windows is used to reserve RAM that is used during the bot procedure when your system is turning on. By default, it may permanently and unnecessarily reserve a significantly large amount of RAM for it. Disabling this full reserved memory will increase singnificant amount of memory for usage.
To set that right, Press and Hold the Windows key and Press R. Type msconfig in the Run dialog box and Press Enter.
System Configuration window will open. Go to the Boot tab in it.

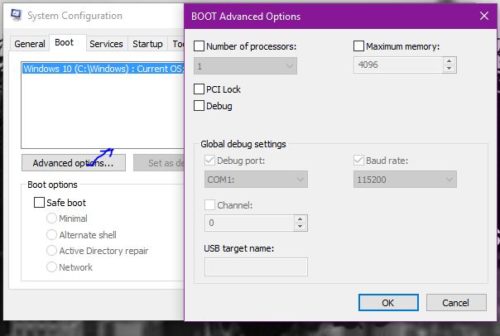
On the upper right corner, Clear the checkbox next to Maximum memory. Click Ok.
Now restart your computer. Check of the issue resolved. If not, move on to the next solution.
Solution 2: Inspect the RAM Physically
In some cases, the reason Windows 10 showed less amount of RAM usable was due to a physical defect. So we will check the RAMs physically, and will also rule out the possibility if the slots on which the RAMs are installed are faulty. Only proceed if you’re comfortable opening your CPU.
Unplug all wires and open up your CPU and you will be able to see Rectangular sticks (RAMs) installed on your motherboard. They will be next to a big heat sink with a fan on it. There will be either 2 or 4 slots on which RAMs can be installed.
There will be clips at the sides of the slots. Toggle them and Unplug All the RAMs installed and make sure there contacts are clean. Also remove any dust that maybe inside the slots.
If you have more than 1 stick of RAM installed it is possible one may be faulty so remove any one them and start up your computer. Do the same with the other stick of RAM. If the system fails to run with any one of the RAM installed, then that stick of RAM is faulty.
Similarly, check the slots in use by inserting a known working stick of RAM in it and running your computer. If it fails to run on any one slot, then the slot in question is faulty rendering the RAM inserted in it unusable by Windows.
If all the slots and stick of RAM are working, inserting them back but in different slots as they were originally in before. This is also known to work for some users. Make sure they are properly placed and locked in.
Solution 3: Update BIOS
In some cases, an outdated BIOS version has been known to cause this memory bug to appear in Windows 10.
The procedure to update BIOS varies by system manufacturers and models. Access your system manufacturer’s website to download and install the latest BIOS version on your system.


