Before installing the Operating System we have to check few Parameters like Boot mode (Legacy or UEFI), BIOS admin password, Boot sequence, if you are installing from the LAN then you have to choose Network PXE Boot, and Operating Modes(IDE, AHCI, and RAID). If all the Parameters are correct then you are good to go. But Most of the user forget to check AHCI, AHCI Advanced Host Controller Interface (AHCI) is an Intel computer standard that is limited to Intel chipsets. It is a new mode for memory devices, where a computer can use all SATA advantages, primarily higher speed of data exchange with SSD and HDD (Native Command Queuing technology, or NCQ), as well as hot-swapping of hard disks. When you activate AHCI mode, it increases the speed of access to files in memory devices and improves the overall performance of your computer. If You forget to select the AHCI before installing the Operating system then you no need to worry, Follow the below mentioned steps to Enable AHCI after installing Windows 10. Before following these steps find which Mode the computer’s controller is Using.
Find out which Mode Computer’s Controller is Using:
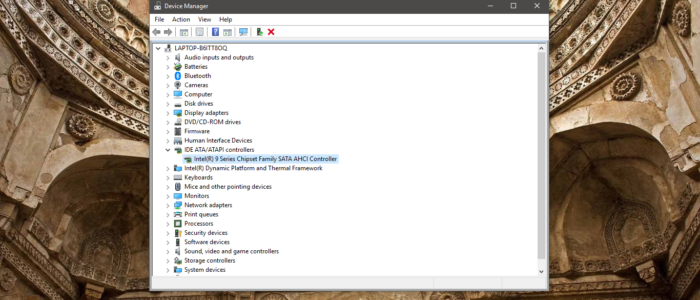
The Simple method to find this is using device manager. Go to Device Manager.
- Open Run command by pressing Windows + R and type Devmgmt.msc and hit enter. This will open the Device Manager.
- Now check for IDE ATA/ATapi controller
- Expand the IDE ATA/ATapi controller then check are you able to see Standard SATA AHCI Controller.
- If you found AHCI then Your computer’s Controller mode is in AHCI.

Enable AHCI after installing Windows 10:
Open Run command by Pressing Windows + R and type regedit and hit enter, This will Launch Registry Editor.
Now Navigate to the following Location
HKEY_LOCAL_MACHINE\SYSTEM\CurrentControlSet\Services\iaStorV
From Left-hand Pane click on the iaStorV key and from the Right-hand Pane Double click on the Start DWORD and modify the Value to 0.

Next on the left pane of Registry Editor navigate to the following location.
HKEY_LOCAL_MACHINE\SYSTEM\CurrentControlSet\Services\iaStorAVC\StartOverride
From the Right-hand pane, Right-click on the 0 DWORD and choose modify, In the Box that pops up modify the value to 0. And click OK.

Now again Navigate to the Following Location.
HKEY_LOCAL_MACHINE\SYSTEM\CurrentControlSet\Services\storahci
From the Right-hand pane, Right-click on the Start DWORD and choose modify, In the Box that pops up modify the value to 0. And click OK.

Once the modification is done, Expand the Storahci key, check if there is any key named StartOverride, If the StartOverride is not there then Exit the registry editor.
If you found StartOverride then from the Right-hand Pane, right-click on the 0 DWORD then choose modify, Modify the value to 0, then click OK.

Now reboot the system and Boot the computer to BIOS or UEFI firmware settings. In your BIOS or UEFI firmware settings check for AHCI and enable it.