Before proceeding to enable or disable the Mouse Click Lock first we need to understand what is Click Lock and how to Use the Mouse click Lock effectively. Click Lock is a feature introduced in Windows 7 which is used to drag any file without clicking the left mouse button Selecting and Moving the file. For example, you want to move a particular file from one place to another place on the desktop you don’t need to keep on pressing the left mouse button for selection purposes. If the Mouse Click Lock was turned on we can select and drag the file easily. Just select and Hold the file for 3 Sec max and now release the left mouse button and now drag the file to anywhere from the location.

SO what is the main use of this click Lock feature?
- If you are using a big word file like more the 5000 words and you need to select and copy some words you have to click the left mouse button and have to scroll until your selection this is a bit difficult. If the mouse click Lock was on you just keep hold the left mouse button for 3 Sec and release it and now you can easily scroll to make a selection. This is also applicable for excel files also.
- Also, you can change the settings for Click Lock on how long you need to hold down the mouse button before your item is locked which gives you more control on this feature. Anyway, without wasting any time, let’s see How to Enable or Disable Mouse Click Lock in Windows 10 with the help of the below-listed tutorial.
Turn ON or OFF Mouse Click Lock in Windows 10:
In two methods you can enable this Mouse Click Lock
Method 1: Enable or Disable Mouse ClickLock in Windows 10 Settings
Method 2: Change Mouse ClickLock Settings in Mouse Properties
If you are a laptop user and it is very much useful to select and scroll without pressing the touchpad continuously.
Method 1: Enable or Disable Mouse ClickLock in Windows 10 Settings
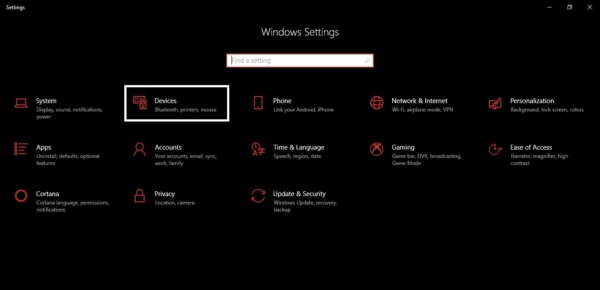
- Press Windows Key + I to open Settings, then click on Devices.
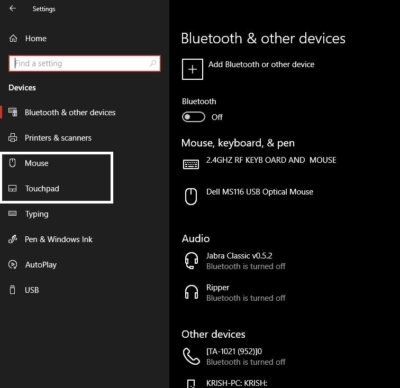
- From the left-hand menu click on Mouse. If it’s a laptop choose the Touchpad. Or use the below mentioned command to open the setting page directly.
- Go To run command by pressing windows + R.
Type this if you are a desktop User: ms-settings:mousetouchpad Type this if you are a Laptop User: ms-settings:devices-touchpad
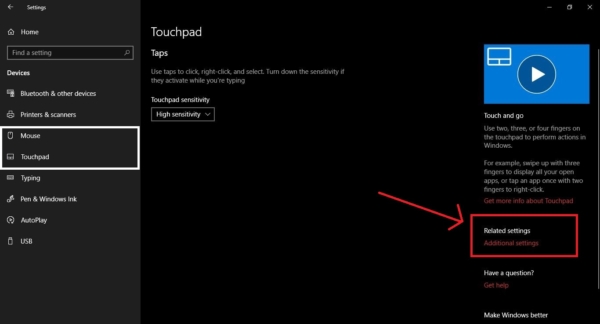
- Now in the right-hand window scroll down to Related settings then click on “Additional mouse options“.
- Make sure to switch to Buttons tab then under Click Lock checkmark “Turn on Click Lock” if you want to Enable Click Lock.
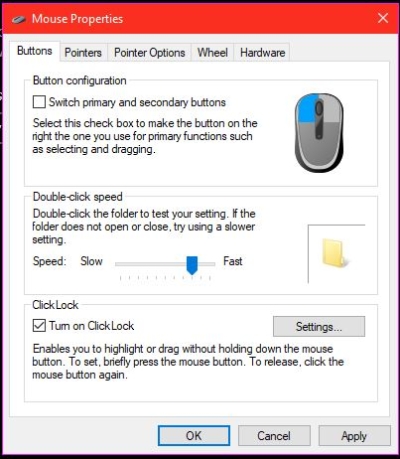
- Similarly, if you want to disable Click Lock simply uncheck “Turn on Click Lock”.
- Reboot your PC to save changes.
Method 2: Change Mouse ClickLock Settings in Mouse Properties
- Open the control panel from the start menu or press Windows + R and type control in the Run command.
- Search for the Mouse option in the control panel. Click On Mouse setting.
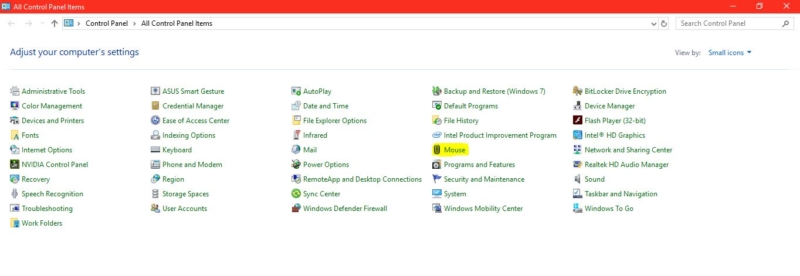
- Then under Click Lock checkmark “Turn on Click Lock” if you want to Enable Click Lock.
- Similarly, if you want to disable Click Lock simply uncheck “Turn on Click Lock”.
- Reboot your PC to save changes.
Read Also: How to Increase Mouse Cursor size in Windows 11?



Thanks man, It was outstanding tutorial.
THIS DOESNT WORK. IT STILL BRINGS UP AUTOSAVE IN EXCEL