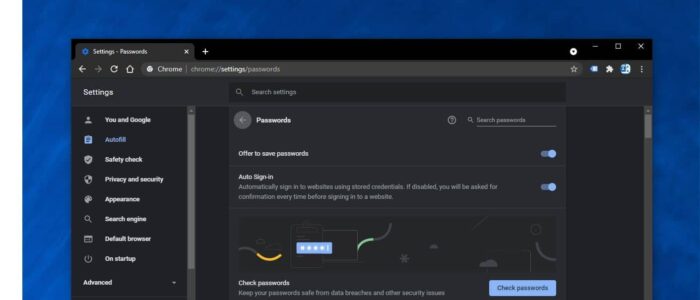
Google Chrome Leak Detection is a security feature that is included in Chrome Browser as an official extension. But later on, the feature becomes part of the browser’s password manager.
This feature has designed to help users to avoid using compromised passwords- even if they are unaware of the leak. Once you enabled the Password Leak Detection, chrome will start checking the password which is stored on your browser have been part of data breaches that Google can identify.
Once chrome detects password detection, it will automatically send an alert to users to modify the password. This built-in feature increases the chrome security also proactive the Protection. This article will guide you to Turn on Password Leak Detection in Google Chrome.
Turn on Password Leak Detection in Google Chrome:
You can enable Password Leak Detection in three different methods, let’s see the methods in detail.
Turn on Password Leak Detection using Chrome settings:
First Make sure your google chrome is updated, if your browser is already updated, then Launch the Google Chrome browser.
Next in the address bar, type Chrome://flags and hit Enter. Now search for Password leak detection. Or just copy-paste the below-mentioned flags URL in the address bar.
chrome://flags/#password-leak-detection
Now click on the Password Leak Detection, and change the Default option to Enabled.
Next restart the chrome browser, by pressing the Relaunch button.
Using Group Policy Editor:
Open Run command by pressing Windows + R and type gpedit.msc and hit enter. This command will open the Group Policy Editor.
First, you need to download the Group Policy Templates for Google Chrome. Click here and download it, next extract the zip file.
Now Open the Group Policy Editor, expand Computer configuration > Administrative Templates. Right-click on the Administrative Templates, and choose Add/Remove Templates.

Click on Add and then Browser the adm file from the extracted folder from the below-mentioned path.
policy_templates\windows\adm\en-US

Now Navigate to the following path.
Computer Configuration > Administrative Templates > Classic Administrative Templates > Google > Google Chrome > Password manager
From the Left-hand side click on the Password Manager and from the right-hand side, double click on the policy named “Enable leak detection for entered credentials”. And choose Enabled under Policy Settings.

Next click on Apply and Ok.
Using Registry Editor:
Note: Modifying the Registry is risky, and it causes irreversible damage to your OS Installation Follow the steps correctly. Friendly advice Before Modifying Registry Creating Restore Point is recommended.
Open the Run command by pressing Windows + R and type Regedit and hit enter. This command will open Registry Editor.
Now Navigate to the following path.
Computer\HKEY_LOCAL_MACHINE\SOFTWARE\Policies\Google\Chrome
From the left-hand side, right-click on the Chrome and choose New > DWORD(32-bit) Value and name it as PasswordLeakDetectionEnabled.
Double click on the newly created DWORD and enter value 1 and click on OK.

If you want to revert it back, then double click on the same DWORD and enter the Value 0, and then click on OK.
Read Also: How to Auto-refresh webpage in Google Chrome?

Pingback: HOW TO FIX WI-FI PERFORMANCE ISSUE ON iPHONE - RakoDako