Task Manager is a core component of the Windows operating system, available in all versions from Windows NT 4.0 to the latest Windows 11. In Windows 11, Microsoft has redesigned the Task Manager with a modern look and added several advanced features. The new interface follows the Fluent Design system, providing a cleaner layout and better performance monitoring experience. Task Manager in Windows 11 continues to help you monitor applications, background processes, services, and users running on your PC.
Just like in Windows 10, you can still view which application is consuming CPU, Memory, Disk, GPU, and Network resources. Under the Performance tab, you’ll find real-time graphs for CPU, Memory, Disk, Ethernet, and GPU usage. The App History tab shows the resource usage history of applications, and the Startup tab lets you enable or disable startup apps easily. The Users tab displays all the active users on the system, and the Services tab gives you detailed information about system services.
One of the major improvements in Windows 11 Task Manager is the new Efficiency Mode, which allows you to limit resource usage for background processes, helping improve overall performance and battery life. Also, you can quickly access other OS components using the Task Manager.
By default, Task Manager opens in a simplified view, showing only running apps. Many users customize it to view more detailed information, but sometimes these customizations can cause confusion or issues. If you’ve made many changes and want to restore Task Manager to its original state, this article will guide you on Reset Task Manager to default settings in Windows 11
Reset Task Manager to default settings in Windows 11:
Using the following methods you can reset the Task Manager in Windows 11 to default Settings. Note: You need admin privileges to Reset the Taks Manager to default Settings in Windows 11.
Method 1: Using PowerShell
You can use the PowerShell command to reset the Task Manager. This method is very convenient and you can use this command to create a script to use it many systems.
Open PowerShell in Elevated mode. Now copy-paste the below-mentioned command and hit enter.
Remove-ItemProperty HKCU:\SOFTWARE\Microsoft\Windows\CurrentVersion\TaskManager -name Preferences
This command will delete the Task Manager User preferences settings from the registry. Open the Task Manager and check it once.
Using the Keyboard Shortcut:
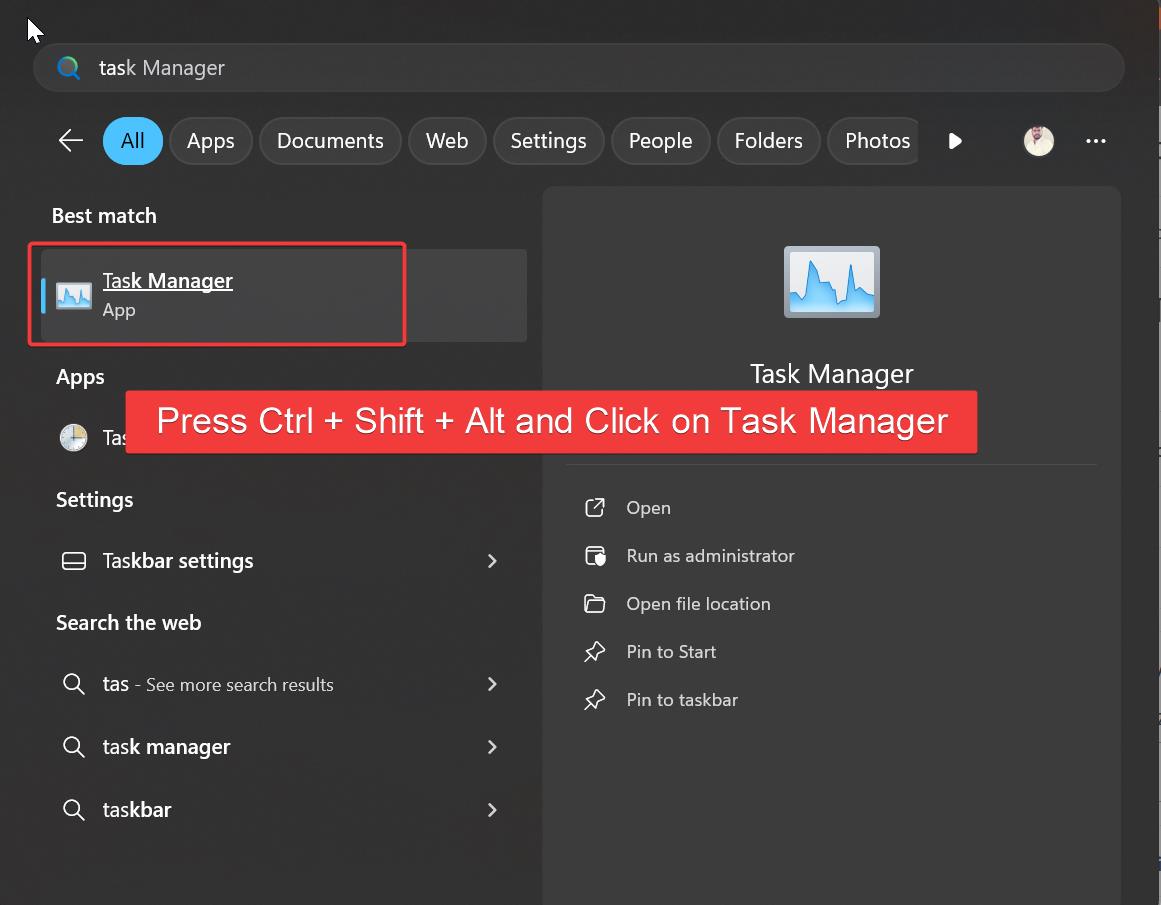
This method is very simple and allows you to reset Task Manager quickly using a keyboard shortcut. First, you need to locate the Task Manager from the Start menu.
In Windows 11, open the Start menu and search for Task Manager directly—there’s no longer a separate “Windows System” folder like in Windows 10. Just type “Task Manager” in the search bar, and you’ll see it appear in the results.
Now, press and hold Ctrl + Shift + Alt keys together and then click on the Task Manager from the search results. This action will reset the Task Manager to its default settings.
Method 3: Using Registry Editor:
Note: Modifying the Registry is risky, and it causes irreversible damage to your OS Installation. Follow the steps correctly. Friendly advice before modifying the Registry Creating Restore Point is recommended.
Open Run command by pressing Windows + R and type Regedit and hit enter, this command will open the Registry Editor.
Now navigate to the following path
HKEY_CURRENT_USER\Software\Microsoft\Windows\CurrentVersion\TaskManager
From the Left-Hand side right click on the TaskManager Registry Key and choose Delete.

This Registry Key includes User status settings and Preferences. Deleting this Key will reset the Task Manager settings to default.
Read Also:
Fix Task Manager not opening in Windows 11
How to enable Task Manager option in Taskbar context menu on Windows 11?
Fix Task Manager has been disabled by your administrator in Windows 11/10