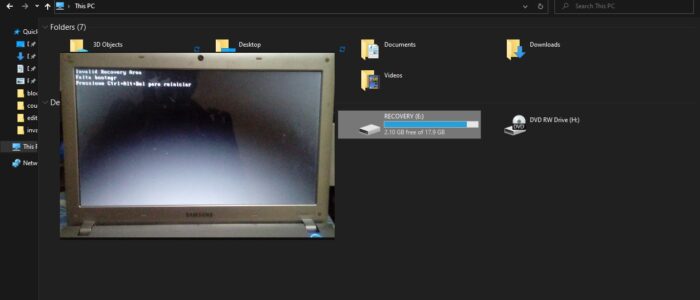
Recently one of the users from our organization reported an issue, that he is facing an error Invalid Recovery Area error on Windows 10 while he is trying to access the Windows Recovery Environment. We tried to fix this issue, and in this post, we have mentioned the Root cause of the Invalid Recovery Area Error and all the possible resolution methods to fix it.
What is Invalid Recovery Area?
Recovery Area is a Partition that stores a recovery image comprised of the operating system and applications. Most of the computers are coming with Recovery partitions nowadays, this partition stores restoring data or saving backup files. Whenever your computer got corrupted then you can use Windows Recovery Environment to repair your operating system. Windows RE access Recovery Area to fix the OS corruption. If Windows RE is not able to access this recovery area then you will receive Invalid Recovery Area error.
What is the Root cause of this error?
The main reason for this issue is that the Windows Recovery Environment is not able to access the recovery partition, either because it has been deleted or just inaccessible due to some unknown reasons.
If the WinRE is disabled on your computer then you will face this error.
The BCD doesn’t contains entries to boot in recovery mode.
The file winre.wim (WinRE environment image) is missing or moved.
The WinRE Configuration file ReAgent.xml is missing or contains incorrect settings.
Fixes for Invalid Recovery Area Error:
So as I mentioned above, if you are not able to Repair your Windows 10 computer using the Windows Recovery environment. Then check you are able to access the Windows in safe mode. If you are able to access safe mode then try the following resolutions.
Enable Windows Recovery Environment:
If the Windows RE is disabled then you will face this error. You can check the status of the Windows RE using simple command.
First check the status of the WinRE,
Open the Command Prompt in Elevated mode and type the following command to check the status of the Windows RE.
reagentc /info
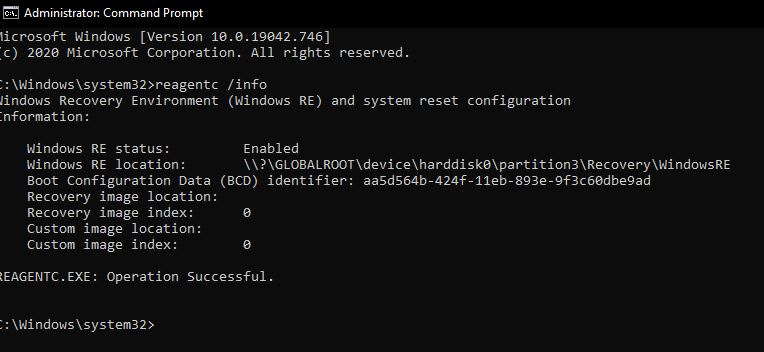
If you are able to see the Windows RE status is Enabled then you are good to go, if you see Disabled status then type the following command to enable the Windows RE.
Reagentc /enable
After enabling the Windows Recovery Environment, try to access it, if you are facing the same issue then you have to try the next resolution.
Check WinRE BCD Entries:
Open PowerShell in elevated mode and type the following command, hit enter.
Bcdedit /enum all
This command will list out all the Windows Boot loader entries. Now you need to look for the current boot loader identifier. In that section you can see the recoverysequence entry, note the GUID of the recovery sequence.
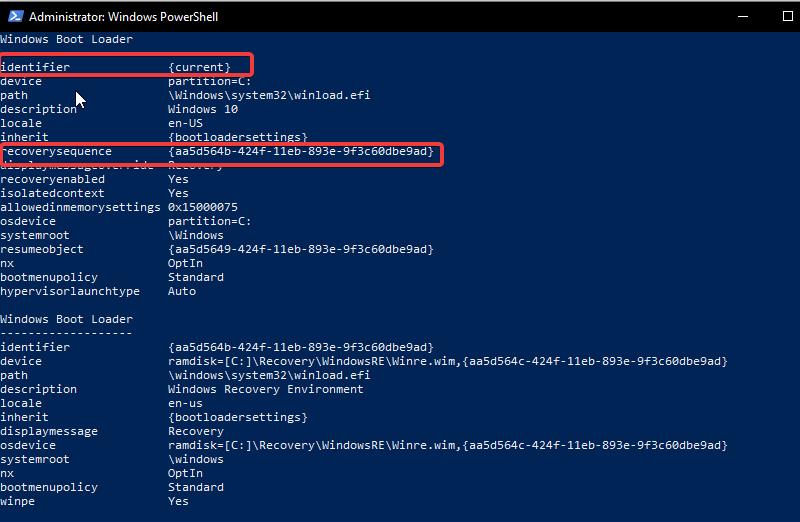
Again, in the result, look for the Windows boot loader identifier set as the noted GUID, and the OS device path should be mentioned with same GUID. If the OS device path is different then you need to type the below mentioned command with the same GUID.

bcdedit /set {current} recoverysequence {GUID_Device path}
Mostly this will resolve the issue.
Reset ReAgent.xml file:
Note: Before proceeding with this method, backup ReAgent.xml file in advance. The file location is mentioned below.
On Windows 10 Resetting ReAgent.xml file is very simple, just delete the file and it will be automatically created the next time you enable WinRE.
If you installed your OS in C drive then you can see the WindowsRE as a separate partition, for example in my Windows 10 system E is the WindowsRE partition, so the ReAgent.xml file should be located in below mentioned directory path.
E:\Recovery\WindowsRE
IF you are not able to see the WindowsRE folder then you need to show hidden files and folders under View options. Inside WindowsRE folder you can see the wim file, just delete and restart and check.
Repair your Windows 10 computer:
This solution requires in-place upgrade repair, to perform a in-place upgrade repair you need to use your installation DVD or ISO file to repair your computer. This repair process will Install the Windows 10 over the existing installation of Windows 10 on your hard disk. Performing this repair can fix the corrupted operating system. This repair won’t affect your personal files, settings, and installed applications.

