Intel Microphone Array is the technology that uses Intel Smart Sound Technology in Microphone Array. So basically, Microphone Array is a Microphone device that functions just like a regular Microphone but instead of having only one Microphone to record sound, it uses multiple microphones to record sound. The Microphones array works together to record sound simultaneously, if you are using Dell or HP Latest model laptop you can see the Inter Microphone Array as a default recording device. And moreover, the audio drivers will comes with Microphone array support. But the problem with the Microphone array is during the Teams call meeting it will take the Microphone array as the default mic setting even though you connect the headset. And it won’t give you an option to change the Microphone array, if you click on the Device settings drop-down menu, you can see only Microsoft Array as the only option. So in this case how to disable the Microsoft array and switch to Headset Microphone. You can follow this article to Disable Intel Microphone Array in Dell Laptops. If you are using any other laptops just follow the same steps and try once.
Disable Intel Microphone Array in Dell Laptops:
If you are getting a Microphone audio issue during the teams call then try to disable the Microphone Array and switch to Headset Microphone.
First Open Device Manager on your Windows 10/11 laptop, Open the Run command by pressing Windows + R and type devmgmt.msc, and hit enter. This command will open the Device Manager.
In Device Manager look for Sound, Video, and Game Controllers and expand it, look you are having the latest audio driver. Or else just go to the Dell official Website and download the latest audio driver.

Here you can see the Intel Smart Sound Technology for Microphones, try to uninstall it, mostly uninstalling won’t fix the issue. It will reappear after some time, if you Disable the Microphone array the device won’t go off, it will be still active.

So first update the audio driver then restart your system once, after that try to connect Headphone to the Jack. Now you’ll get one pop-up for device optimization, choose Headset and Over-Ear and click on Optimize.

If you choose Headphones, then you can’t be able to disable the Microphone array. So, choose the Headset and Over-Ear and click on Optimize.
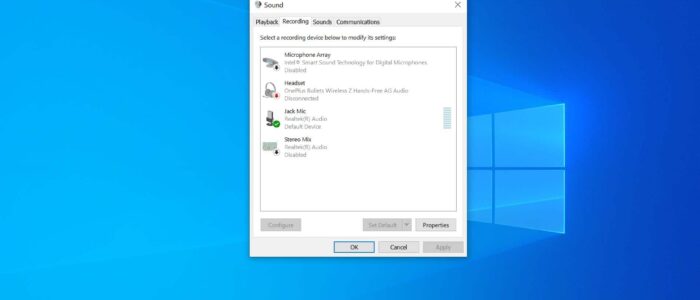
Next, Right-click on the Sound icon from the taskbar and click on Sounds, now you’ll get the Sound settings pop-up, click on the Recording tab. Now you can see the Jack Mic is enabled. Right-click on the Jack Mic and set it as default.

Click on Apply and Ok.
Now you can check in the Teams audio settings, you’ll get an option to choose the Headset Mic as a default Microphone.

What happens if you leave Microphone Array as a Default Recording device?
Recently one user reported that During teams calls, his audio is very low, even though he connected Jack headset with a mic. The problem is his laptop automatically set the Microphone array as a default mic, so if he leaves the laptop away, the voice will get low due to the distance. so if you want to resolve this issue, you need to disable the Microphone Array and keep the jack mic as a default device.
Read Also:
How to Fix Microsoft teams Mic Not working issue in windows 10?
Fix Full Disk Space issue in Dell Laptops