Windows Update Error Code 0x800f0831 is an error that may occur while updating windows update using the windows update service, once you received this error then none of the updates you tried to install will be successful. Also, this error accompanied by a message: Installation Failure: Windows failed to install the following update with error 0x800F0831, you might get this error when you try to install the cumulative update manually by downloading it from Microsoft Update Catalogue. And also you might get this error while upgrading your Windows 7/8/8.1 to Windows 10, there are no specific reasons for this error. This article will guide you to fix windows update error 0x800f0831.
Fix windows update error 0x800f0831:
Windows Update Troubleshooter
Windows update troubleshooter is one of the best tools which is included in Windows 10 that may be able to help windows update related issues. And also, it is the easiest method. This troubleshooter is built-in by default in Windows 10, if you are using other versions of windows then you can download it from the given link below. For Windows 7 or Windows 8.
Open windows settings by pressing Windows + I, and click on Update and security.
From the left-hand pane click on Troubleshoot. Find the windows update from the right-hand pane and click on Run the Troubleshooter.
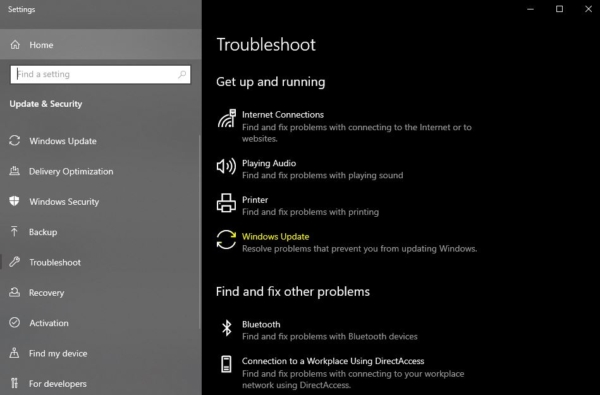
Restart the system once Troubleshooting is done. Mostly this will fix the issue.
Check Windows Update Service
Windows Update Service that’s used to provide windows updates like service packs and patches for Windows operating system. Once you received this error check windows update services are running.
Open Run command by pressing Windows + R and type services.msc and hit enter to open service management console.
Look for the below-mentioned services that are running fine.
- Windows Installer
- Windows Update
Set the Startup type to Automatic and make sure its status is Running. If it is Stopped, click Start to enable it.
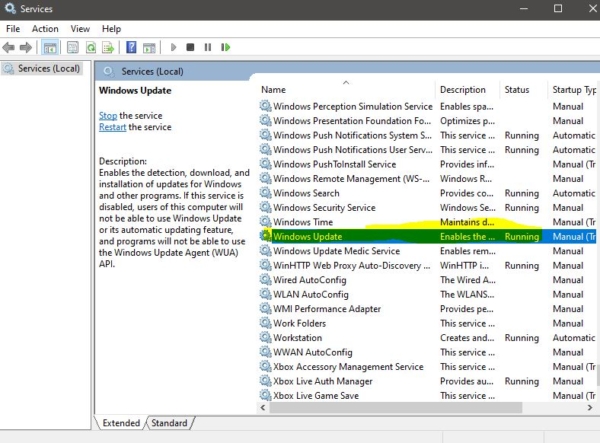
Click on Apply and OK.
Restart the system once and check if you can update your Windows.
Enable .NET Framework 3.5
Microsoft .Net Framework is the A programming infrastructure created by Microsoft for building, deploying, and running applications and services that use .NET technologies, such as desktop applications and Web services. In Windows .NET Framework is installed by default, if it is disabled then you may get windows update error code 0x800F0831. Check here how to enable Microsoft .Net Framework.
Disable Antivirus and Firewalls
Antivirus or malware protection usually protects our system from threats and malware. Antivirus scan or known patterns of data on your hard disk, and if enabled, in the data that’s arriving on your computer via the network or media such as CDs and USB keys. Those patterns are also called “signatures”; Sometimes the signatures look like malware. If the antivirus scanner scans something that looks like a virus then it will block that to install. While windows updated the software center downloads the updates from the internet and stores it in software distribution and catroot2 folders. If the files in the SoftwareDistribution and Catroot2 folders are identified as threats, the anti-virus software will prevent the Windows update. So disabling the antivirus temporarily will allow you to install the windows updates without any error. Follow the instructions of your antivirus provider to disable it.
Disable Windows Proxy
Sometimes if any proxy servers choose automatically by VPN, if you are using a proxy server, internet traffic flows through the proxy server on its way to the address you requested. The request then comes back through that same proxy server (there are exceptions to this rule), and then the proxy server forwards the data received from the website to you. Sometimes the Proxy server blocks the internet.
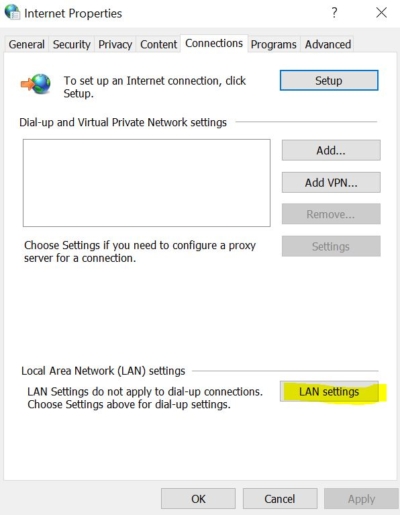
Open Internet Option, click on the connection tab. In the connections, tab click on LAN settings.
Under LAN Settings, uncheck Use automatic configuration script, and check Automatically detect settings.
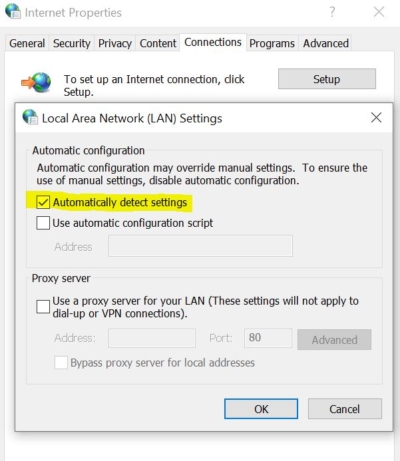
Click on Ok and restart the system and check for can’t connect to this network issue.
Rename Software Distribution Folder
Restart the system and boot up in Safe Mode with Networking. To boot through safe mode: Lock the system, press CTRL+ALT+DEL key, right side bottom of the screen, “Power” icon is visible, If you click on Power icon, you will get an option “Restart”, hold the shift key on your keyboard and restart the machine. You will get an option to boot the system “Safe Mode with Networking”, login to the system, and open the command prompt as “Run as Administrator”.
Type: net stop wuauserv and Enter.
Type: net stop cryptsvc and Enter.
Open C:\Windows and find the SoftwareDistribution folder and rename the folder to “SoftwareDistribution.old”.
Go back to command prompt and type: net start wuauserv and Enter Type: net start cryptsvc and Enter.
Restart your system.
Read Also:
How to Resolve Error Code 0x80070BC9 in Windows 11/10?
How to Re-register Windows Update Components in Windows 11/10?


