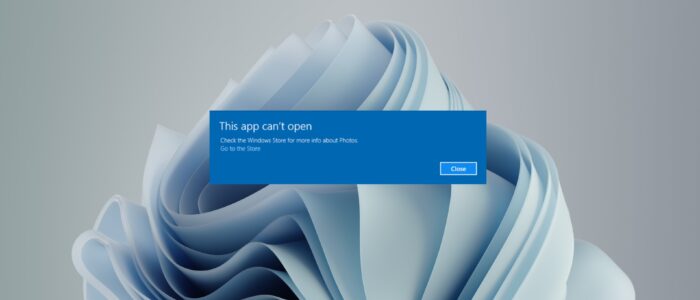
Sometimes In Windows, you’ll receive the following error message while you try to launch any Installed app from the Store. The app refuses to open the app and you’ll receive the following error message pop-up “This app can’t open. Check the Windows Store for more info about the app”. This error may occur due to several reasons, mostly this error occurs due to a Corrupted Windows Store, an issue with the Windows Store cache, Antivirus or Firewall conflict and Unresponsive Windows Update Service, etc. This article will guide you to fix This app can’t open Check the Windows Store error in Windows 11/10.
Fix This app can’t open check the Windows Store error:
Once you encounter this issue, follow the below-mentioned resolution methods one by one to resolve the issue.
Solution 1: Repair the Problematic App:
Open Windows Settings by pressing Windows + I and from the left-hand side click on Apps and from the right-hand side click on Apps & features.
Under Apps & features, scroll and choose the Problematic app, click on the three dots and choose Advanced options.
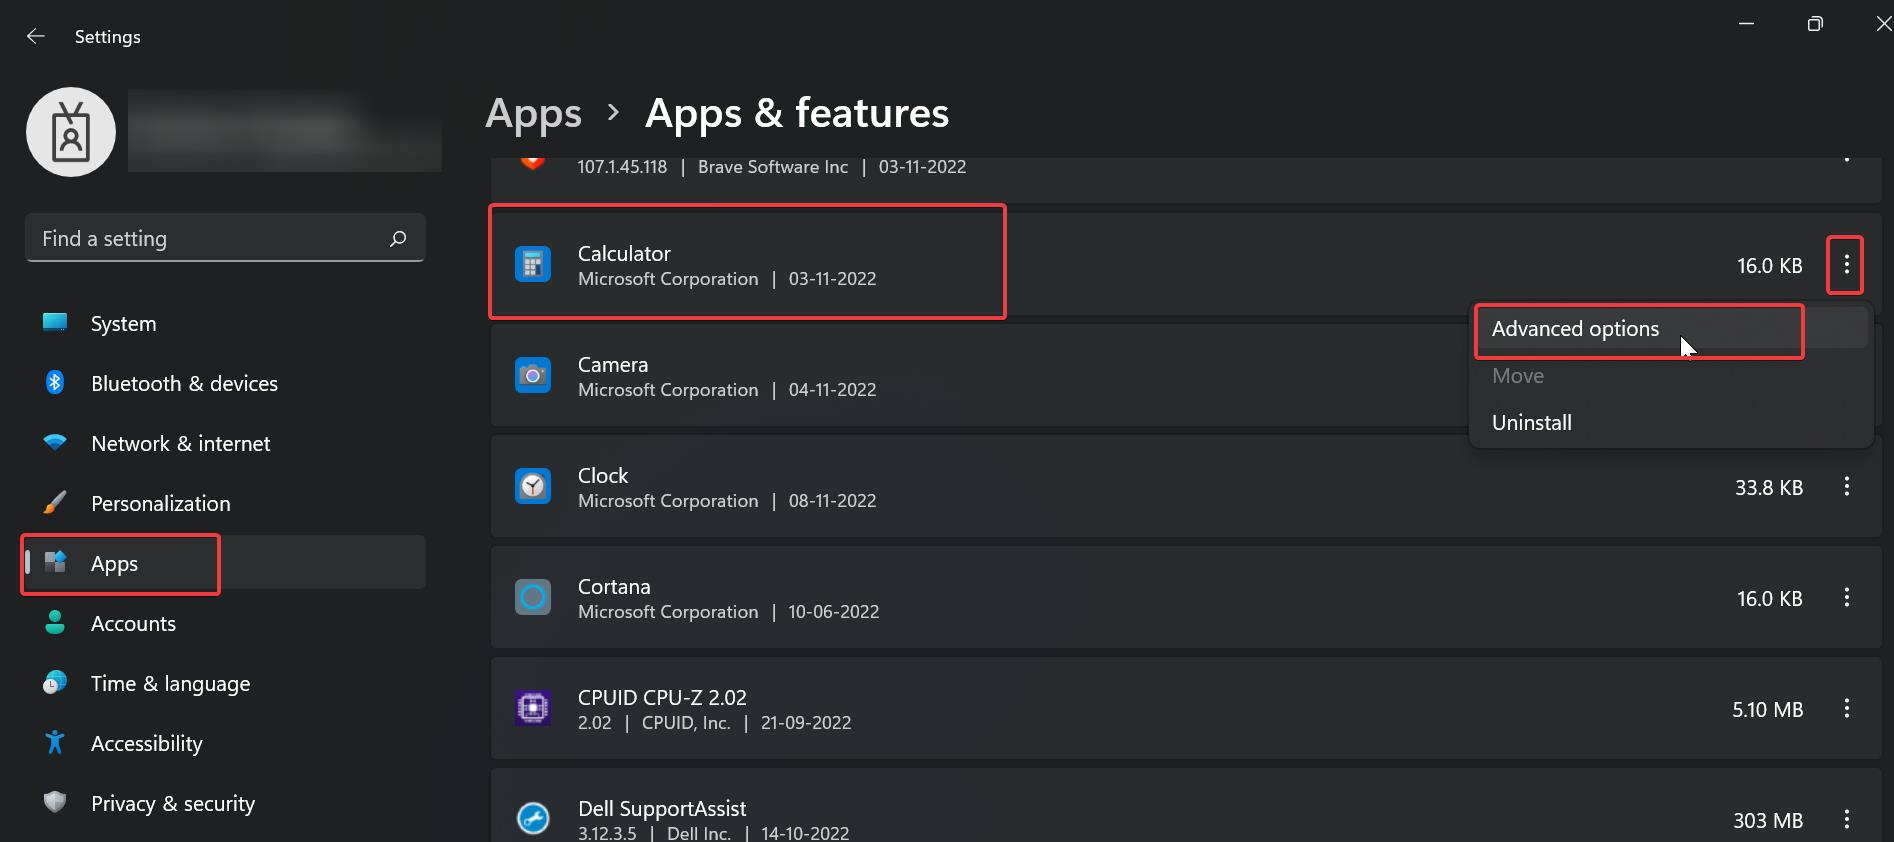
Under Advanced options, look for the Repair option, and click on Repair.
This will Repair the Problematic app and it won’t delete any user data. After the app repair try to relaunch the app once and check. If you received the same error follow the next resolution method.
Solution 2: Reset the App:
Open Windows Settings by pressing Windows + I and from the left-hand side click on Apps and from the right-hand side click on Apps & features.
Under Apps & features, scroll and choose the Problematic app, click on the three dots and choose Advanced options.
Under Advanced options, look for the Reset option, and click on Reset.
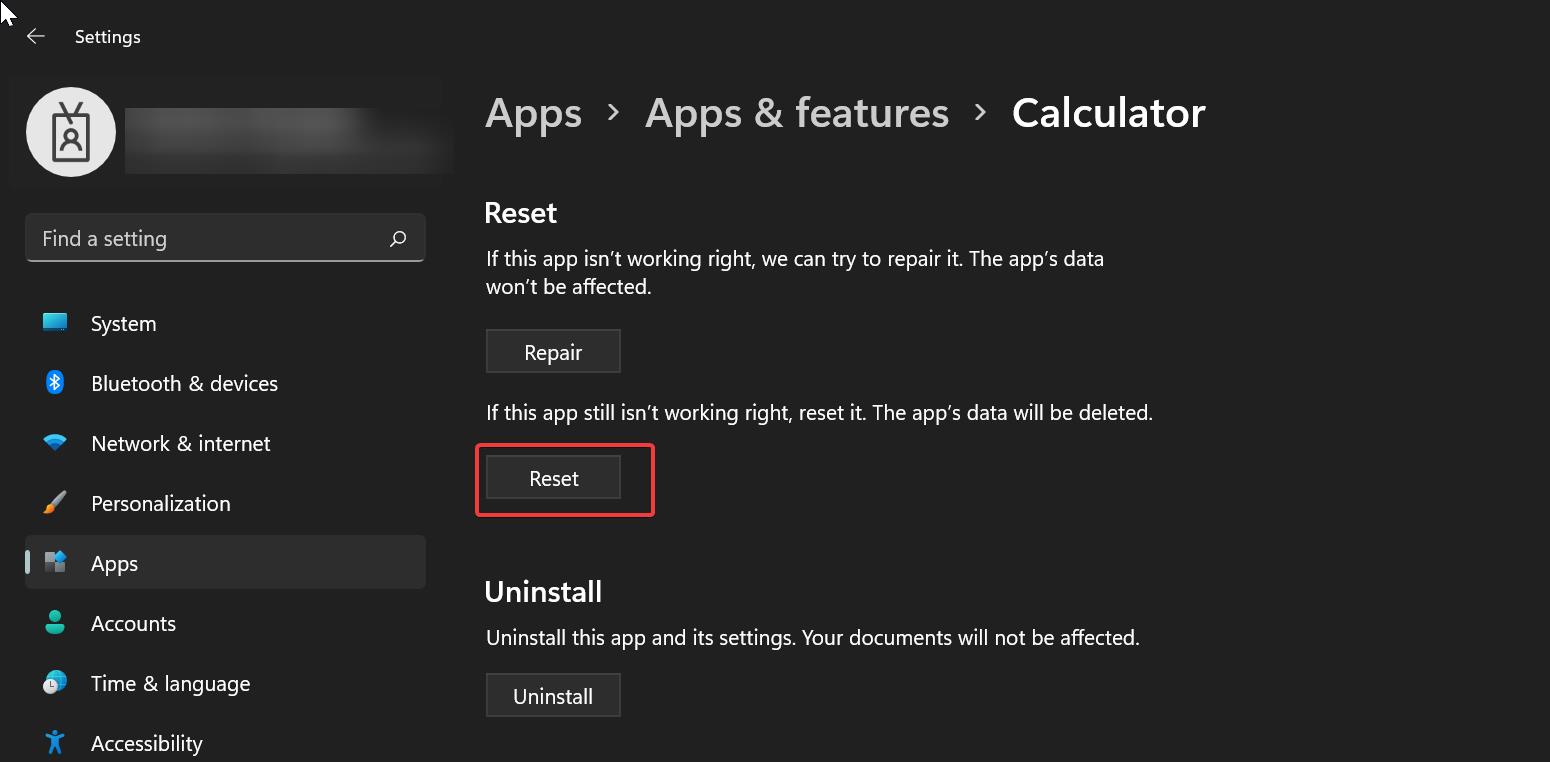
Resetting the app will delete all the app data, After the Reset, launch the app and check.
Solution 3: Reinstall the Problematic app to fix this app can’t open error:
If you are facing This app can’t open error in any specific app then uninstall the app and reinstall it. Mostly this will fix the issue.
Open Windows Settings by pressing Windows + I and from the left-hand side click on Apps and from the right-hand side click on Apps & features.
Under Apps & features, scroll and choose the Problematic app, click on the three dots and choose Advanced options.
Under Advanced options, look for Uninstall option, and click on Uninstall.
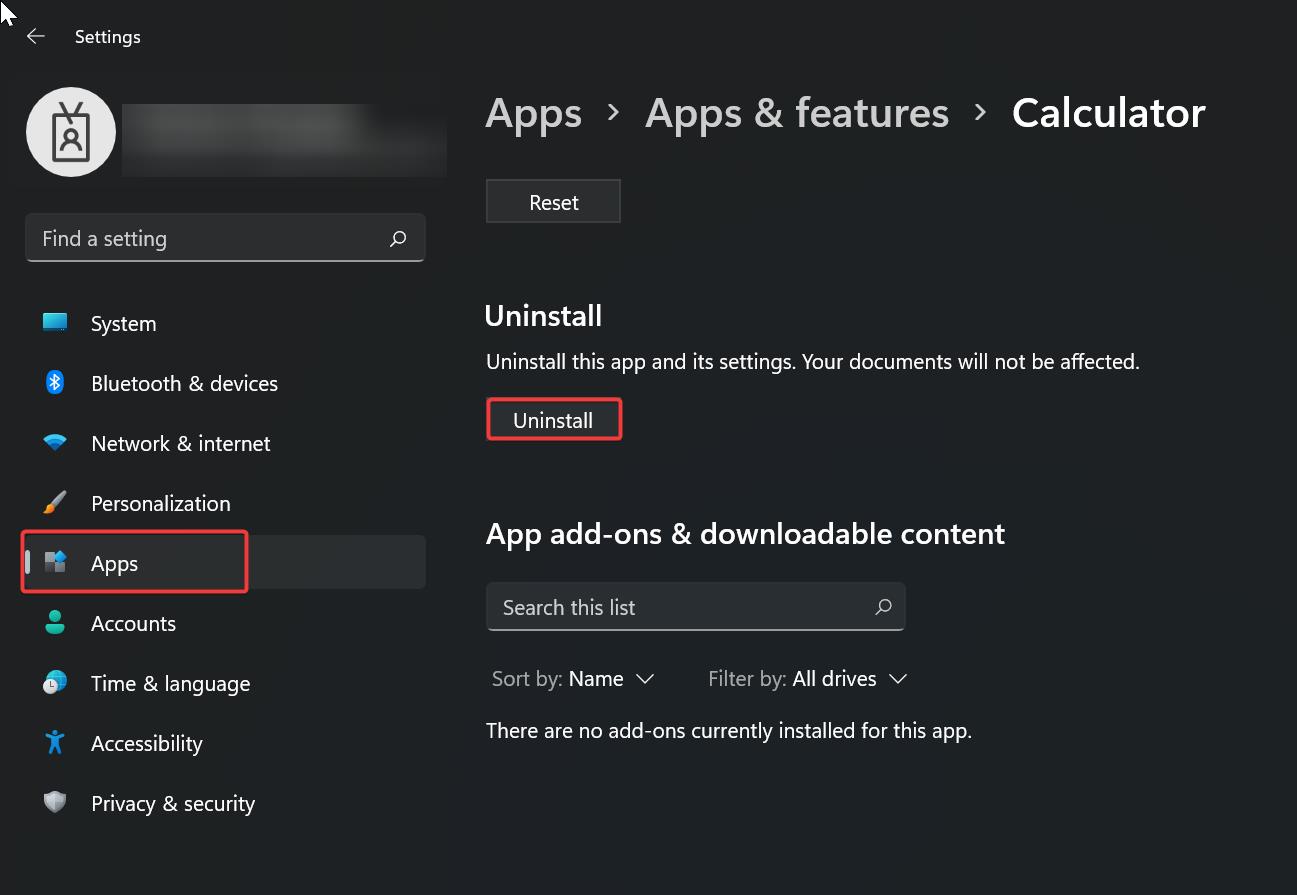
Next, Open the Windows Store Download the app again, and install it. Mostly this will fix the issue.
Solution 4: Reinstall the Problematic app using PowerShell:
If you are not able to uninstall the problematic app using windows settings then use windows Powershell to reinstall the app. Check this detailed article about reinstalling the windows app using PowerShell.
Solution 5: Run Windows Store apps TroubleShooter:
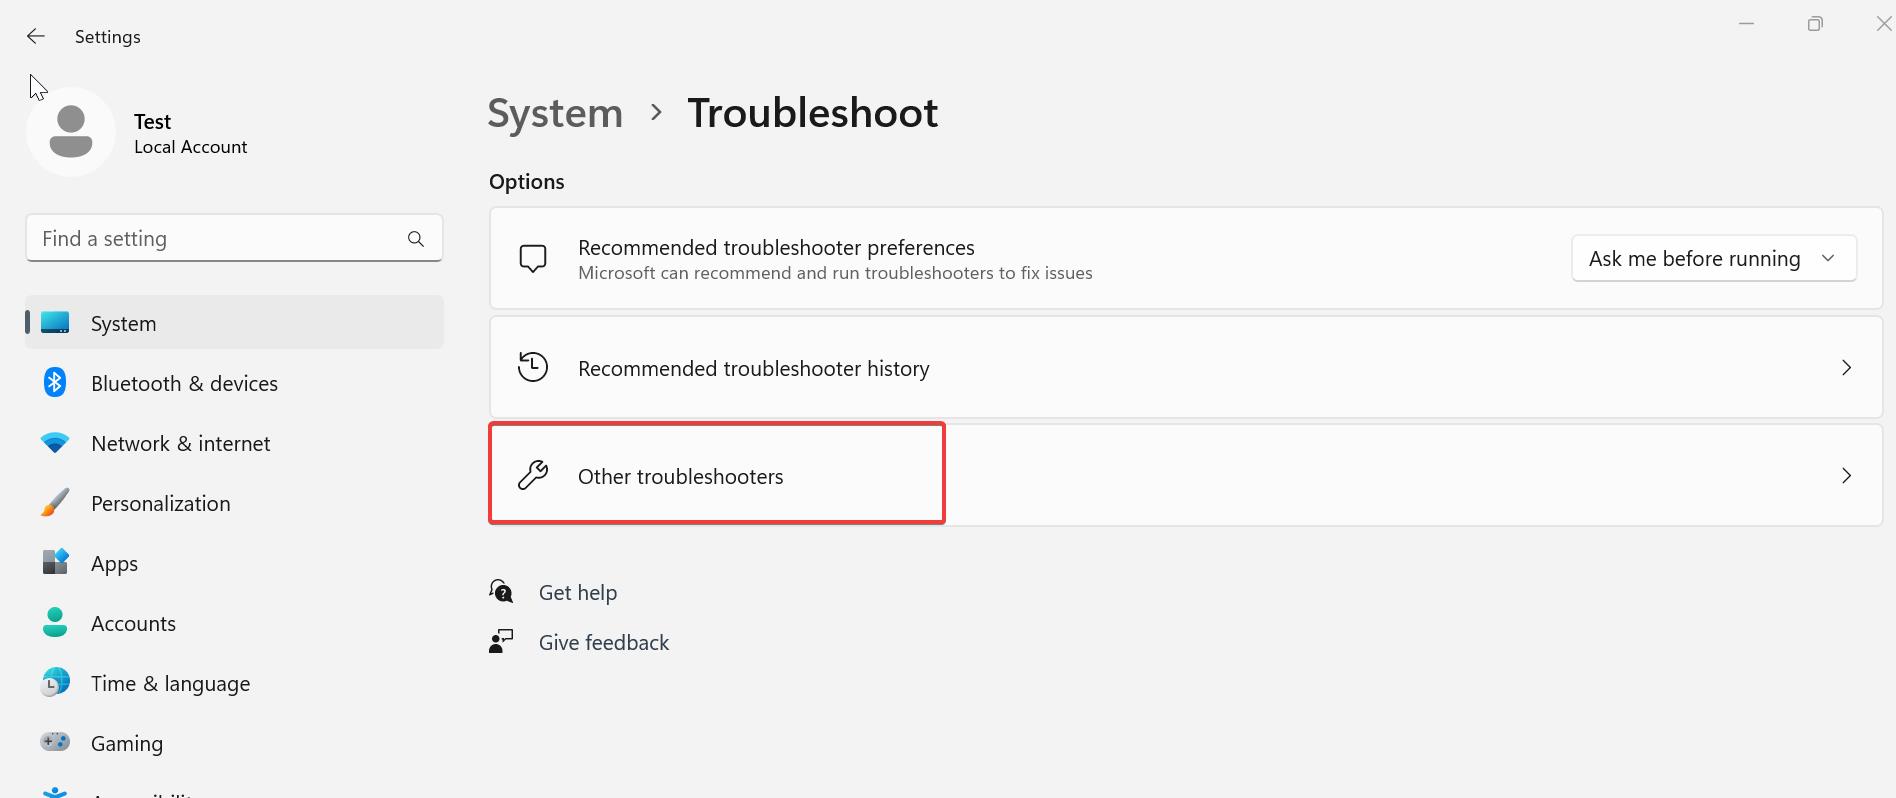
Open Windows Settings by Pressing Windows + I and from the left-hand side click on System and from the right-hand side click on Troubleshoot.
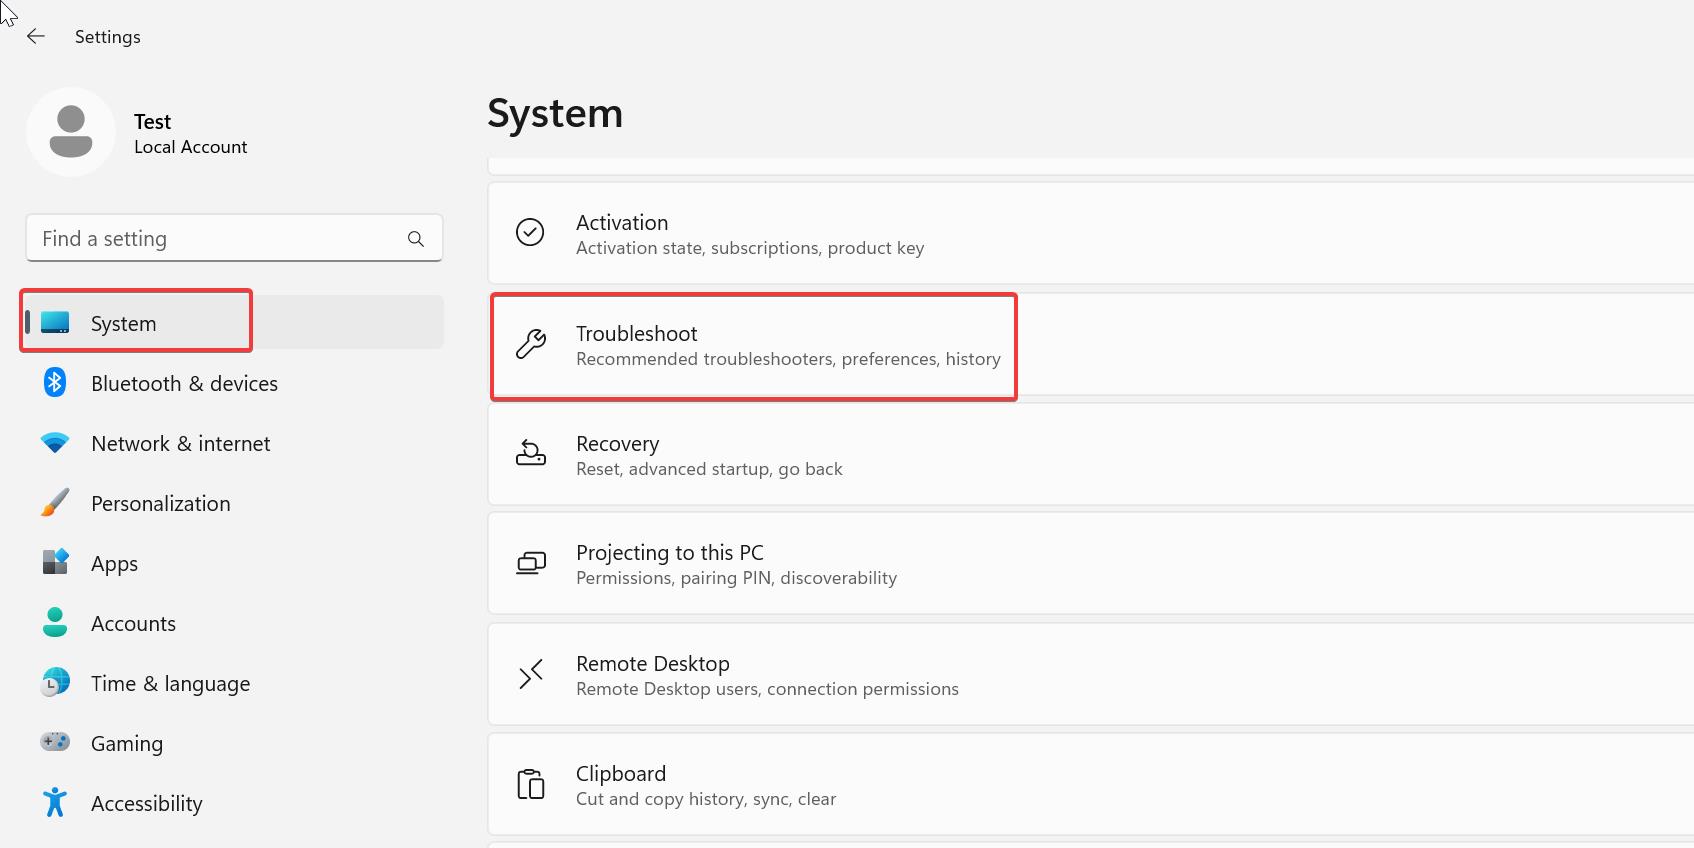
Under Troubleshoot click on Other troubleshooters.
Under Other troubleshooters scroll down and look for Windows Store apps troubleshooter. Click on Run to start the Troubleshooter.
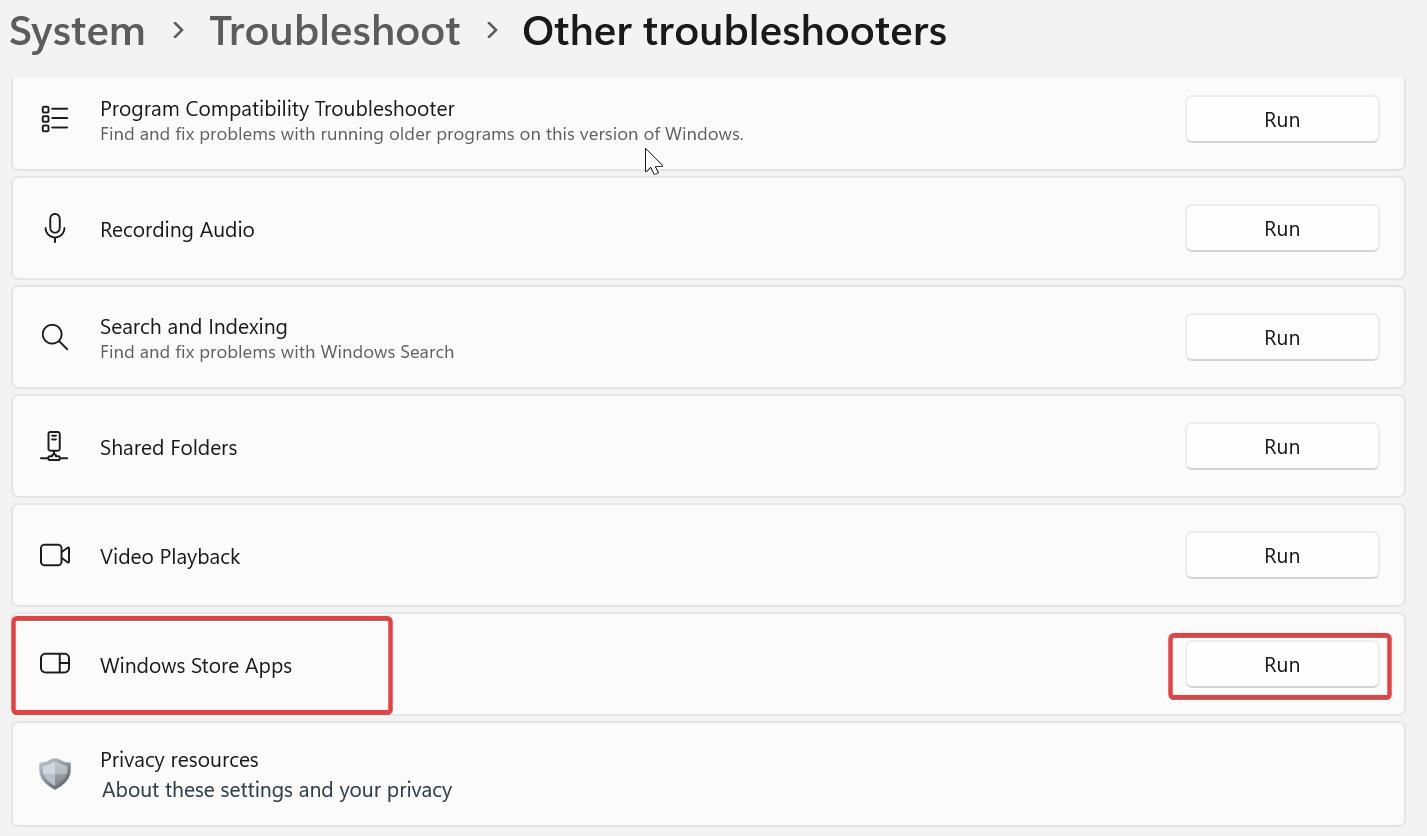
Follow the onscreen instruction to complete the troubleshooting. Once the troubleshooting done successfully, launch the app and check.
Solution 6: Re-Register Windows Store to fix this app can’t open error:
Open Start and search for PowerShell then right-click on Windows PowerShell and select Run as administrator. Now type the following cmdlet and hit enter.
Get-AppXPackage | Foreach {Add-AppxPackage -DisableDevelopmentMode -Register "$($_.InstallLocation)\AppXManifest.xml"}Wait for the Process to complete, This Command will Re-register your windows store.
Solution 7: Check the App Blocker:
If you are using a domain-based system, then mostly there may be a chance that you are restricted to access inbuilt apps. If there is any policy applied to your system, you can use the following method to unblock the app.
Open Run command by pressing Windows + R and type gpedit.msc and hit enter, this command will open the Group Policy Editor.
Now navigate to the following path.
User Configuration > Administrative Templates > System
From the left-hand side click on the System and from the right-hand side look for “Don’t run specified Windows applications Policy”.
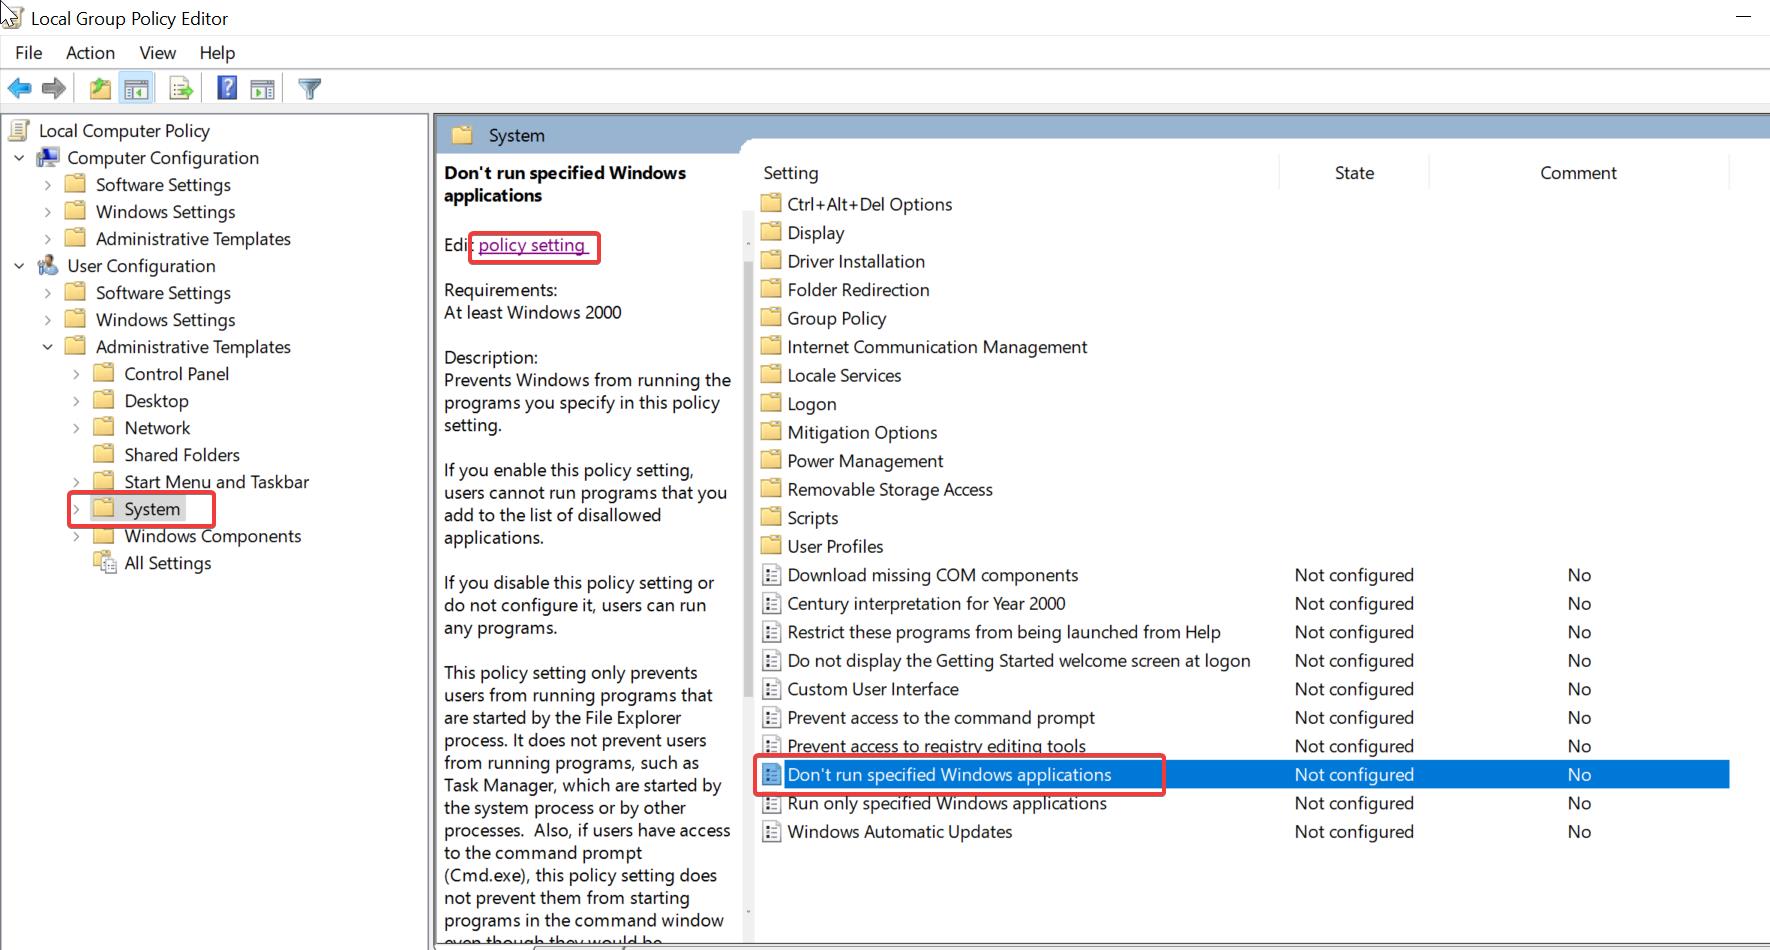
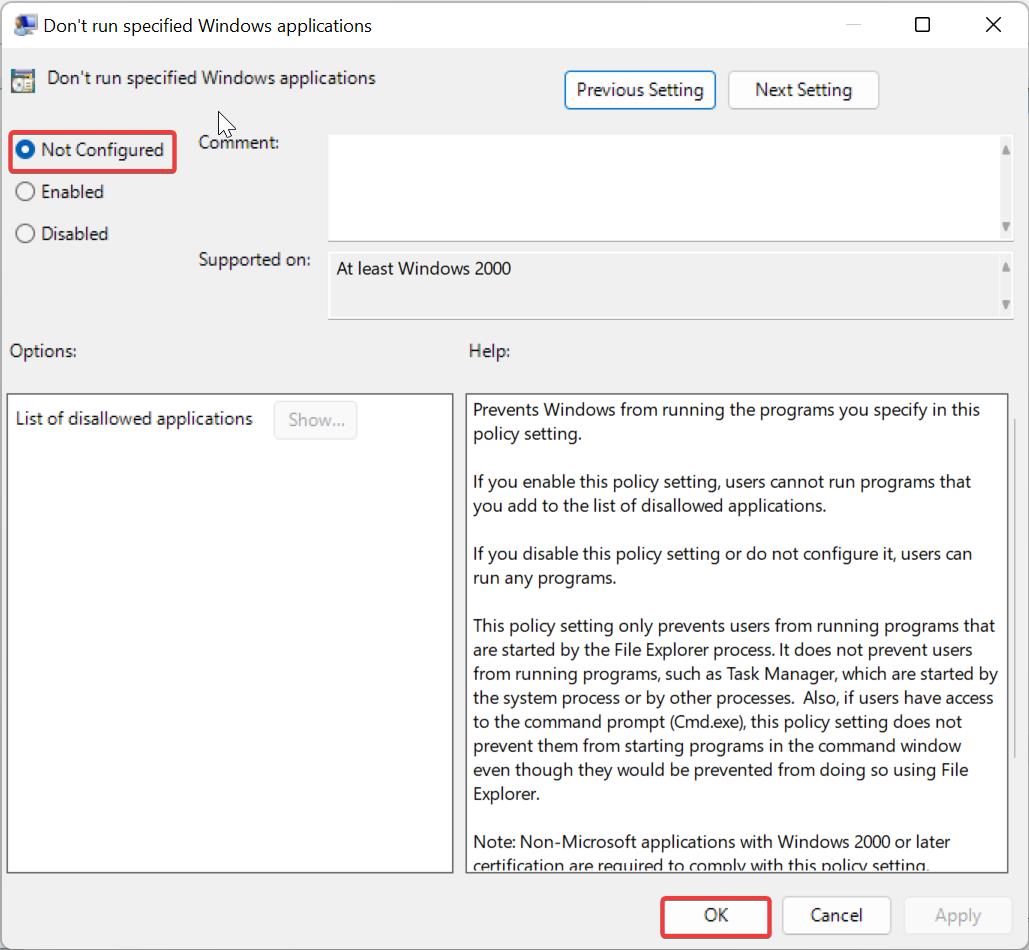
Double-click on don’t run specified Windows applications Policy and click on the Policy Settings.
Check the policy is Disabled or Enabled, If the Policy is enabled choose disabled or not configured.
Solution 8: Disable Antivirus and Firewall:
If you are using any antivirus, Disable it once and check, follow the instructions as per your antivirus guidelines. If you are using windows 10/11 default built-in Windows Security, then follow the below-mentioned steps to disable the Real-time protection.
Open Start and search for Windows Security and Click on Windows Security. From the Left-hand side click on Virus & threat protection.
Under Virus & threat protection settings from the right-hand side click on the Manage settings.
Turn Off the Real-time Protection toggle switch to disable Windows Defender temporarily.
Once you turned off the Windows Defender, Launch the app and check.
How to Disable Firewall in Windows 11?
Solution 9: Change the User Account Control Settings:
User Account Control Settings (UAC) is a feature that was designed to prevent unauthorized changes to your computer. When functions that could potentially affect your computer’s operation are made, UAC will prompt for permission or an administrator’s password before continuing with the Task.
Click on the Start menu and search for UAC, and click on Change User Account Control settings.
Drag down the slider to never notify and Click on OK.
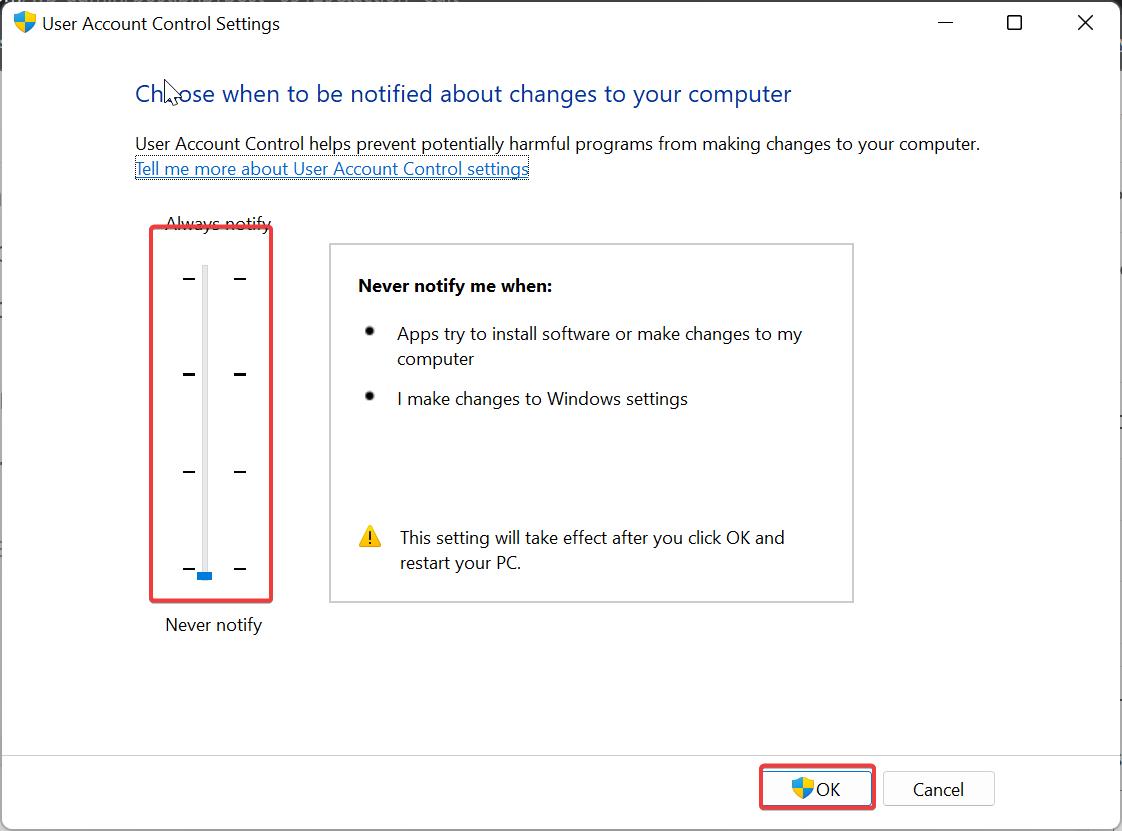
Check the app is opening now or not, if not proceed to the next resolution.
Solution 10: Change the User Account Control Settings using Group Policy Editor:
Open Run command by pressing Windows + R and type secpol.msc and hit enter, this command will open the Local Security policy.
Navigate to the following path.
Local Policies > Security Options
From the left-hand side click on Security Options, and from the right-hand side look for the following policies.
- User account control: Detect application installations and prompt for elevation
- User account control: Run all administrators in Admin Approval Mode
Make sure both policies are Enabled, if not double-click on the policy and enable the policy.
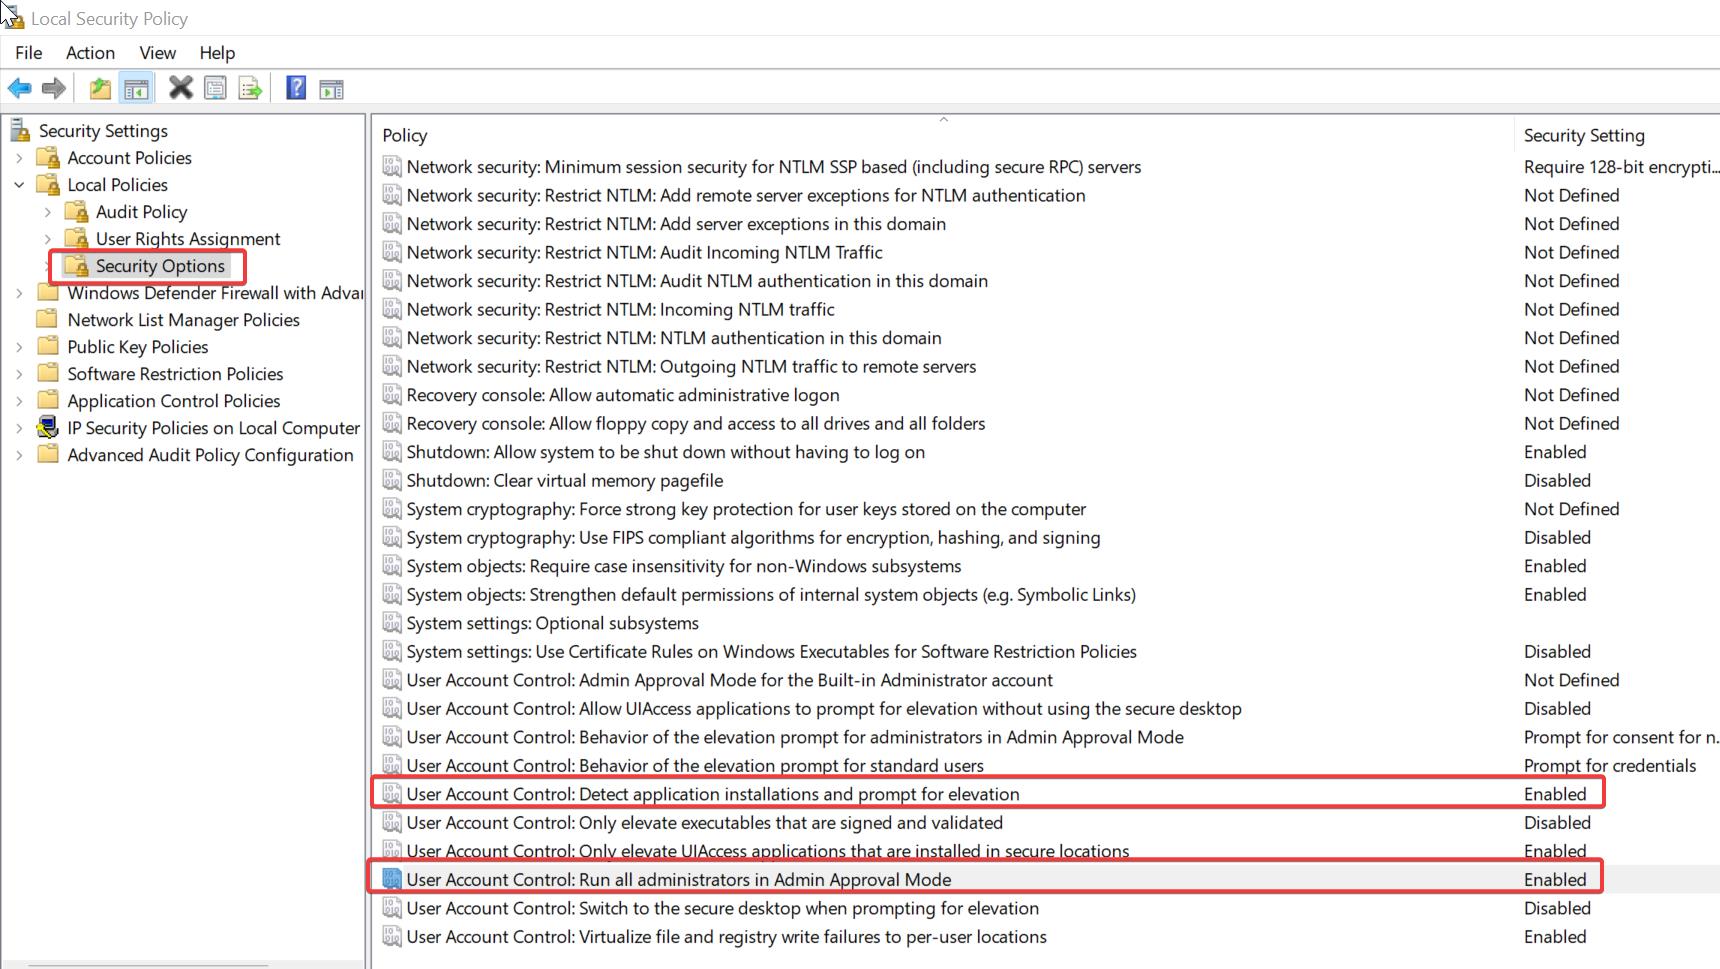
Close the Local Security Policy and restart the system once, after the restart launch the app and check.
Solution 11: Reset Windows Store Cache to fix this app can’t open error:
Open Run command by pressing Windows + R and type Wsreset.exe and hit enter. This command will reset your windows store cache.
Solution 12: Update Windows Store:
If Windows Store is outdated, then it could result in this type of error, updating Windows Store will fix the issue. Follow the below-mentioned steps to update the Windows Store using Command Prompt.
Click on the Start Menu and type Command Prompt and right click on it and choose Run as Administrator. Open the command prompt in elevated mode.
Now copy-paste the following command into the command prompt window and hit enter.
schtasks /run /tn “\Microsoft\Windows\WindowsUpdate\Automatic App Update”
If this command gives an error then update the Microsoft Store manually.
Solution 13: Change Ownership of your Operating System Drive:
Sometimes you will get this error due to ownership problems, but you can easily fix that by changing the ownership of that particular Drive.
Open Windows Explorer by pressing Windows + E, and Right-click on the C drive and choose C Drive. If you installed Operating in a different drive then right-click on that drive and choose Properties.
Go to the Security tab and click on the Advanced button.
Now you will get the separate window under Owner you can see the TrustedInstaller. Click on Change and add the users or Group.
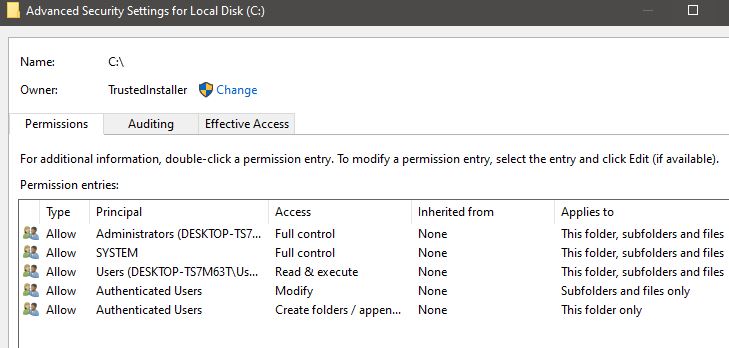
Click on Apply and Ok. Wait for the process to complete. and now open any app and check This app can’t open error appearing or not.
Solution 14: Filter Administrator Token Registry setting:
Many users reported that after following this registry method they are able to access the apps.
Open Run command by pressing Windows + R and type Regedit and hit enter. This command will open Registry Editor.
Now Navigate to the following Path.
HKEY_LOCAL_MACHINE\SOFTWARE\Microsoft\Windows\CurrentVersion\Policies\System
From the left-hand side click on the System and from the Right-hand side look for the FilterAdministratorToken DWORD.
Double click on the FilterAdministratorToken DWORD and modify the value to 1.
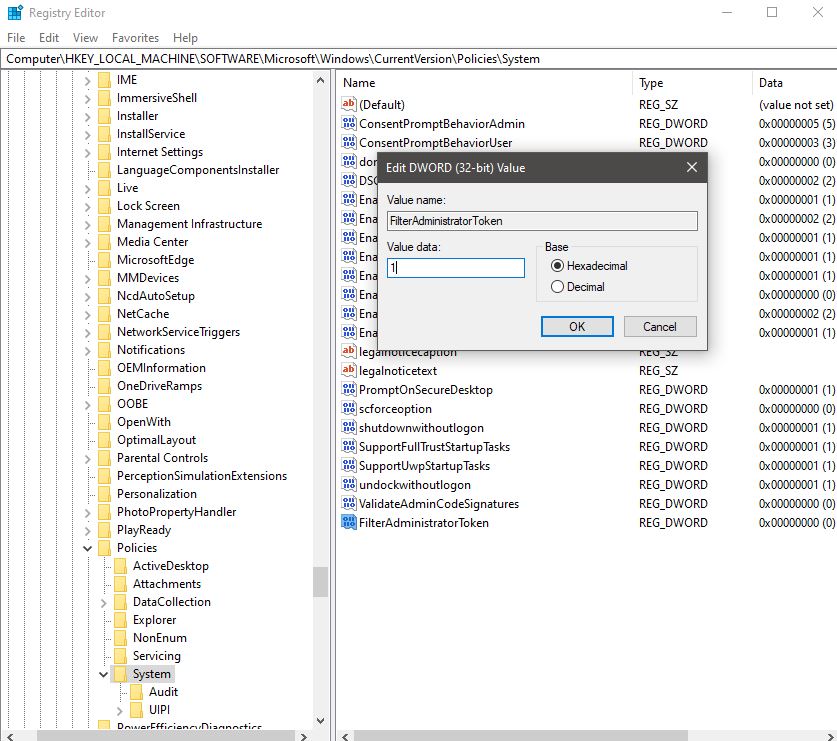
Click on OK and restart the system once. and now open any app and check This app can’t open error appearing or not.
Solution 15: Perform a Clean Boot:
Sometimes if any third party software or background program may interfere with your system apps. Performing Clean Boot will boot your system with a minimal set of drivers and startup programs. Enable Clean Boot once and check, check here to perform a Clean Boot.
Solution 16: Check Application Identity Service Status:
Application Identity service determines and verifies the identity of an app, stopping this service will prevent AppLocker policies from being enforced.
Open Run command by pressing Windows + R and type services.msc and hit enter, this command will open the Service Management console.
Now look for the Application Identity service, Right click on Application Identity and choose Properties.
Click on the General tab and under Startup type and set it to Automatic.
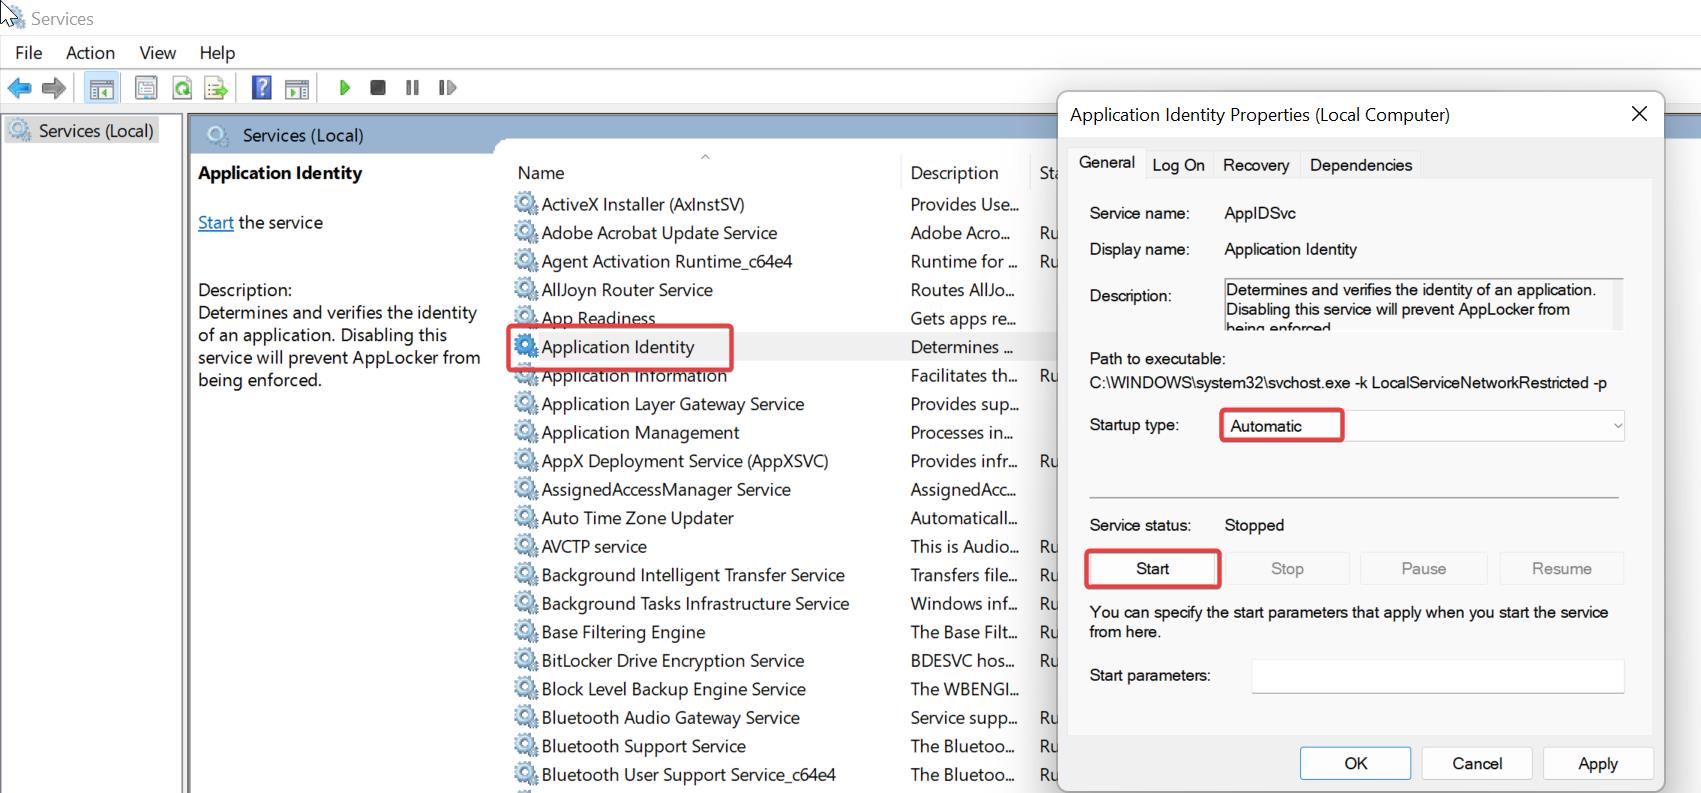
And Start the service, then click on Apply and OK.
Solution 17: Stop and clear License Service Cache:
Open Notepad and copy paste the below mentioned code, and save the notepad as License.bat on your Desktop.
echo off
net stop clipsvc
if “%1?==”” (

echo ==== BACKING UP LOCAL LICENSES

move %windir%\serviceprofiles\localservice\appdata\local\microsoft\clipsvc\tokens.dat %windir%\serviceprofiles\localservice\appdata\local\microsoft\clipsvc\tokens.bak

if “%1?==”recover” (

echo ==== RECOVERING LICENSES FROM BACKUP

copy %windir%\serviceprofiles\localservice\appdata\local\microsoft\clipsvc\tokens.bak %windir%\serviceprofiles\localservice\appdata\local\microsoft\clipsvc\tokens.dat

)


net start clipsvc
Right click on the License.bat file and choose Run as administrator. This will stop the license service and rename the caches. Try to launch any app after this method.
Soultion 17: Check for Windows Update:
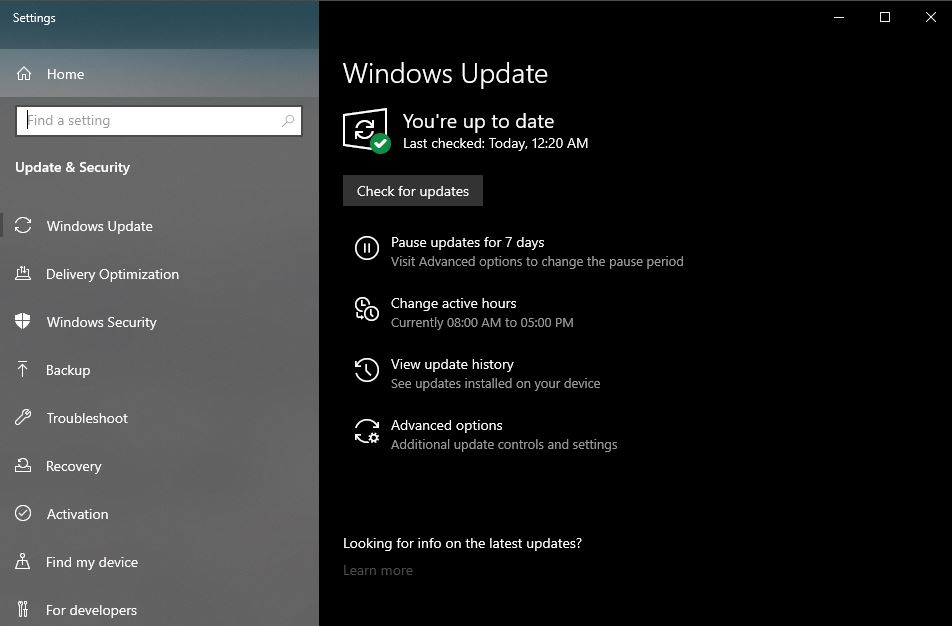
Make sure your windows is up to date, if your windows is not update then you may face this type of error.
Open Windows Settings by pressing Windows + I and then select Update & Security.
From the Left-hand side click on Windows Update and from the right-hand side click on Check for Updates.
Solution 18: Check Windows update Service Status:
Make sure the Windows Update service are running, if not, follow the below mentioned steps and Start the Windows Update services.
Open run command by pressing Windows + R and type services.msc and hit enter.
Look for windows update service and right-click on it and choose properties.
Click on the General tab and set the Startup type to Automatic and start the service.

Click on Apply and Ok.
Solution 19: Recreate User Profile:
If you are a domain login user then recreating user profile will fix this issue. Follow the link here to check how to delete the user profile and recreate it. If you are using a local user account then you can follow the below-mentioned steps to recreate the user profile.
Open Run command and type lusrmgr.msc and hit enter, this command will open the Local users and Groups console.
Now click on the users and Right-click and create a new administrator account.
Solution 20: Reset Windows Operating System:
If the above-mentioned methods don’t give proper resolution, then this is the last and final method. In this method, we are going to reset the PC. crashes and bugs have become a regular occurrence and hindering productivity, it could be a good idea to reset the PC to its factory defaults and start all over again.
That’s it, we have mentioned all the possible resolution methods to fix this app can’t open Check the Windows Store error in Windows 11/10. We hope these methods will help you to resolve the issue.
Read Also:
100% Worked: Fix This app has been blocked by your System administrator
Fix OneDrive install error 0X800703fd in Windows 11
Fix the “Something Happened on Our End” Error in Microsoft Store

