DNS also Known as Domain Name System is used to resolve human-readable hostnames like www.Technoresult.com into machine-readable IP addresses like 103.50.160.145. DNS also provides other information about domain names, such as mail services. It looks simple but there are a lot of processes involves in it. When you enter any domain names like google.com in a browser, your computer uses DNS to retrieve the website’s IP address of 103.50.160.145. Without DNS, you would only be able to visit any website by visiting its IP address directly, such as http:// 103.50.160.145. Think it’s like a Phone book. If you know a person’s name but don’t know their telephone number, you can simply look it up in a phone book. DNS provides this same service to the Internet. It stores all the DNS Resolved addresses in the cache. The OS stores these results in a local DNS cache so that local clients don’t repeatedly query the DNS server for the same address. These DNS cache entries are known as DNS resource records, and the DNS resolver always checks the local cache before it queries the DNS server. If you are facing any network issue, clearing the DNS cache will fix the issue. This article will guide you to Clear DNS cache using PowerShell.
Clear DNS Cache using PowerShell:
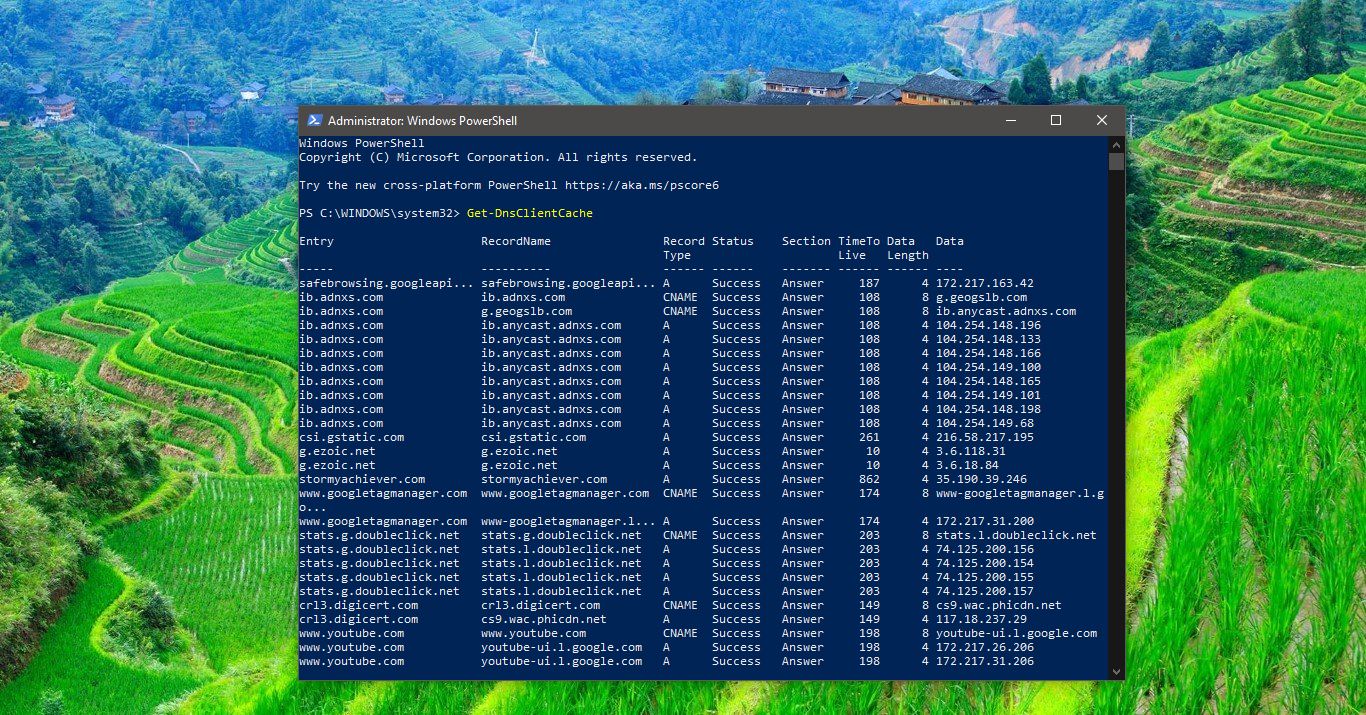
PowerShell allows you to view the DNS cache entries like command Prompt and you can export the list in the text format using cmdlet.
To View DNS Cache Entries: Get-DnsClientCache
This command will list out the DNS Cache Entries.

To export the DNS Cache Entries: Ipconfig /displaydns > dnscacheentries.txt
This command will export the DNS cache entries to the dnscacheentries.txt format.
To get DNS help: Help Get-DnsClientCache -full
This command will display all the Help information.
To Clear DNS Cache: Use the following command, this command is as same we use in Command Prompt. ipconfig /flushdns
This command will clear the DNS cache entries.
To Disable the DNS Caching: If you want to Disable the DNS Caching, then you need to stop the DNS Client service. The DNS Client service (dnscache) caches DNS entries, If the service is stopped, DNS names will continue to be resolved. However, the results of DNS name queries will not be cached and the computer’s name will not be registered.
Open Run Command by pressing Windows + R and type services.msc, this command will open the service management console. Now Look for DNS Client Service.

Right-click on the service and choose Properties. And set the startup type to Disable.
Click on OK.
Read Also: