On Windows 10/11, Autoplay is a feature that allows you to choose the action when connecting a USB drive, memory card, or any other kind of external media or device. while connecting a USB drive, memory card, or any other kind of media you will get a Pop up like “Choose what happens with removable drives” this feature is Known as AutoPlay. This handy feature allows you to quickly open removable media and to configure it on windows 10. When this feature is enabled, Windows 10/11 will automatically detect and AutoPlay will launch the media using a default action. This popup includes options like a File explorer, settings app to configure the storage, import images, or another action. This is a very useful and handy feature, if you want to change the default settings to take a different action while connecting a USB drive or any other media, you can quickly manage this feature using the control panel or Windows settings. If you feel this feature is not useful then you can disable it, disabling this feature will stop the AutoPlay, but you can access the external media or drives using File Explorer. This article will guide you to Disable AutoPlay in Windows 11.
Disable AutoPlay in Windows 11:
In Windows 10/11 you can disable AutoPlay feature using three different methods, follow the below mentioned methods to Disable AutoPlay feature.
Disable AutoPlay using Settings:
Open Windows settings by pressing Windows + I and Navigate to Bluetooth & Devices > AutoPlay.

Under Device settings page from the left-hand side click on the AutoPlay and from the right-hand side you can see the toggle button Use AutoPlay for all media and devices.
Turn off the toggle button Use AutoPlay for all media and devices.

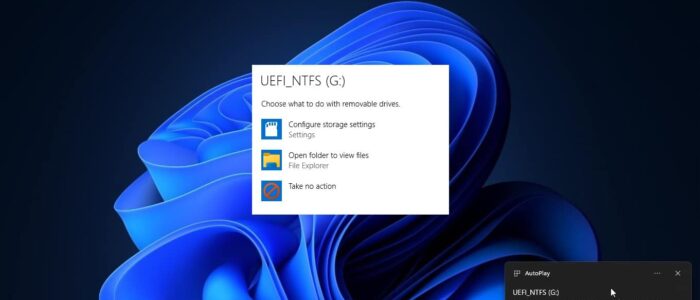
Also, individually you can configure default settings for your media device. For example, if you connect your phone then you can get the following settings to configure. You choose the settings how to open your phone while connecting.
Disable AutoPlay using Control Panel:
Open run command by pressing Windows + R and type control and hit enter. This will open the control panel.
Now search for AutoPlay in the Control panel search at the top right corner.
Click on the AutoPlay, Under Choose what happens when you insert each type of media or device, Uncheck the Use AutoPlay for all media and devices.

Click on Save, That’s it you have successfully Disabled the AutoPlay settings.
Using Registry Editor:
Open Run command by pressing Windows + R and type regedit and hit enter, this command will open the Registry Editor.
Now navigate to the following Registry Path.
HKEY_CURRENT_USER\Software\Microsoft\Windows\CurrentVersion\Explorer\AutoplayHandlers
From the left hand side click on the AutoplayHandlers and from the right hand side look for the DWORD named DisableAutoplay.
By default you can the DisableAutoplay value as 1, to disable the AutoPlay feature double click on the DWORD and change the value from 1-0, then click on OK.

Close the Registry editor and restart the system once. This will disable the AutoPlay settings.