If you are using a Dell Laptop and facing a Full disk space issue then this article is for you, recently one user from our organization complained about the Full disk space issue. His laptop Disk space is getting full very frequently even though he is not saving anything on the Laptop’s HDD. During the troubleshooting we found one issue with his Dell Laptop, there is not much user data, but still, the disk is getting full very frequently. Clearing the cache and moving the files to OneDrive is not an option. Due to the low disk space, the user is not able to save any Excel or data on his laptop, it’s a very annoying issue. And we have checked and cleared all the temp and software distribution folder for update caches, but still, it didn’t give enough space. If you are facing a similar issue like this, this article is intended to help you fix the Full Disk Space issue in Dell Laptops.
Full Disk Space issue in Dell Laptops:
One of the main reasons for this issue is Dell SupportAssist OS Recovery, Support Assist OS recovery is a Dell tool that comes as a built-in Dell tool for supported system models. It provides a recovery environment that consists of tools to diagnose and troubleshoot issues that may occur before your computer boots on to the operating system. When your computer is unable to boot to the operating system even after repeated attempts, it automatically starts SupportAssist OS Recovery. The recovery environment enables you to diagnose hardware issues, repair your computer, back up your files, or reset your computer to its factory state. This tool automatically set up OS recovery partition on your PC. And after the setup, it will periodically save files to that partition that you can use for recovery through Support Assist.
So First make sure you have Dell SupportAssist installed on your system. Go to Run command and type appwiz.cpl and open Programs and features, verify Dell SupportAssist is installed on your system.
If it’s installed open the Dell SupportAssist from the start menu > All apps and click on the Settings icon from the top right corner.
Expand the System repair option and uncheck System Repair is tuned on.

Once you uncheck this option you’ll get a warning message, “When System Repair is turned off, we’ll remove any backups we created for you and free up any hard drive space that they used. You can turn System Repair back on at any time if you’d like to back up important system files again“
Click on Yes, I’m sure.

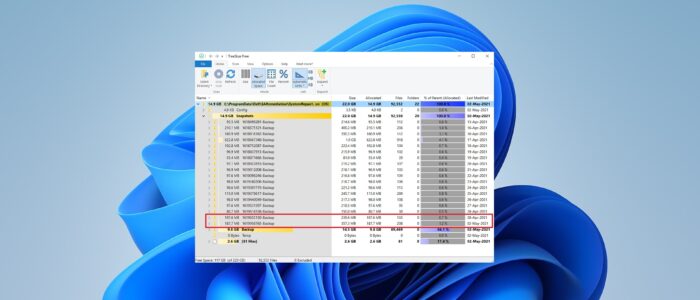
This will delete all the stored snapshots of the Backup image, SupportAssist store this Backup snapshot under the following location.
C:\ProgramData\Dell\SARemediation\SystemRepair\
Make sure you have enabled the Hidden folder view option on your file explorer.
Now you’ll get more Disk space automatically on your system. In case, if you are unable to find the Support assist on your system, then you need to manually navigate to the above-mentioned path and Delete that SystemRepair folder.
Before Deleting make sure you have taken the full folder access of the SARemediation folder.
Read More:
How to Disable Intel Microphone Array in Dell Laptops?
How To Upgrade TPM 1.2 to 2.0 in DELL?
Remove BIOS password in Dell Laptops/systems Without Resetting the BIOS