If you are a person who has a lot of friends and are you a person who shares your computer with your friends then this post might be useful for you. Personal Privacy is very much important nowadays. you can keep your data safe on your computer without being accessible to anyone. But if you are sharing your own computer or laptop with your friends keeping Data safe is not enough, you should limit access to computer setting too. Windows 10 Settings app and Control Panel provide a wide range of settings such as User Accounts, Privacy, Security Settings, etc. which means anyone with access to your PC can modify these settings. Modifying these settings can give access to steal any private data and critical information from your computer. In Big organizations these settings are blocked by default by IT admins, this post explains how to Enable or Disable Control Panel and windows 10 settings through various methods.
Method 1: Enable or Disable Control Panel and windows 10 settings using the Registry editor.
Method 2: Enable or Disable Control Panel and windows 10 settings using Group Policy Editor.
Note: Modifying the Registry is risky, and it causes irreversible damage to your OS Installation Follow the steps correctly. Friendly advice Before Modifying Registry Creating Restore Point is recommended.
Method 1: Enable or Disable Control Panel and windows 10 settings using the Registry editor.
- Press Windows + R to open the Run command and type Regedit to open the registry editor.

- Navigate to the following path, If you using the falls creator Update version and above you can copy this path and directly enter in the address bar
HKEY_CURRENT_USER\Software\Microsoft\Windows\CurrentVersion\Policies\Explorer
- Right-click on the Explorer Folder and Create a New D-Word 32 Bit value.
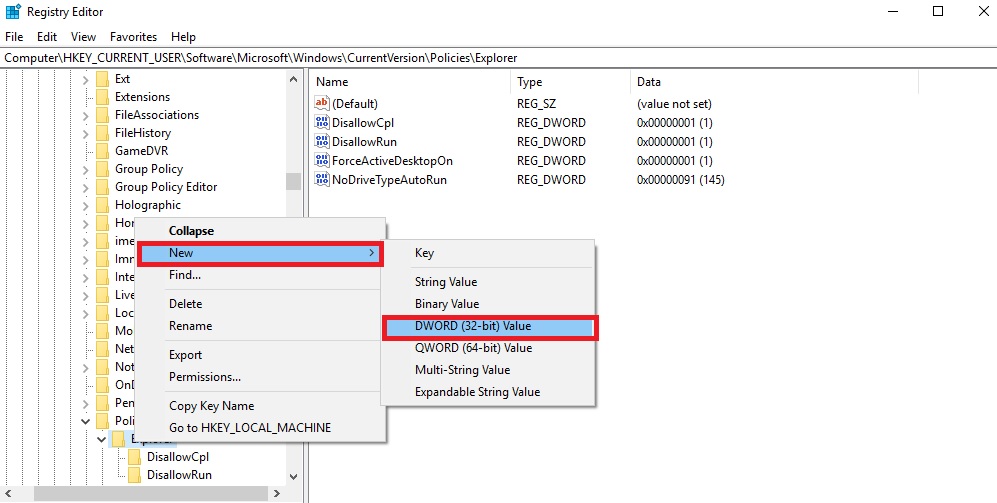
- Explorer then select New > DWORD (32-bit) value.
- Name this newly created DWORD as NoControlPanel and hit Enter.
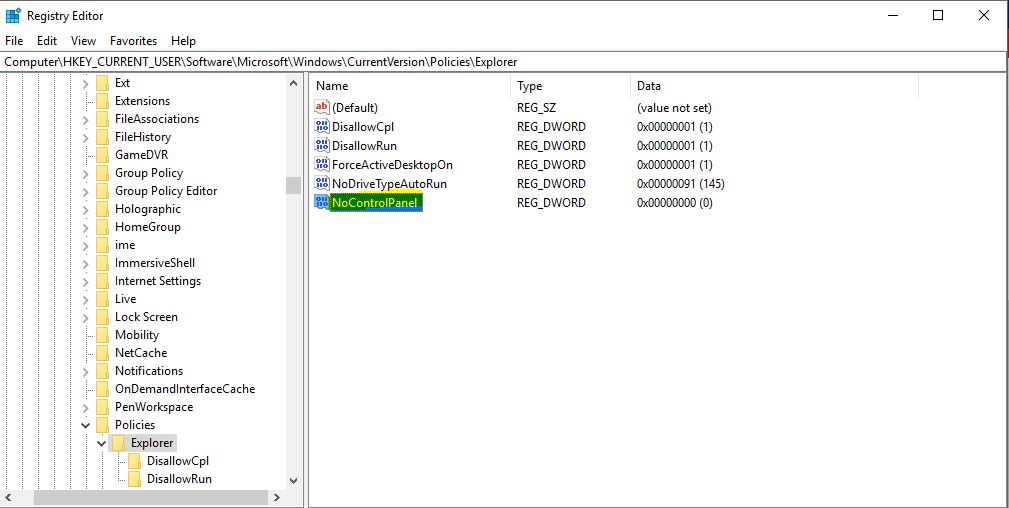
- Double-click on the DWORD NoControlPanel and change it’s value to 1 then click OK.
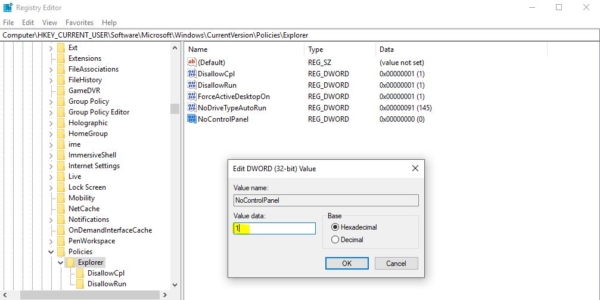
Then Navigate to the Following path and do the same steps Once again. HKEY_LOCAL_MACHINE\SOFTWARE\Microsoft\Windows\CurrentVersion\Policies\Explorer
- Right-click on the Explorer Folder and Create a New D-Word 32 Bit value.
- Explorer then select New > DWORD (32-bit) value.
- Name this newly created DWORD as NoControlPanel and hit Enter.
- Double-click on the DWORD NoControlPanel and change it’s value to 1 then click OK.
- Once everything Done Reboot the PC Once to make it effective. After enabling it you can see the Control panel Icon, but you can’t Open it. It will Prompt an error Like this.
“This operation has been canceled due to restrictions in effect on this computer. Please contact your system administrator.” To revert Follow as Mentioned Below.
- Press Windows + R to open Run command and type regedit to open the registry editor.
- Then Navigate to the Following path and do the same steps Once again.
HKEY_LOCAL_MACHINE\SOFTWARE\Microsoft\Windows\CurrentVersion\Policies\Explorer
- Right-click on the Explorer Folder and Create a New D-Word 32 Bit value.
- Explorer then select New > DWORD (32-bit) value.
- Name this newly created DWORD as NoControlPanel and hit Enter.
- Double-click on the DWORD NoControlPanel and change it’s value to 0 then click OK.
If you find any Difficulties in modifying the Registry Key. Download the Reg file to enable or disable the Control Panel. To Enable: Download Zip files here and save it on your desktop and right-click on the reg files to merge it. To Disable: Download Zip files here and save it on your desktop and right-click on the reg files to merge it.
Method 2: Using Group Policy Editor.
Method 2 doesn’t work for windows 10 Home users. This method is only applicable for Windows 10 Pro, Education, and Enterprise Edition. If you are a win10 Home user follow Method 1.
- Press Windows Key + R then type gpedit.msc and hit Enter.

Navigate to the following location: User Configuration > Administrative Templates > Control Panel
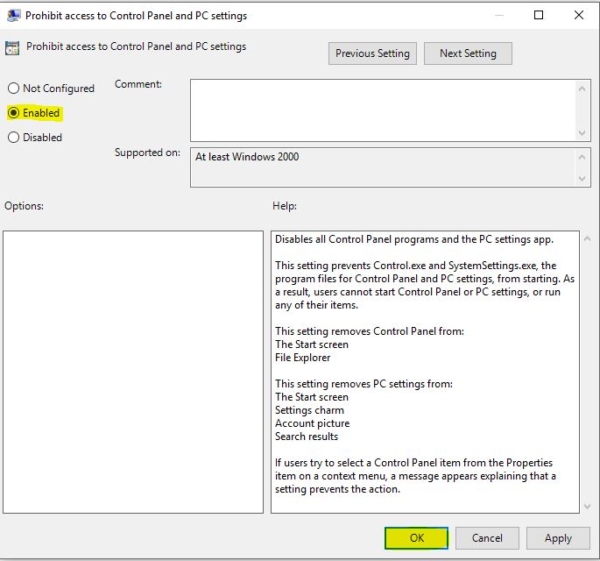
- Make sure to select Control Panel then in the right window pane double-click on “Prohibit access to Control Panel and PC settings” policy.
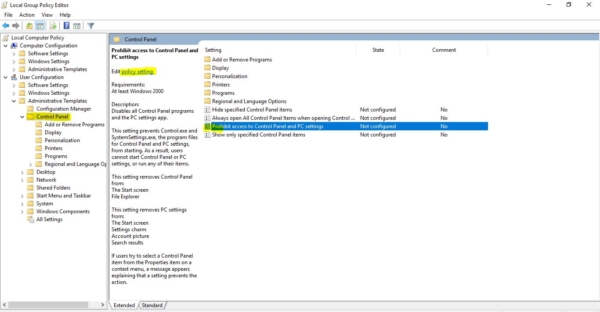
- Select “Enabled” under policy settings then click Apply followed by OK.
- Reboot your PC to save changes.
- Once everything is Done Reboot the PC Once to make it effective. After enabling it you can see the Control panel Icon, but you can’t Open it. It will Prompt an error Like this.
“This operation has been canceled due to restrictions in effect on this computer. Please contact your system administrator.” To revert Follow as Mentioned Below.
- Press Windows Key + R then type gpedit.msc and hit Enter.
Navigate to the following location: User Configuration > Administrative Templates > Control Panel
- Make sure to select Control Panel then in the right window pane double-click on “Prohibit access to Control Panel and PC settings” policy.
- Select “Disabled” under policy settings then click Apply followed by OK.
- Reboot your PC to save changes.
Read Also: Fix Control Panel is not Opening in Windows 10



TechnoResult’s every article is helpful to find-out perfect solution. I really appreciate that.