USB Write access Or USB Write Protection is the security feature that can be enabled for any USB Data storage. There are many ways to enable or disable the USB write access for USB data storage, the main purpose of enabling USB write access is to maintain the integrity of USB data storage. By enabling Write protection, we can avoid the virus attack to the USB Data storage. When write protection is started, the data in the disk will not be modified. Thus, it can protect the disk data and prevent viruses from invading the disk. There are two kinds of Write protection available for USB Drives, One is hardware write protection and another one is software write protection.
Hardware Write Protection:
Hardware write Protection is very old style mostly this type of write protection available in the card reader or floppy disks. In hardware write protection there will be a mechanical switch at the side of the card reader, in floppy, there will be a black slid-able block in the lower-left corner. Once this switch is pulled over then the write protection is On. To turn off just slide down the switch. In this article, we are going to see how to enable or disable USB Write access using the software method.
TO enable Write Protection at the Pen drive level:
Connect the Pen Drive to the system and open command prompt in admin mode.
Type Diskpart and hit enter Then type List disk, Now you will get list of installed Disk with Disk Number,
Now type Select Disk Number They type attributes disk set readonly This command enable the write protection on the pen drive level. So you cannot copy anything to the pen drive.
But what happens if someone connects a different pen drive to the system and steals your data. Windows 10 includes a write protection feature, which is hidden for some reasons, using this feature you can prevent any users from inserting a USB drive and downloading any data from your computer.
There are two methods to enable or disable USB Write access in windows 10 this article will guide you to Enable or Disable USB Write access using these methods.
Enable USB write Protection using Registry editor:
Note: Modifying the Registry is risky, and it causes irreversible damage to your OS Installation Follow the steps correctly. Friendly advice Before Modifying Registry Creating Restore Point is recommended.
Open run command by pressing windows + R and type regedit and hit enter this will open the Registry Editor. Now Navigate to the following location
HKEY_LOCAL_MACHINE\SYSTEM\CurrentControlSet\Control
From the Left-hand side, Right-click on the Control key and choose New Key and Name it as StorageDevicePolicies and press Enter

Select the StorageDevicePolicies and from the right-hand side right-click on empty space and choose New > DWORD (32-bit) Value and Name it as WriteProtect and press enter.

Now again double click on the WriteProtect and change the value from 0 to 1 and give OK.

Restart the system once to make it effective.
Disable USB write Access using Registry editor:
To disable USB write access open the registry editor and navigate to the following location.
HKEY_LOCAL_MACHINE\SYSTEM\CurrentControlSet\Control\ StorageDevicePolicies
From the left-hand side click on the StorageDevicePolicies key and from the right-hand side delete the WriteProtect Key. Restart the system once to make it effective.
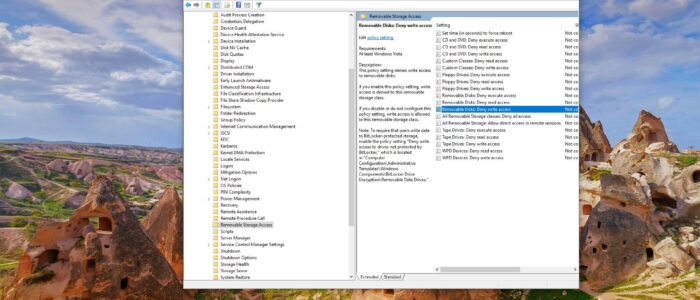
Enable USB write Protection using Group Policy Editor:
Open run command by pressing windows + R and type gpedit.msc and hit enter this command will open the Group Policy Editor.
Navigate to the Following Path:
Computer Configuration > Administrative Templates > System > Removable Storage Access

Click on the Removable Storage Access and from the right-hand side search for the policy named
Removable Disks: Deny Write access Double click on the
Removable Disks: Deny Write access Policy and choose Enabled and give Ok. 
Go to cmd and type Gpupdate /force and once the policy is updated restart the system once.
Disable USB write Access using Group Policy editor:
Open run command by pressing windows + R and type gpedit.msc and hit enter this command will open the Group Policy Editor.
Navigate to the Following Path:
Computer Configuration > Administrative Templates > System > Removable Storage Access
Click on the Removable Storage Access and from the right hand side search for the policy named Removable Disks: Deny Write access Double click on the Removable Disks: Deny Write access Policy and choose Not Configured and give Ok.