FFmpeg is a name of a free software project for the multimedia handling licensed under GNU General Public License. The name FFmpeg means Fast Forward Moving Pictures Experts Group. The most popular part of the project is ffmpeg command-line tool for video and audio encoding/decoding and its main features are the high speed, quality of output, and small file sizes. There are many different tools available for editing, tweaking, and converting multimedia files into different formats, some of the software are licensed and some of the software are open-source tools which you can download for free from the internet. Tools like Audacity or Handbrake are fantastic tool which you can use to convert file from one format to another. These software’s are GUI based, we can record and convert multimedia files from one format to another. FFmpeg is a command-line tool to convert the multimedia files format real quick. As I mentioned above FFmpeg is a collection of different projects for handling multimedia files. There are two main project categories, FFmpeg command-line tools, and FFmpeg software libraries. In this article, we are going to see about FFmpeg Command-line tools and how to install FFmpeg in windows 10. FFmpeg command line tools are available for Windows, Linux and Mac.
FFmpeg Command Line Tools:
FFmpeg – Fast audio and video encoder/decoder
FFplay – media player
FFprobe – shows media files characteristics
FFserver – broadcast server for multimedia streaming using HTTP and RTSP protocols
Download FFmpeg Command Line Tools:
The primary download source is located on the webpage: http://ffmpeg.org/download.html Many Linux distributions have FFmpeg tools already installed, otherwise, they can be compiled, this is possible also on the OS X, or the OS X binaries can be downloaded from the webpages http://www.evermeet.cx/ffmpeg or http://ffmpegmac.net
The users of Windows can download the binaries (static builds are recommended) from Link here. Choose the version, CPU Architecture, and Linking. Under Linking choose static and click on the Download Build.

Install FFmpeg:
Once you downloaded the Build, Most probably the build saved under the download folder. Extract the Zip file and Move the Folder to C Drive. Make sure that the location is safe from accidental deletion. I moved the folder named ffmpeg-20200225-36451f9-win64-static to the C drive.
Next, open control panel and click on the system.

From the left hand side click on the Advanced system settings, Now you will get the separate window, click on the Advanced Tab,
Under Advanced tab click on the Environment Variables.


Now you will get one separate window, Under User variables for [UserName], click on Path and choose Edit.

In Next window click on New. Then click on Browse, and choose the location where you stored the ffmpeg folder > bin and give OK to install FFmpeg.


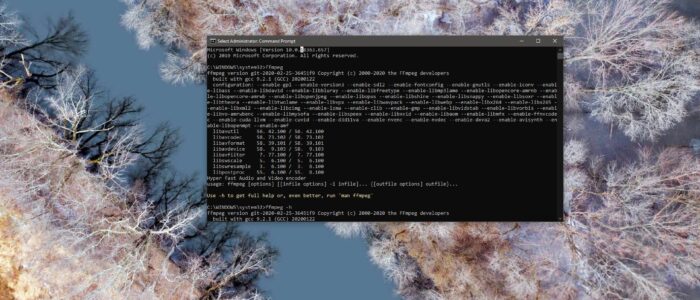
That’s all FFmpeg is successfully installed. Open command prompt in admin mode and type ffmpeg and hit enter.
Read Also:
How to install FFmpeg using Command Prompt in Windows 11/10?