TLS abbreviated as Transport Layer Security. TLS is a cryptographic protocol that provides end-to-end communications security over networks and it is widely used for internet communications and online transactions. And TLS is a more secure and efficient protocol compared to SSL, it has stronger message authentication, key material generation, and other encryption algorithms. For example, TLS supports pre-shared keys, secure remote passwords, elliptical-curve keys, and Kerberos whereas SSL does not. So you may wonder how the TLS works, The working principle is very simple The TLS protocol specification defines two layers.
1. The TLS record protocol–> provides connection security.
2. The TLS handshake protocol–> Enables the client and server to authenticate each other and to negotiate security keys before any data is transmitted.
In these TLS record protocols Secures the application data using the keys created during the Handshake. The Record Protocol is responsible for securing application data and verifying its integrity and origin. It manages the following:
- Dividing outgoing messages into manageable blocks and reassembling incoming messages.
- Compressing outgoing blocks and decompressing incoming blocks (optional).
- Applying a Message Authentication Code(MAC) to outgoing messages, and verifying incoming messages using the MAC.
- Encrypting outgoing messages and decrypting incoming messages.
When the Record Protocol is complete, the outgoing encrypted data is passed down to the Transmission Control Protocol (TCP) layer for transport. Transport Handshake Protocol is a multi-step process, Handshake Protocol is responsible for the authentication and key exchange necessary to establish or resume secure sessions. When establishing a secure session, the Handshake Protocol manages the following:
- Cipher suite negotiation
- Authentication of the server and optionally, the client
- Session key information exchange.
This multi-step process is a little more complex than the record protocol, in TLS, a server provides an identity to the client by the use of public and private key pairs, Then the session key has been generated and shared between client and server, then the main part is establishing a secure session by using TLS, In this client and server exchanges the simple hello messages with encryption keys. Also for each message ends client and server gets a certificate of authentication and finishes the handshake process, This session ID will be saved for future use so that This TLS session can be resumed in the future. These are the basic working principle of TLS. The IETF officially took over the SSL protocol to standardize it with an open process and released version 3.1 of SSL in 1999 as TLS 1.0. The protocol was renamed TLS to avoid legal issues with Netscape, which developed the SSL protocol as a key feature part of its original Web browser. Then TLS 1.1 was added with little extra features, The TLS 1.2 was published as RFC 5246 in 2008, then over the years monitoring researchers have discovered a slew of vulnerabilities. To overcome these issues IETF officially released TLS 1.3 in 2018. TLS 1.3 is mainly focused to improve performance, Privacy, and security. TLS 1.3 offers faster encryption compared to TLS 1.2, and TLS 1.3 handshake is faster compared to TLS 1.2. It completes the handshake in just one trip so it cuts down on encryption Latency. TLS 1.3 introduced a new feature call Zero round trip time resumption or 0-RTT. This feature gives an extra speed boost while browsing, when user return to a TLS secured website which they previously visited, it will load very faster if you enabled TLS 1.3 on your Browser. This article will guide you to enable TLS 1.3 on your browser.
Enable TLS 1.3 in Windows 10:
Before proceeding first you need to check which browser supports the new TLS version. Many browsers and SSL Test services do not yet support TLS 1.3 but this situation will change soon. But popular browsers like Chrome, Edge, IE, and Firefox support TLS 1.3 and you need to enable it manually. Check your browser protocol support from the link here.
Enable TLS 1.3 in IE and Edge Legacy:
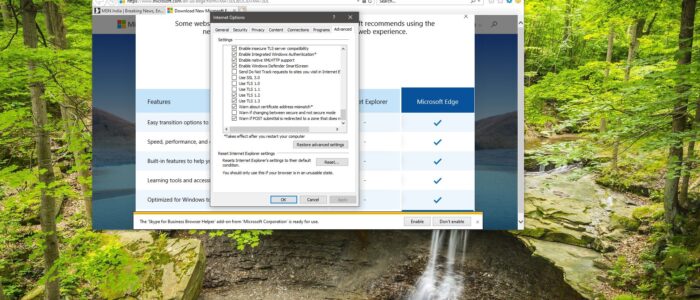
Open the Run command by pressing Windows + R and type inetcpl.cpl hit enter. This command will open Internet options.
Click on the Advanced Tab and under settings scroll down until you see Use TLS 1.3.

Check the box and click on Apply and OK. Restart the browser once to make it effective.
Enable TLS 1.3 in Chrome:
Launch the Chrome Browser and type Chrome://flags in the new tab address bar.
Now search for TLS and you will notice the TLS 1.3 hardening for local anchors, this setting is enabled by default, if you want to disable it then you can choose the option from the drop-down menu.

In Edge Chromium browser:
Launch Edge Chromium and type edge://flags/ in the new tab address bar.
Now search for TLS and you will notice the TLS 1.3 early data, this setting is enabled by default, if you want to disable it then you can choose the option from the drop-down menu.

In Firefox Browser:
Launch Mozilla Firefox and type about:config in the new tab address bar. And click on Accept the Risk and Continue. This will open the configuration area, and in the search preference box search for Security.tls.version.max.
If the Security.tls.version.max value is 4 then leave it, if it is 3 then change it to 4.

Then restart the browser once.
Read Also: How to Check TLS 1.3 Browser support in Windows 11/10?