If you are facing an issue in Switching between the users, or you can’t find the Switch user option, then this article will guide you to fix can’t switch user in Windows 11. Also, few users reported that they are not able to use the switch user option, the switch user option is missing from the login screen, and unable to access the user profile. And they noticed that they could not see their user profile icon, and the user accounts were not visible. If you are facing similar issues, then follow the below-mentioned resolution methods to fix Can’t switch user issue in Windows 11. In Windows Switch user features allows users to switch between accounts quickly without logging out completely. And by default, Fast user switching is enabled in Windows, if you are facing any issue in switching users, it may be due to the disablement of Fast User Switching. Follow the below-mentioned resolution methods to resolve this issue.
Fix Can’t switch user in Windows 11:
Mostly this issue occurs due to the disablement of Fast User Switching. Fast user Switching allows users to switch between one user account to another user account. You can enable fast user switching using two built-in features in Windows 11.
Solution 1: Using Local Group Policy Editor:
Open Run command by pressing Windows + R and type gpedit.msc and hit enter. This command will open the Group Policy Editor console.
Now navigate to the following path.
Computer Configuration > Administrative Templates > System > Logon
From the left-hand side click on the Logon, and from the right-hand side look for the policy named “Hide entry points for Fast User Switching”.
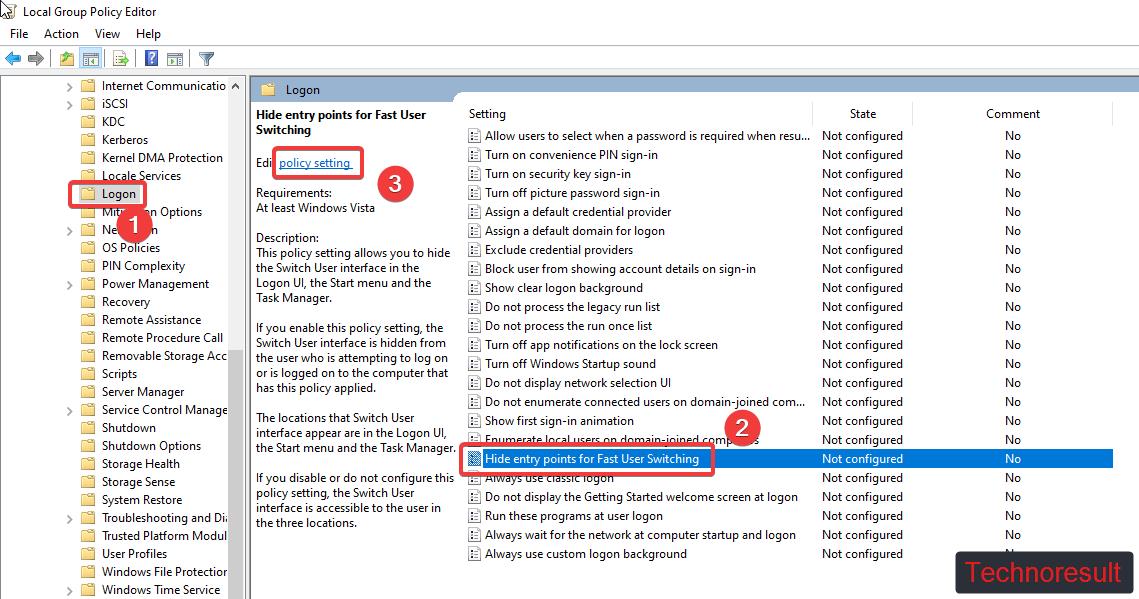
Double-click on the Policy and open policy setting, if the policy is enabled, then click on Not configured or Disabled.
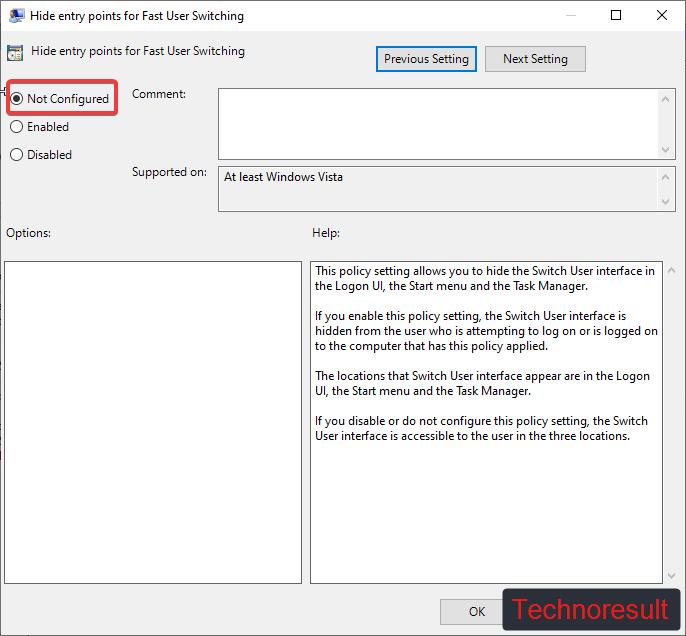
Next click on Apply and OK. Restart the system once to apply the changes.
Solution 2: Using Registry Editor:
Note: Modifying the Registry is risky, and it causes irreversible damage to your OS Installation Follow the steps correctly. Friendly advice Before Modifying Registry Creating Restore Point is recommended.
Open the Run command by pressing Windows + R and type Regedit and hit enter. This command will open the Registry Editor console.
Now navigate to the following path.
HKEY_CURRENT_USER\Software\Microsoft\Windows\CurrentVersion\Policies\System
If the System registry key is not present under Policies, then you need to create it. Right-click on the Policies registry key and choose New > Key and name it as System.
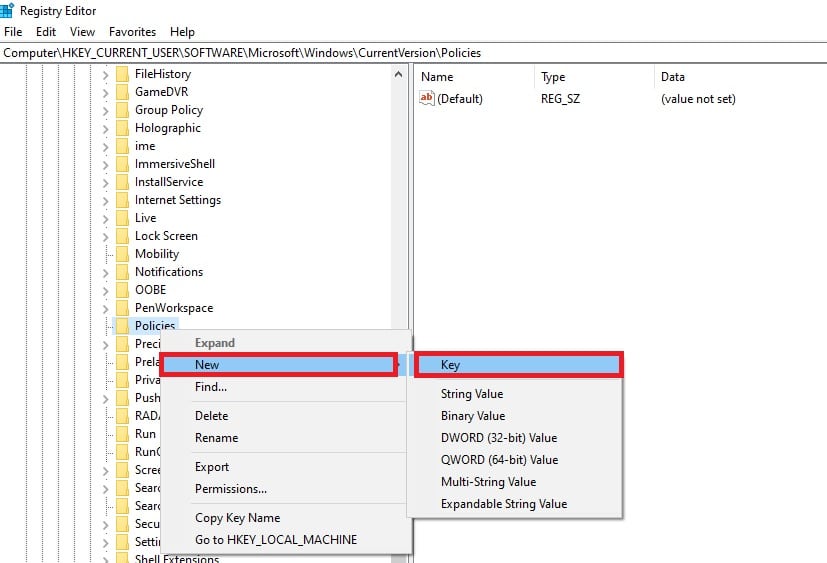
Now from the left-hand side click on the System registry key and from the right-hand side, right-click on an empty area and choose New > DWORD (32-bit) Value.
Name the DWORD as HideFastUserSwitching and click on OK.
Now Double click on the HideFastUserSwitching DWORD and enter the Value 0 and click on OK.
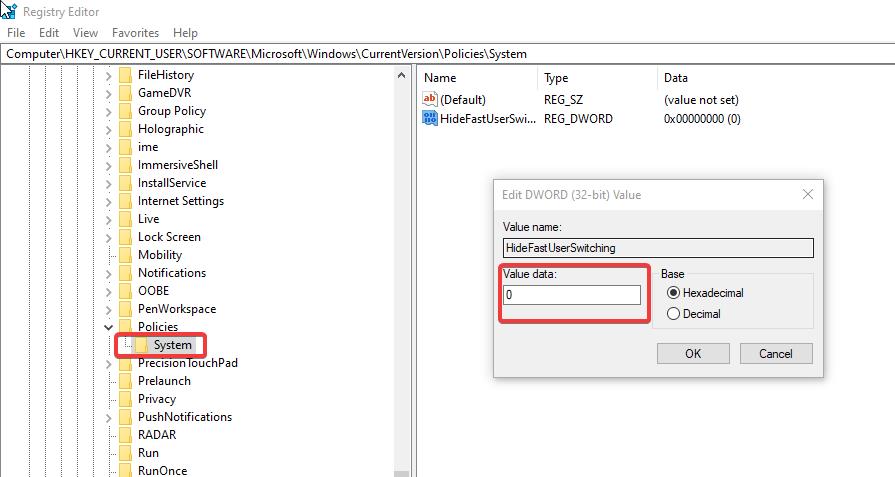
Now Close the Registry Editor and restart the system once.
Solution 3: Using Local Users and Groups:
If you are using a Local user account then make sure the account is not disabled, sometimes due to the account disablement you can’t see the Switch user option.
Log in to the Admin account, open run command by pressing Windows + R and type lusrmgr.msc and hit enter, this command will open the Local Users and Groups console.
Under the Local Users and Groups console, click on Users and right-click on the user account and choose Properties.

under user account properties, click on the General tab and make sure your Account is disabled option is unchecked. If it’s checked, uncheck the option and click on Apply and OK.

This will enable the account, and now you can switch between users accounts.
Read Also:
How to Show all users on Login Screen in Windows 11?
Fix Switch User Option missing in Windows 10
How to Enable Fast User Switching in Windows 10?


