Task Scheduler is a Windows tool that allows you to Create and automate any routine tasks on a chosen computer. Task Scheduler is mainly used to run any monitoring tools, and for maintenance tasks such as disk defragmentation, disk Clean-up, and to install windows updates. Also, you can use the Task Scheduler to execute tasks such as starting an application, sending an email message, run commands, to execute scripts at a particular day and time, or showing a message box. Task Scheduler can be scheduled in response to the following events or triggers. At a Specific Time. At a specific time on a daily schedule At a specific time on a weekly schedule At a specific time on a monthly schedule At any Specific Time. When the system is booted. When the computer enters an idle state. When a user Logs on. When the task is registered. You can create tasks and schedule based on the above response. Tasks can be saved and if you want to can import or export the task from one Computer to another. This article will guide you to Import or Export Tasks from the Task Scheduler in Windows 10.
Import or Export Tasks from the Task Scheduler:
In this windows 10 guide we are going to show how to import or export scheduled tasks from the Task Scheduler in three methods.
Table of Contents:
- Import or Export Tasks using Task Scheduler
- Import or Export Tasks using Command Prompt
- Import or Export Tasks using PowerShell
Let’s see the topics in detail
Import/Export Tasks using Task Scheduler
This is the direct and easiest method, using Task Scheduler it is very easy to export or import scheduled tasks. Follow the steps as mentioned below.
Export Scheduled tasks using Task Scheduler
Click on Start and Search for Task Scheduler. Open the Task Scheduler in administrative Mode.
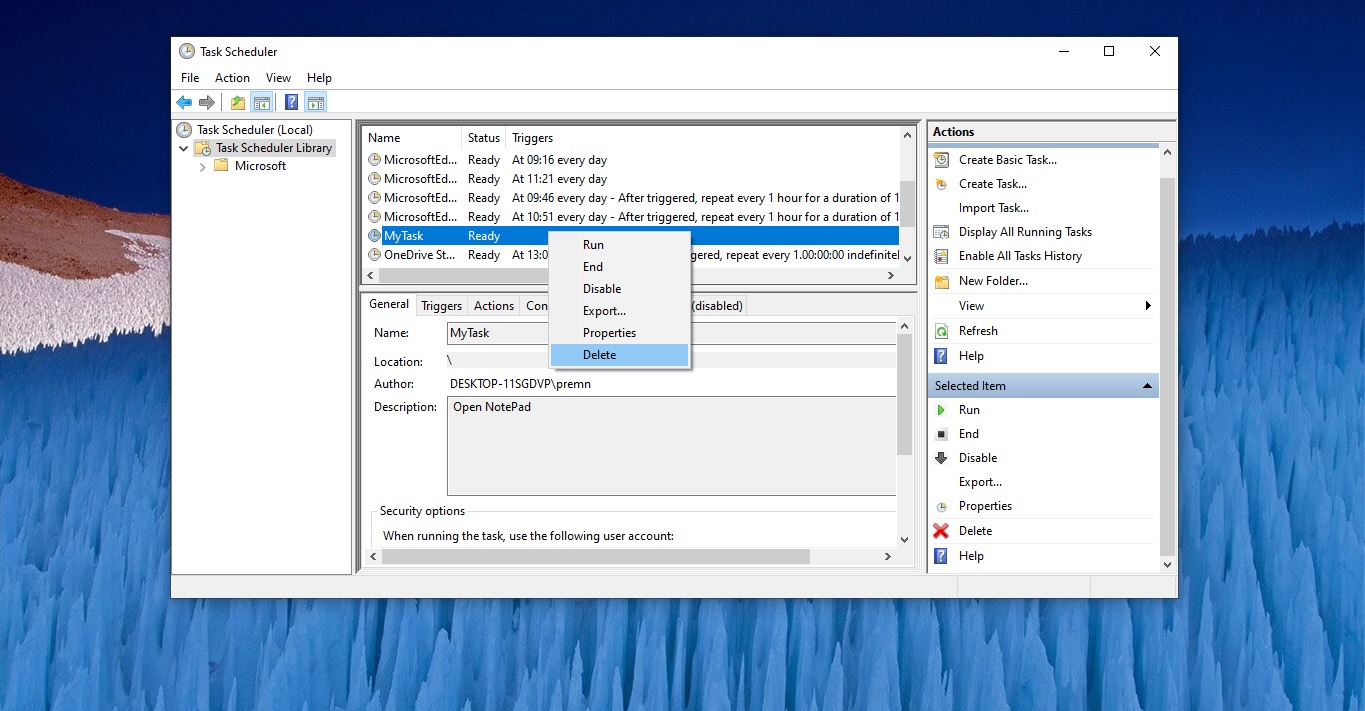
Now Navigate to your Tasks and Right-click on the Task and Choose Export.

Also, you can find the Export from the Actions Window, Click on Export and choose the location to save the file.
Click on the Save button.

After saving you can find the XML File in that particular saved location. You can copy this XML file to another machine using a USB drive or via Mail.
Import Scheduled tasks using Task Scheduler
Using this method you can easily Import the Scheduled Tasks, and before importing make sure you have copied all the required files to run the tasks, for example, if you are going to run any PowerShell scripts make sure you have copied the script along with the XML file. Exporting Tasks only export the task scheduler task configurations, it won’t copy the required files. So copy all the required files and then start importing.
Click on Start and Search for Task Scheduler.
Open the Task Scheduler in administrative Mode.
From the Right-hand side Navigate to the exact Import location. Right-click on the folder and choose Import Task.

And now browse the XML file location and click on Open.

If you already configured any Task Settings do it after the import.
Import/Export Tasks using Command Prompt
You can use command prompt as an alternative method to import or export tasks, in this method we are going to use the Schtasks.exe command, this command enables users to create, delete, query, change, run and end scheduled tasks on a local or remote computer. Find more about Schtasks here.
Export Tasks using Command Prompt:
Open command prompt in admin mode. Now type the below-mentioned command and hit enter.
schtasks /Query /XML /TN “task location\task name” > “%UserProfile%\Desktop\name.xml”
Let’s dig the command deeply, In this command, you have to replace the task location and task name. first.
You can find the Task location and the task name from the Task scheduler itself.

Open task scheduler and navigate to the Task, and click on the task to view the information. There you can find the Name and Location of the Task. Now replace the following items from the command.
First, replace the task location, then task name and copy the path with the name as per your wish. Find the image below for detailed information.

Once the command executed to make sure the file is located in the correct location which you have mentioned in the command.
Import Tasks using Command Prompt:
In command Prompt there is no import option, Instead of importing and setting the location and script, we can create new task using the same excel file which we export.
Open Command Prompt in admin mode. Now copy-paste the below-mentioned command in the command prompt and hit enter.
schtasks /create /xml “%UserProfile%\XML file Path\TaskName.xml” /tn “\TASKSCHEDULER-FOLDER-PATH\TASK- NAME” /ru “COMPUTER-NAME\USER-NAME” /rp SystemPassword
Replace the following items in the command
“%UserProfile%\XML file Path\TaskName.xml –>Copy the exported XML file path.
TASKSCHEDULER-FOLDER-PATH –> Replace it with the Task Location, You can find it from the Task scheduler itself.
TASK- NAME –> You can give any name as your wish
COMPUTER-NAME –> Your system Hostname to get hostname from the system go to cmd and type hostname
USER-NAME –> Your system username SystemPassword –> type Your system password See the image below for detail

Import or Export Tasks using PowerShell
Like command prompt, we can use the PowerShell to Import or Export scheduled tasks.
Export Tasks using PowerShell
In this method, we are going to use Export-ScheduledTask PowerShell Command.
Open PowerShell in Administrative Mode Type the below-mentioned command with slight modification as per your requirement.
Export-ScheduledTask -TaskName “task location from scheduler\task name” > “$env:UserProfile\Desktop\name.xml”

Replace the following items from the above command
Task location from the scheduler, Task name, And Name.xml Once you execute the command the task will be export to the mentioned location. Check the location once.
Import Tasks using PowerShell
Like command Prompt, there is no import command in PowerShell also, so we are going to use the Register command to create the new task with the export XML file.
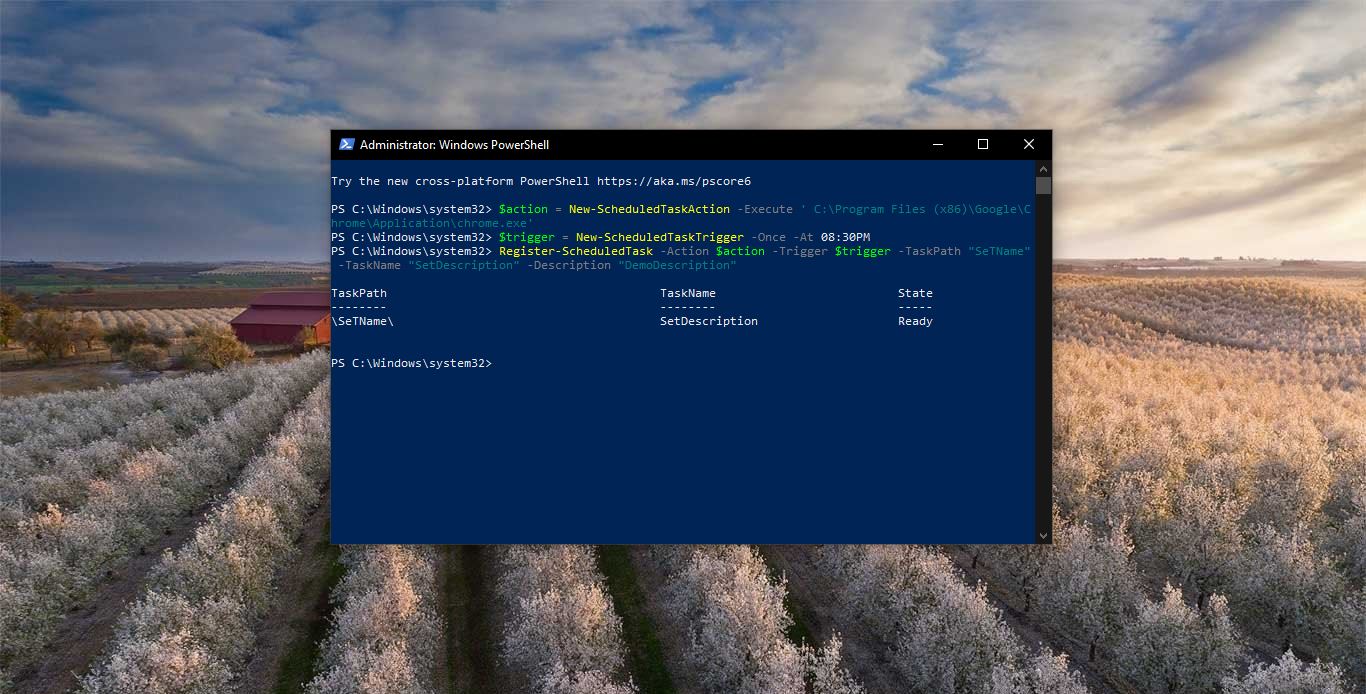
Open PowerShell in Administrative Mode Type the below-mentioned command with slight modification as per your requirement.
Register-ScheduledTask -xml (Get-Content ‘C:\PASTE THE PATH OF THE EXPORTED XML FILE WITH NAME.XML ‘ | Out-String) -TaskName “TASK-IMPORT-NAME” -TaskPath “\TASK-PATH-TASKSCHEDULER\” -User COMPUTER-NAME\USER-NAME –Password TYPE YOUR PASSWORD -Force

Make sure all the caps items are changed and execute the command. After the execution of the command, the exported task scheduler will be created as a new task in the Task Scheduler.