Microsoft Defender also Known as Windows Defender is an anti-malware Component of Microsoft Windows. It is an official Protection Program provided by Microsoft to Protect computers running windows from Spyware and malware. Many users think that it’s a new program Which is introduced in Windows 10, but actually it has very long story, At first the concept of Microsoft Defender is based on GIANT AntiSpyWare from the GIANT Company software. Then this company was acquired by Microsoft on December 16, 2004. It was first released to the public as a downloadable free antispyware program for windows XP, then later shipped with Windows Vista and Windows 7. After it has evolved into a full antivirus Program, replacing Microsoft security Essentials as part of Windows 8. Finally, in windows 10 it is known as Windows Defender before Windows 10 November 2019 Update or Windows Defender Antivirus in Windows 10 Creators Update and later.
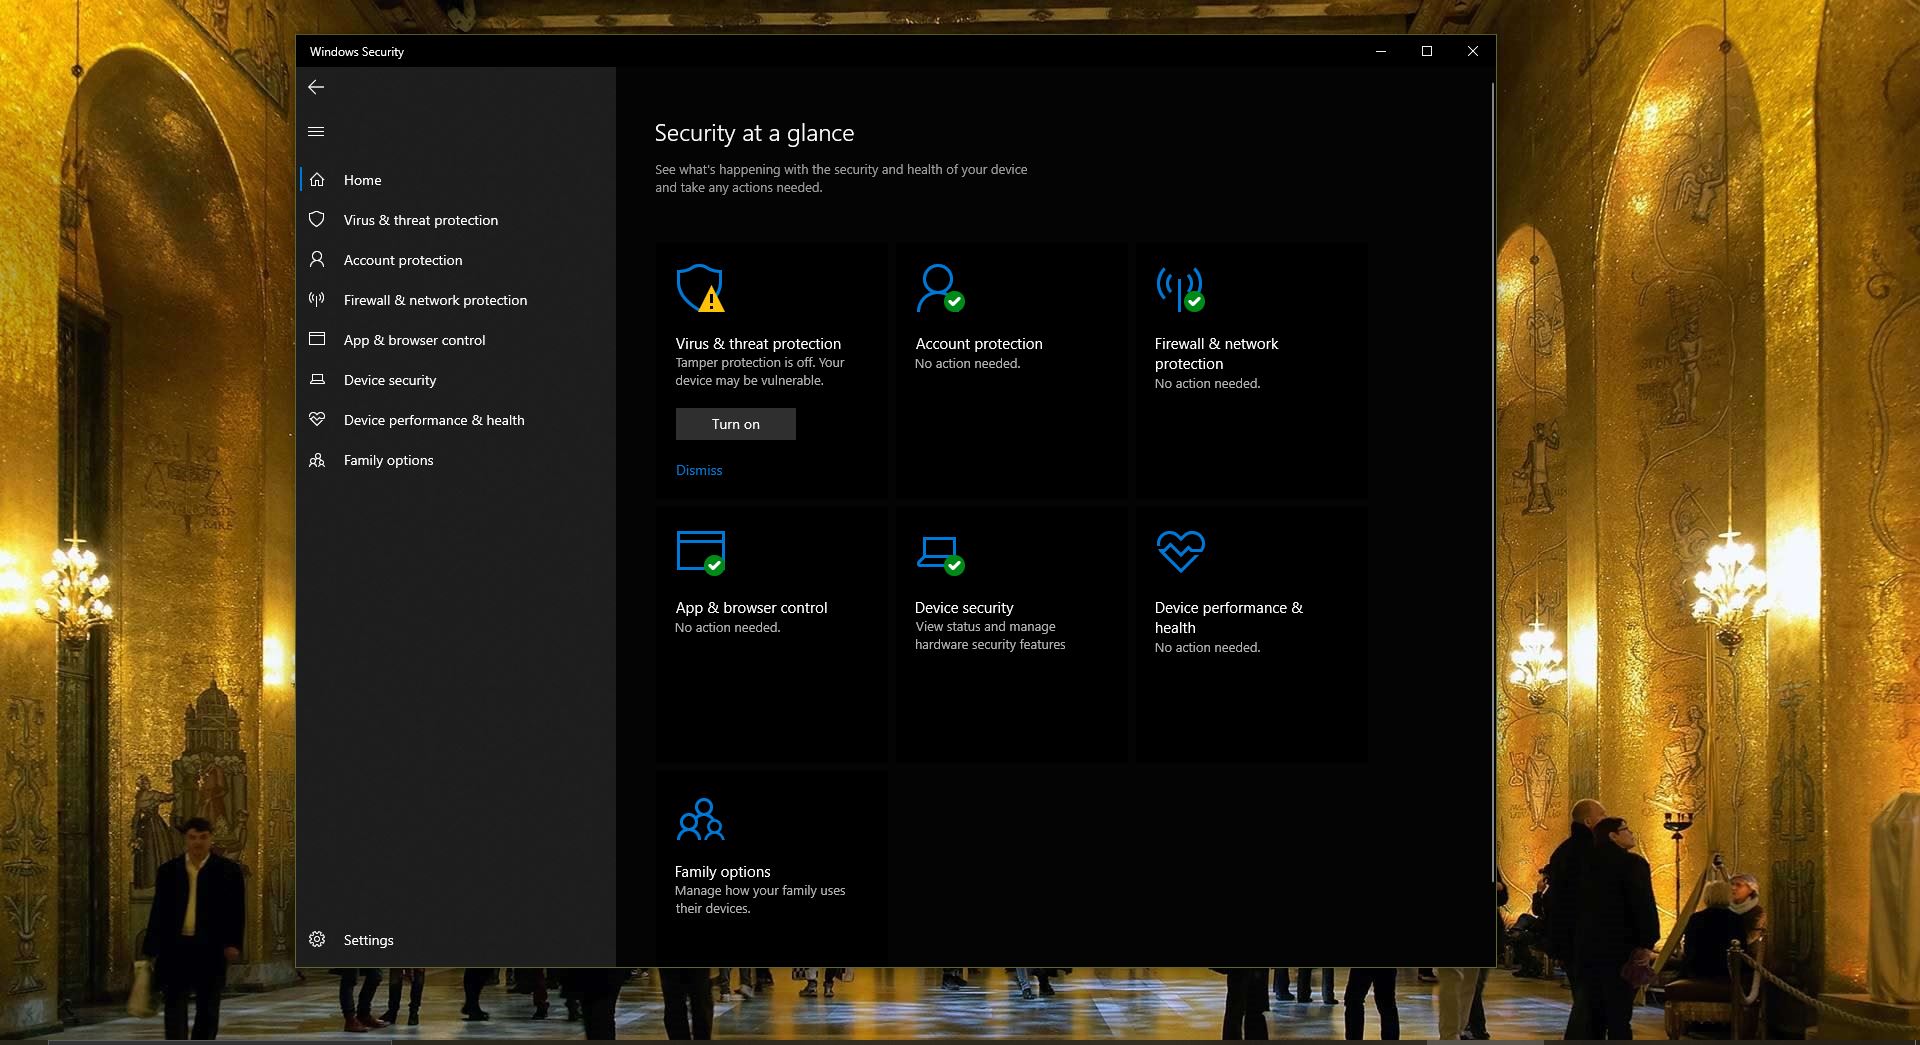
Windows Defender Protect Your PC by these Seven security areas mentioned below.
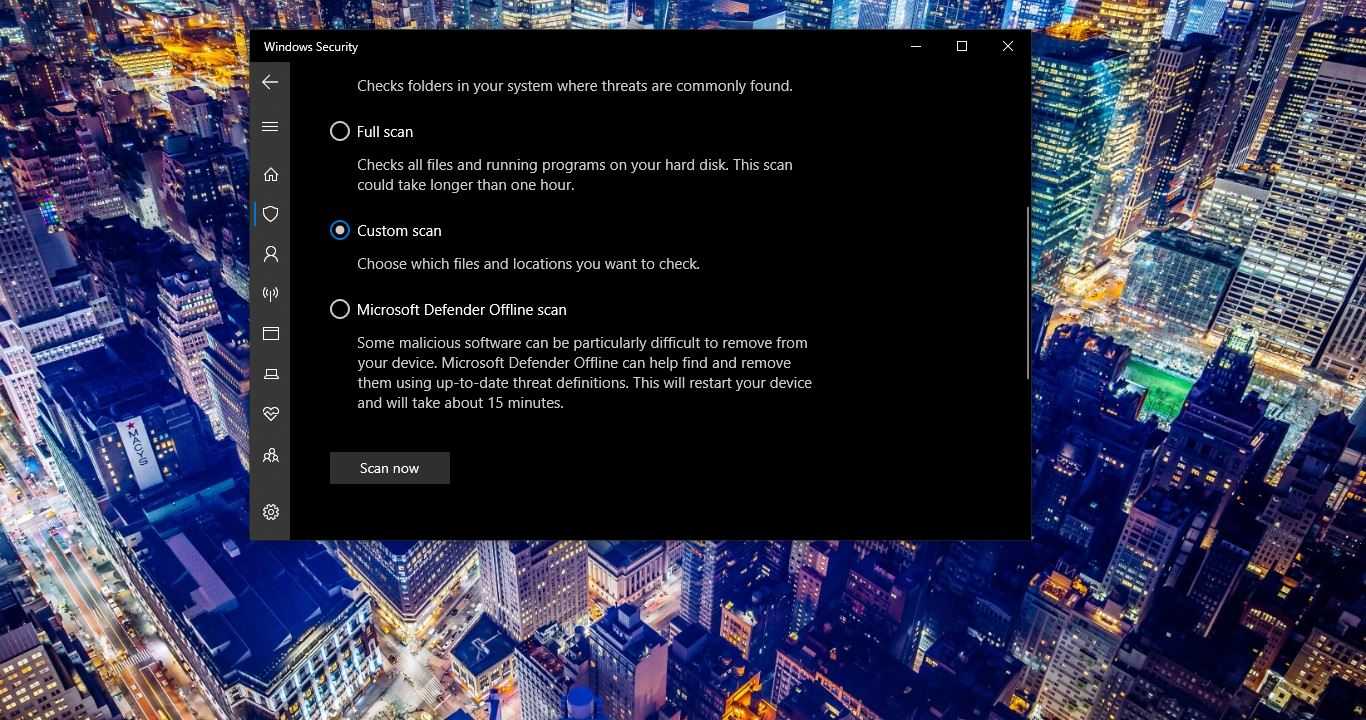
- Virus & threat protection – This feature runs scans, detects threats, and downloads updates to help identify new viruses and malware. On version 1709, this section also offers configuration settings for controlled folder access.
- Account Protection – When you sign in to Windows, the new Account Protection pillar protects your identity. You will be encouraged to set up Windows Fingerprint, Hello Face, or PIN sign-in. If applicable, Account Protection will also notify you if Dynamic Lock has stopped working because your PC’s Bluetooth is inactive.
- Firewall & network protection – In this area, you will be able to manage the Windows Defender Firewall settings. You can also monitor what’s happening with your Internet connections and networks.
- App & browser control – This feature allows you to use Windows Defender SmartScreen, which can protect your computer against potentially dangerous files, sites, apps, and downloads. Moreover, it provides a customizable exploit protection feature.
- Device Security – You can get a better insight into the security features integrated with your Windows computer. You can access this area to manage your PC’s built-in security features. Moreover, you can use it to generate security status reports.
- Device performance & health – Access this page to get reports on your computer’s performance and health. This feature can also help you keep your PC clean and up-to-date with the latest version of your operating system.
- Family options – If you’re a parent, you can use this feature to manage your children’s online experience.
Microsoft antivirus protection

When your PC is protected by Windows Defender Antivirus you are receiving comprehensive protection for your system, files and online activities from viruses, malware, spyware, and other threats. Peace of mind has never been this easy.
- Virus protection and removal
- Malware protection and removal
- Spyware detection and removal
- Boot-time protection
- Real-time protection
- Cloud-based protection
- Network inspection
- FREE automatic updates
Enable Windows Defender Using Windows Settings:
In this method we use windows Settings, Using windows settings we can easily Enable Windows Defender. Open Windows Settings by pressing windows + I Click on Update and Security, From the Right hand pane Click on Windows Security. Once you clicked, from the left hand pane you can see open Windows security. Now you will get the Windows Security Program page. Or You can directly search in the Cortana search bar for Windows defender and click on it. Once the windows defender program open Click on Virus and thread protection from the left hand pane. Under Virus and thread protection settings, click on manage settings. Toggle the switch to On under Real-time protection. Once you Switch On the Real time Protection it Locates and stops malware from installing or running on your device.
How to Enable Windows defender Offline?
Windows Defender Offline is a powerful offline scanning tool that runs from a trusted environment, without starting your operating system. This topic describes using Windows Defender Offline in Windows 10 and Windows 7.
Run Windows Defender Offline if:
- Windows Defender detects rootkits or other highly persistent malware on your PC and alerts you to use Windows Defender Offline. You might see a message saying that malware was found on your device, or a message in Windows Defender that looks like this:

- You suspect your PC has malware that might be hiding on your PC, but your security software doesn’t detect anything. In this case, you can start a Windows Defender Offline scan from Windows Defender Settings. Go to Settings > Update & security > Windows Defender > Select Scan Offline.
- The Windows Defender Offline scan takes about 15 minutes to run, and then your PC will restart.
Where can I find scan results?
To see the Windows Defender Offline scan results:
- Select the Start button, then select Settings > Update & security > Windows Defender.
- On the History tab, select All detected items, then select View details. Any items detected by Windows Defender Offline will be listed as Offline in Detection source.

Using Windows Defender Offline on Windows 7
- Download Windows Defender Offline and create a CD, DVD, or USB flash drive.
- Restart your PC using the Windows Defender Offline media.
- Scan your PC for malicious and other potentially unwanted software.
- Remove any malware that is found from your PC.
Read Also: How to Disable Non-critical notifications from Windows Security?