What is Java Update?
Java Update is a feature that keeps your Windows computer up-to-date with the latest Java releases. When you have auto-update enabled, your system periodically checks for new versions of Java. When a new version is found this tool asks your permission to upgrade your Java installation. This annoying Java Update Keeps Popup by windows Notification, And sometimes Some of the Project related tools work only with the specific version of Java Update, If the Java updated on every month, it will create a problem. So if you are decided to Stop the Java Update, Follow the below mentioned methods.
Stop the Java update Using Control Panel:
- Login local admin Goto–> Control Panel.
- click on the Java control panel.
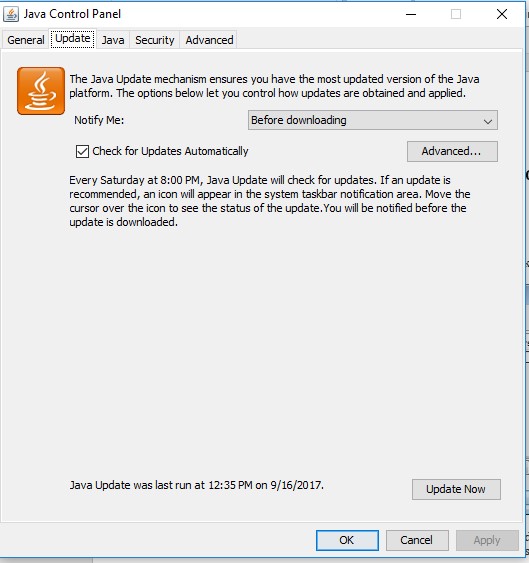
- update Java.
- Verify that the latest Java Runtime version is enabled by checking the Enabled box.
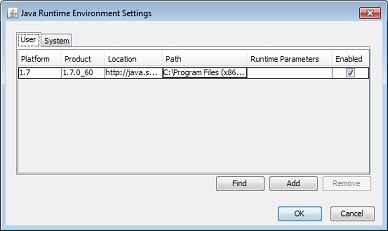
Click View to display the Java Runtime Environment Settings Click OK to save settings Click OK in Java Control Panel window to confirm changes and close the window. Try to run same applet and verify it is now running using latest version of Java installed in your system.
Using Registry Editor:
If the control panel method didn’t work out, follow this registry editor method’s steps to Stop the Java update. Note: Modifying the Registry is risky, and it causes irreversible damage to your OS Installation Follow the steps correctly. Friendly advice Before Modifying Registry Creating Restore Point is recommended.
- The first check are you using 32 bit or 64-bit operating system.
- Open Command Prompt in admin mode, and enter the following command, and hit enter.
wmic os get architecture
- This command will quickly return the OS Architecture.
For 32 bit Version:
- Open the Run command by pressing Windows + R and type Regedit and hit enter, this command will open the registry editor.
Now Navigate to the following Location Computer\HKEY_LOCAL_MACHINE\SOFTWARE\JavaSoft\Java Update\Policy
- From the Left-hand Pane try to find the EnableJavaUpdate Registry Key, Double Click, and Modify the value to 0.
- Give Ok and Restart the PC once to make it effective.
For 64 bit Version:
- Open the Run command by pressing Windows + R and type Regedit and hit enter, this command will open the registry editor.
Now Navigate to the following Location Computer\HKEY_LOCAL_MACHINE\SOFTWARE\WOW6432Node\JavaSoft\Java Update\Policy
- From the Left-hand Pane try to find the EnableJavaUpdate Registry Key, Double Click, and Modify the value to 0.
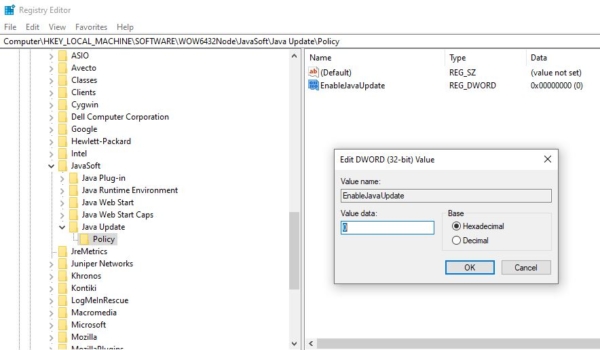
- Give Ok and Restart the PC once to make it effective.
Read Also:
Fix Java Error Code 1618 in Windows 10


