If you are not aware of DISM then this post is the perfect guide. In this post, you will get to know about DISM and How to use DISM in an effective manner. How this DISM is useful for normal PC users?
What is DISM?
DISM or Deployment Image Servicing and Management (DISM.exe) is a command-line tool that can be used to service and prepare Windows images, including those used for Windows PE, Windows Recovery Environment (Windows RE), and Windows Setup. DISM can be used to service a Windows image (.wim) or a virtual hard disk (.vhd or .vhdx). DISM is available through the command line or from Windows PowerShell. We can also use the DISM as a Repair Tool. The utility can be used to repair your Windows PC, for a normal PC user this Tool work as a very good repair tool. On a normal working day if you ever feel your system is slow or if you face any system-related error and you don’t know how to check the entire system you can use this repair tool as your primary tool. you can also use the System File Checker (SFC) command-line utility to check the integrity and replace any corrupted or missing protected system files with a known good version. When SFC is unable to fix the problem, chances are the utility was unable to get the necessary files from the Windows image, which might have become broken. In this situation, you can use DISM to repair the Windows image (.wim), which then it will allow you to use the System File Checker to fix any issue with your Windows 10 installation.
What is the difference between SFC and DISM?
DISM can be used as a system repair tool, DISM repairs the system with the help or a hidden recovery image on your PC, If your PC or laptop don’t have the Recovery image, You can choose the alternate source from WIM image, The System File Checker tool built into Windows can scan your Windows system files for corruption or any other changes. If a file has been modified, it will automatically replace that file with the correct version. If the SFC command doesn’t work, you can use the DISM command on Windows 10 or Windows 8 to repair the underlying Windows system image. Find more about this.
Where to Find this DISM?
DISM comes with Windows 10, in the c:\windows\system32 folder. You can use DISM from a Command prompt running as administrator.
What are the main commands we can use in DISM?
DISM /Online /Cleanup-Image /CheckHealth –>This command can only be used to see if corruption exists, but it doesn’t perform any repairs.
DISM /Online /Cleanup-Image /ScanHealth –>Use the DISM command with the /ScanHealth switch to scan the Windows image for any corruption.
DISM /Online /Cleanup-Image /CheckHealth –>Use this command scan repairs it will do the quick scan.
DISM /Online /Cleanup-Image /RestoreHealth –> This command restore the repairs from the DISM image. Usually it will take more time to complete.
How to Use DISM and SFC?
- Open Command Prompt as administrator by right-clicking Command Prompt and choose Run as administrator.
- Type:
- DISM /Online /Cleanup-Image /RestoreHealth
- Press Enter to run the command.
- Wait for it to perform the scan, it can take about five to ten minutes, sometimes more. And if the progress bar gets stuck on 20 percent, don’t worry, that’s perfectly normal, you just need to be patient.
- After DISM has finished its scan, restart your computer.
In addition, you can try the following method as well.
- Mount your Windows 10 .iso file by double-clicking it.
- Open Command Prompt or PowerShell as administrator.
- Check for system health by running these commands:
- dism /online /cleanup-image /scanhealth
- dism /online /cleanup-image /checkhealth
- dism /online /cleanup-image /restorehealth
- Run this command:
-
- DISM /Online /Cleanup-Image /RestoreHealth /source:WIM:X:\Sources\Install.wim:1 /LimitAccess
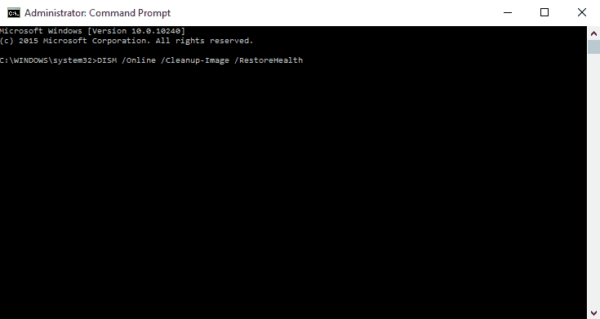
Remember to replace X with the letter drive on which your Windows 10 ISO is mounted. Restart your computer and try SFC again.
In this method, we are taking install.wim from the ISO package so it will restore the health from the fresh image. If still the issue persists re-imaging the system is the final option.
Read Also: How to Fix Windows 10 Automatic Repair Loop?


