When your system Met any boot error with windows 10/8 the OS will automatically invoke automatic repair Mode. Sometimes this method will work most of the time this auto repair won’t work properly which gives an error “automatic repair couldn’t repair your PC”. Here I listed out the top solutions to this issue.
Fix Windows 10 Automatic Repair Loop
In Windows 10 if the Automatic Repair couldn’t repair your PC you may get Two Options Below.
1.ShutDown
2. Advance Options
Now you have to click on advanced options. In the Advanced Options screen, select Command Prompt. Then a new screen will be displayed with an open command prompt. If you are prompted to enter your password, enter your Windows password.
Solution 1: Restore Windows Registry

The Windows Registry is a hierarchical database that contains all of the configurations and settings used by components, services, applications, and Everything in Windows. If any registry Key or Value got corrupted system OS will get Crash Restoring the Registry from the Advance option mostly will fix the issue.
Open the Command Prompt from the Advance Option and copy and paste the below-mentioned Command and Hit Enter.
copy c:\windows\system32\config\RegBack\* c:\windows\system32\config
If prompted to overwrite existing files, type All and hit Enter. Type exit and hit Enter to close the Command Prompt window. Restart your computer. Mostly this Solution will fix the Automatic Repair Loop error.
Solution 2: Disable Automatic Startup Repair to fix Automatic Repair Loop
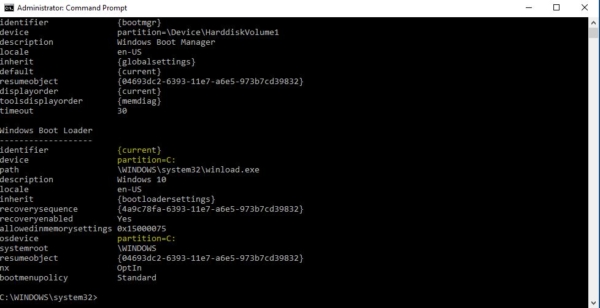
To Disable Automatic Startup repair go to the Command Prompt and Change the Path to c:\Windows\system32 type bcdedit and hit Enter.
Then you will see the result displayed. Look for resumeobject item and note the number next to it (In the below case, the number is 04693dc2-6393-11e7-a6e5-973b7cd39832). Type bcdedit /set GUID recoveryenabled No and hit Enter.

Replace GUID with the number that you noted in last step. (For example, if the number is 04693dc2-6393-11e7-a6e5-973b7cd39832, the full command will be “bcdedit /set 04693dc2-6393-11e7-a6e5-973b7cd39832 recoveryenabled No”) Reboot your PC and Windows should start without any problem. This Solution will fix the Automatic Repair Loop error.
Solution 3: Use Command Prompt from Windows 10 Boot Options menu and Rebuild the BDC, MBR,
Open the command Prompt from the Advance Menu options. When Command Prompt appears, enter the following lines and press Enter after each line in order to run it:
- bootrec.exe /rebuildbcd
- bootrec.exe /fixmbr
- bootrec.exe /fixboot
Once the following command is executed Try to open the command prompt and do the Check disk for all the Drive
- chkdsk /r c:
- chkdsk /r d:
Restart your computer and check if the issue is resolved. This Solution will fix Automatic Repair Loop error.
Solution 4: Disable early launch anti-malware protection
Due to the early launch anti-malware protection option. To disable this option, follow these steps:
- After a few restarts, you should be able to access Boot Menu.
- In the Boot Menu, choose Troubleshoot > Advanced Options >Startup Settings.
- Your computer should now restart and give you a list of options.
- Choose Disable early launch anti-malware protection (it should be an option no. 8).
- Restart your computer, and check if the issue has been resolved.
Solution 6: Check device partition and osdevice partition
Sometimes when your OS device partition Values aren’t correct and this is the cause of the “Windows 10 Automatic Repair couldn’t repair your PC” loop. To fix this issue, follow these steps:
- From Boot Options start Command Prompt.
- Enter the following and press Enter:
- Bcdedit
- Now you can see the OS device partition Letter. In my device the OS partition was D: check it on Your PC and Change the value to the correct Drive. Most of the PC OS Drive was C: So if you see any letter Instead of C Just copy and Paste the below-mentioned command and Hit Enter this will change the OS drive Path.

- bcdedit /set {default} device partition=c:
- bcdedit /set {default} osdevice partition=c:
By default it should be C: but if your Windows 10 is installed on a different partition, make sure that you use that partition’s letter instead of C.
Restart your computer and check if the issue has been resolved.
Solution 7: Run a disk check to fix Automatic Repair Loop

Follow the steps below:
1. Open Command Prompt as an administrator.
2. Type chkdsk /f /r and hit Enter.
You need to wait a while until the process completes.
Solution 8: Run a system file check to fix Automatic Repair Loop

Follow the steps below:
1. Open Command Prompt as an administrator.
2. Type or paste sfc /scannow and hit Enter.
The process will also take some time to complete.
Solution 9: Remove additional USB drives
If you connected any USB devices recently connected to the PC, try to disconnect it and check. unplugging USB drives from your computer may also cause this issue.
Solution 10: Remove Your RAM.
Some users reported due to changing the RAM I am getting this error, so in that case, try to remove the extra RAM which is installed recently and check it.
Solution 11: Change your disk controller mode in BIOS
You can fix Windows 10 Automatic Repair Loop without a disc by entering BIOS and changing a few settings. After you’ve entered BIOS, you need to find your disk controller mode and set it to Standard (IDE, SATA, or Legacy)instead of RAID or AHCI. Save the changes and restart your computer. If the issue persists, try changing the mode again. If the issue still persists, return the disk controller mode to its original value.
Read Also:
How to Repair Windows 11 using ISO file?
How to fix Windows10 Repair problems and issues?


