In Outlook Rules are the way to handle incoming or outgoing messages or emails. Rules allow users to sort, file, mark, move, flag, and respond to email messages automatically. In this article, we will see how to create a rule and manage outlook rules in office 365.
Manage Outlook Rules in Office 365
- Sign in to your office365 Outlook Web App using the URL provided by the person who manages email for your organization. Enter your user name and password, and then click Sign in.
- At the top of the page, choose Outlook, or choose the app launcher and Mail.
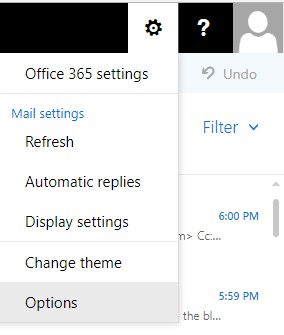
- At the top of the page, go to Settings->Options.
- In Options, select Organize email and go to Inbox rules in Options (or) under MAIL-> automatic processing, select Inbox rules.

Here you can create a new blank office365 outlook rules using the Inbox rules page, choose new. Edit rule
Here you can edit any rule by selecting it and choosing edit to open the rule so that you can change the conditions or actions of the rule. Delete rule
If you have a rule that you no longer want, you can select it and then click delete to remove it. If you just want to turn the rule off for a while, remove the checkmark next to the rule.
What else we need to check in the office365 outlook?
- Sometimes while creating a new rule in Outlook Web App, you may receive a warning that some rules that were created in Outlook and are currently disabled will be deleted. Before you delete those rules, you may want to sign in to your account using Outlook and check the rules to see if you want to keep. Enable any rules you want to keep.
How to create rules from the massage?
- You don’t have to use the Inbox rules tab to create a rule. You can also create rules directly from messages. To create a rule directly from a message.
- Right-click the message in the message list pane, then select Create rule (or) while you view the message in the reading pane, select the extended menu and then select Create rule from the menu.
- Each rule you create will take up space in a hidden section of your mailbox. This section is limited to 64 KB. The actual amount of space a rule uses depends on several factors, such as how long the name is and how many conditions you have applied.
Note:-When you reach the 64 KB limit, you’ll be warned that you can’t create any more rules. If that happens, you’ll have to delete or simplify some of your existing rules before you can create more.
Some ways you can reduce the space used by rules
- Delete rules you no longer need.
- Shorten the names of your rules.
- Combine one or more rules that do the same thing.
- Remove the criteria from rules.
- When you create a forwarding rule, you can add more than one address to forward to. The number of addresses you can forward to may be limited, depending on the settings for your account. If you add more addresses than are allowed, your forwarding rule won’t work. If you create a forwarding rule with more than one address, test it to be sure it works.

