During the launch of Windows 10, Microsoft announced that Windows 10 is free to use and you can download it from the official site. You can download the official version and use it freely for a while with lot of key features and apps missing. It’s like using a trial version of the software. You can install it for free but you need to activate it later. This idea reduced the rampant piracy and cracked versions of Windows that were in circulation. What will happen if I didn’t activate the windows? Windows 10 is free to install and you can use Windows 10 without activation forever. But if you didn’t activate it for the long term, some of the key features will be disabled. Then you will face a lot of limitations while using the unlicensed Windows 10.
- The first thing, you will notice Activate Windows at the lower right corner of the Desktop.
- Windows will keep on send notifications to activate Windows.
- There will be the “Windows isn’t activated, Activate Windows now” message at the windows settings page.
- Windows won’t allow you to change the wallpaper, accent colors, themes, lock screen, and so on. The Personalization option will be greyed out.
- You will miss out some of the apps and features. You will not get Windows Updates if you didn’t activate Windows 10.
But if you are going to use Windows 10 for a while without activation the main and annoying part is the Activate Windows watermark on the Desktop. This article will guide you to Remove Activate Windows Watermark on your computer
Steps to Remove Activate Windows Watermark on Windows 10
Using Registry Editor:
Note: Modifying the Registry is risky, and it causes irreversible damage to your OS Installation Follow the steps correctly. Friendly advice Before Modifying Registry Creating Restore Point is recommended.
Open Run command by pressing Windows + R and type Regedit and hit enter. This command will open the Registry Editor Console.
Now Navigate to the following path.
Computer\HKEY_CURRENT_USER\Control Panel\Desktop
From the Left-hand side click on the Desktop Registry Key and from the right-hand side look for the “PaintDesktopVersion” DWORD. Double click on PaintDesktopVersion DWORD and change the value from 1 to 0.
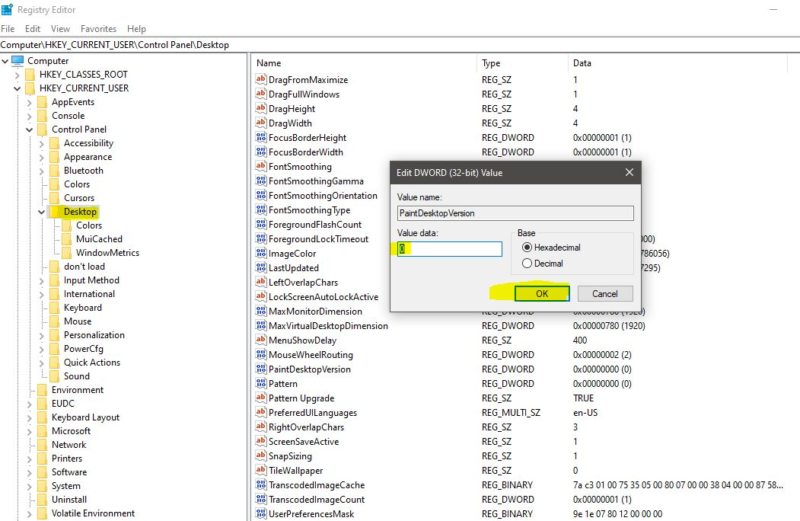
Click on OK and restart the system once.
After the restart, you will notice that the “Activate Windows – Go to settings to activate windows” watermark will be no longer visible.
Using Batch File:
Open Notepad and copy-paste the following code.
@echo off taskkill /F /IM explorer.exe explorer.exe exit
And save it as “Activate Windows.bat” on the Desktop.
Right-click on the Batch file and choose Run as Administrator. After execution restart the system once. Then the watermark will be no longer visible.
Using Third-Party Tools:
There are lot of third-party tools available on the internet to Remove Watermark and to activate Windows 10. Here I listed out few tools to remove the Windows Activation Watermark.
Universal Watermark Disabler:
First Download Universal Watermark Disabler from the Official Site. This tool is a freeware that is used to remove all kinds of watermarks from Windows 10. It is easy to Use.
After the download, Extract the Zip file and Right-click on the software and choose Run as administrator. Then click on the install button.
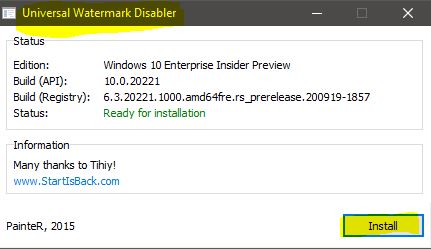
Then click on Yes on the UAC window. After that, your computer will restart automatically and the watermark will disappear.
WaterMark Remover: Download the Watermark Remover from the official site. Follow the instruction as per the site. Restart the system once after the installation. This will remove the Watermark.
Using Ease of Access Settings:
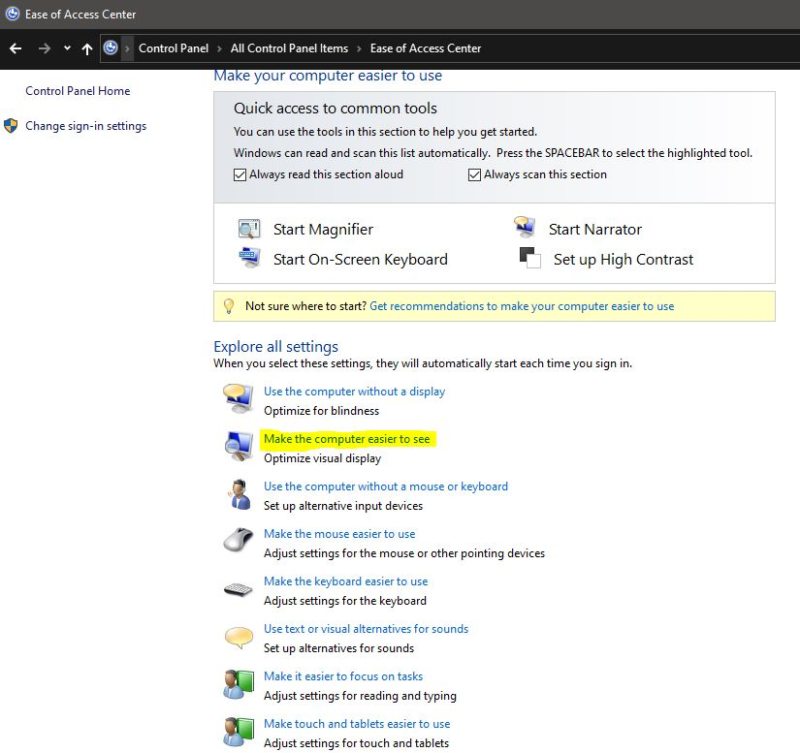
Open Control Panel and click on the Ease of Access Center.
Now Choose the Make the Computer Easier to see option.
Now Under Make things on the screen easier to see, check the Remove background images (Where available).
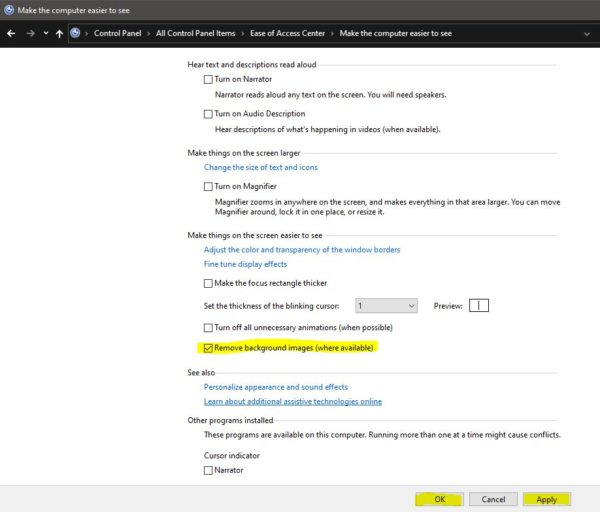
Check that box and click on Apply and OK.
Using Command Prompt:
Open Command Prompt in elevated Mode, and type the following command, and hit enter.
bcdedit -set TESTSIGNING OFF
Then close the Command Prompt and restart the system once.
Read Also:
How to Remove System requirements not met watermark in Windows 11?
How to Hide ‘System Requirements not met’ watermark in Windows 11?


