In windows 10 laptops we can reduce the battery consumption by limiting the processor frequency. Processor frequency means the operating frequency of the CPU’s core(s) in MHz. The higher the frequency is for a CPU, the faster the processor is. You can specify the approximate maximum frequency (in MHz) of your processor from within Windows 10 to limit the frequency if needed.
Why do we need to increase and decrease the Processor frequency?
If your laptop is running out of battery or if you are running a power-hungry application, if you want to save the battery you can use this method. It’s like a power-saving mode. Windows 10 has the option to increase the max processor frequency nowadays these settings are hidden by default and the processor frequency is set to the max by default. If you want to reduce the power consumption of the laptop you can reduce this processor frequency.
Steps to Enable Maximum Processor frequency Option:
- First of all the setting is hidden to enable this setting open run command and type regedit and hit enter.
Then follow the path mentioned bellow HKEY_LOCAL_MACHINE\SYSTEM\CurrentControlSet\Control\Power\PowerSettings\54533251-82be-4824-96c1-47b60b740d00\75b0ae3f-bce0-45a7-8c89-c9611c25e100
- Right click on the 54533251-82be-4824-96c1-47b60b740d00\75b0ae3f-bce0-45a7-8c89-c9611c25e100
- And create a new DWORD and name it as “Attributes”
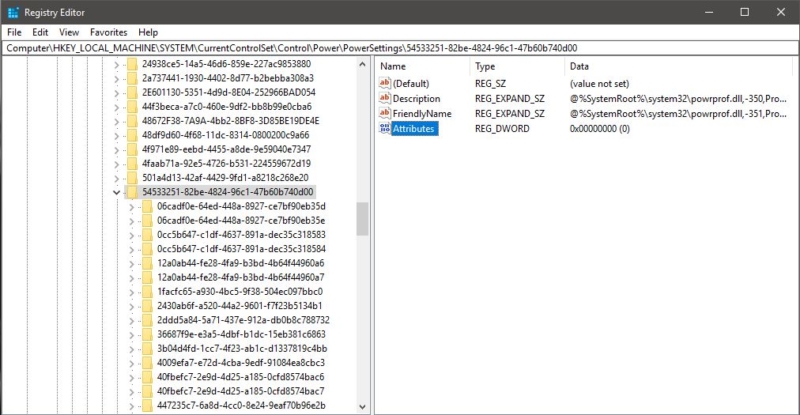
- Give the value mentioned below
1->Remove
2->Enable
- Or Just Download the file here and Run it and restart the machine once.
How to set maximum Processor Frequency in Windows 10?
- To Enable Maximum Processor frequency you must be an administrator.
- Press Windows + R and type control and hit enter, this will open the control panel, or normally go to the control panel. Choose large icons in the category. Search for Power option.
- Click the power option to open. Choose the power plan setting.
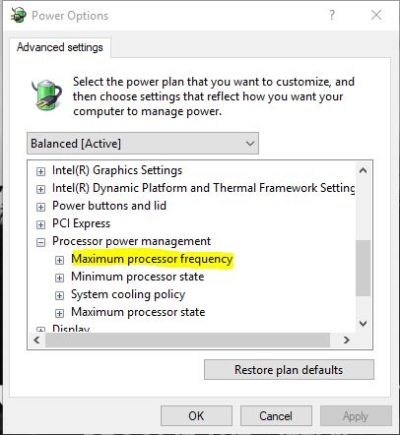
- Select the balanced power setting and click on change the plan setting.
- Click on the advance power plan setting. And search for processor power management and expand it. now you can see the option called Maximum Processor frequency.
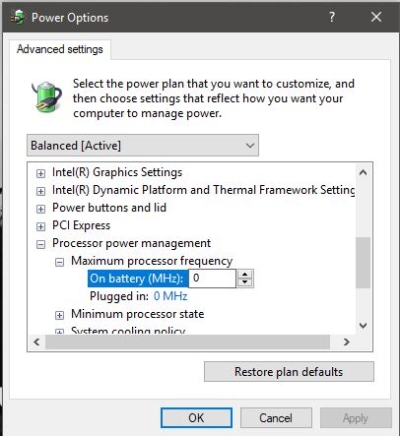
By default, this option is hidden and set to 0 Mhz. 0 means the processor frequency is at the highest rate it’s the maximum frequency. If you want to reduce the processor frequency you can either enter the desired frequency rate of your processor. This will reduce the performance of the processor, due to the low rate processor performance the battery performance will increase. This is suitable only for those who work on typing work and doesn’t want that much processing capacity and also needs the highest battery performance.



Hello, I tried to run the file in stead of naming the values, but the file won’t run. It says I can only import binary register files from the registry-editor. Please help.
I tried to import it from the registry-editor, but it obviously doesnt work as its a .exe file
Hi, I modified the reg file, kindly check and reply back.
Hi, I modified the reg file, kindly check and reply back.
Спасибо за информацию!!!!!