In Windows 11 or Windows 10 you can set Windows Spotlight for the Lock Screen and the Desktop Background, Windows Spotlight is a feature which is introduced in Windows 10, that automatically download picture and advertisement from the Bing search engine and sets as a Desktop or Lock screen wallpaper. This feature automatically changes the wallpaper occasionally. You can see the image on the desktop background, but you can’t save these images directly. This feature doesn’t give the option to save these images to your computer. This article will guide you to save Windows Spotlight Images collection in Windows 11.
What is Windows Spotlight collection?
Windows Spotlight is a feature which is introduced in Windows 10 and got better in Windows 11. Basically, this feature automatically downloads and displays Bing pictures on your lock screen and desktop background. In Windows 11 Insider Preview Build 22518 the spotlight feature has gotten better and has a new feature called Spotlight Collection, this feature changes your desktop background automatically every day. The feature automatically downloads the images from the cloud and then changes the lock screen and the desktop background depending on the personalization settings.
Read More: How to Enable Windows Spotlight Like What You See Option?
Enable Spotlight Collection in Windows 11:
Follow the below-mentioned steps to enable the Spotlight collection feature in Windows 11.
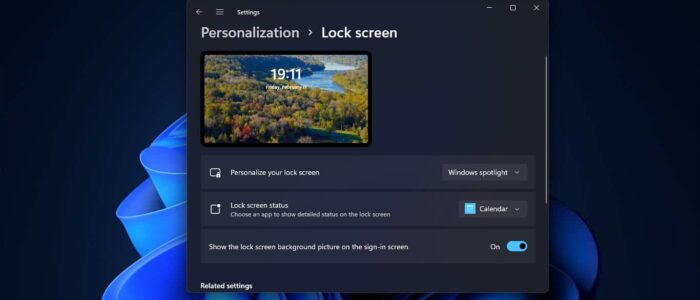
Open Windows Settings by pressing Windows + I and from the left-hand side click on the Personalization option.
Under the Personalization option, you can see the Background and Lockscreen option.

Click on the Personalize Your background/ Lock Screen drop-down menu and choose Spotlight Collection.

Now you can see the awesome wallpaper on your desktop and lock screen, but you can’t save these images locally on your system. There is no direct option to save these images to your system, follow the below-mentioned steps to save the Spotlight collection images.
Where Windows Spotlight Collection images stored in Windows 11?
By default, Windows Spotlight Collection store all the images locally in the following location.
%LocalAppData%\Packages\Microsoft.Windows.ContentDeliveryManager_cw5n1h2txyewy\LocalState\AssetsTo access the location, follow the below-mentioned steps.
Open the Run command by pressing Windows + R and copy-paste the above-mentioned path and hit enter.
Now the file explorer will open the Assets folder, you can see the list of files without any extension these are the spotlight collection images, but those are not in the actual viewable formats like JPG or PNG format.
Note: Windows 11 will store Spotlight images for the lock screen and desktop in the assets folder, Any old spotlight images are automatically deleted after some time. So you can save the current listed images.
Save Windows Spotlight Images in Windows 11:
First, you need to copy all the files from the assets folder, Open the Run command by pressing Windows + R and copy-paste the following path, and hit enter.
%LocalAppData%\Packages\Microsoft.Windows.ContentDeliveryManager_cw5n1h2txyewy\LocalState\AssetsThis will open the assets folder, now copy all the files from the folder, and paste it separately in a new folder.

Open the folder that you have copied all the files, Now you need to rename the file with .JPG or .PNG extension.
Right-click on any file and choose Rename, and name it as example.png or .jpg. and hit enter.

If you want to change all the files at the same time, Open the command prompt in elevated mode and navigate to the folder location where you copied the spotlight images.
Type cd <Folder Location>
Type the following command to rename all the files to .jpg. if you want to save it as PNG then change the extension to .png.
ren *.* *.jpg

That’s it now you can view all the files using the Image Viewer.