CHKDSK is a short form of check disk. It is a Command that displays the report for a volume such as a disk and it corrects any error on that volume. In windows CHKDSK system tool it verifies the file system (NTFS) and fixes the logical file system error. CHKDSK also check the bad sectors in the Hard Disk. CHKDSK utility can be found in all windows versions, such as Windows XP/7/8/10 and DOS. Even you can run this command from the windows installation or repair Disk. But sometimes while Running CHKDSK you may receive Can’t open volume for direct access Error. In this article, we are going to see what causes this error and how to fix Can’t open volume for direct access error.
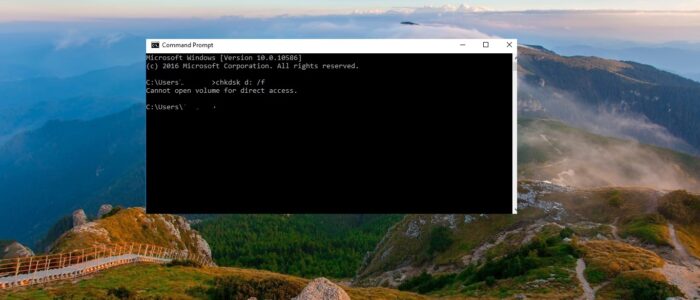
Can’t open volume for direct access:
If you are not able to run the check disk operation on a certain volume or partition on your computer then this article will guide you to fix it. And the cause for this issue is an almost dead disk, which cannot open a volume for direct access via USB. Any antivirus may block the system process due to this you may receive this error.
Run the CHKDSK scan in Clean Boot Mode:
If you are not able to run the chkdsk scan in normal mode, then something could block the system process. So it’s better to run the scan in clean boot mode. Clean boot is the process of Booting a computer system with only the most essential files and services required by the operating system.
- Press the “Windows + R” key to open a Run box.
- Type MSConfig and click OK.
- On the General tab, click Selective startup.
- Clear the Load startup items checkbox.
- Click the Services
- Select the Hide all Microsoft services checkbox (at the bottom).
- Click Disable all.
- Click the Startup
- Click Open Task Manager.
- On the Startup tab, right-click each enabled startup item and select Disable.
- Click OK.
- Click Restart.


Disable Antivirus and Firewall:
If you are using any antivirus, disable it once and check, follow the instructions as per your antivirus guidelines. If you are using windows 10 default built-in Windows Defender Antivirus. Then follow the below-mentioned steps to disable the Real-time protection.
Open Start and search for Windows Security and Click on Windows Security.
From the Left-hand side click on Virus & threat protection.
Under Virus & threat protection settings from the right-hand side click on the Manage settings. Turn Off the Real-time Protection toggle switch to disable Windows Defender temporarily.

If you are using any third-party antivirus then you can stop the antivirus service. This will disable the antivirus.
Open Run command by pressing Windows + R and type services.msc and hit enter.
In Services Management Console find the list of services that is associate with your Antivirus. Stop all the services that are related to Antivirus.
Right-click on that Particular service and choose Properties.
And under the General tab, set the startup type to Disable.

Click on OK and Restart the system once. Once the system boots run the chkdsk scan and check. Follow the next method.
Run the CHKDSK Scan:
- Press Windows + X to open WinX Menu.
- Click on the Command prompt admin in the WinX Menu.
OR
- Run the command prompt as an administrator.
- Type the following command to run the CHKDSK utility.
Chkdsk X: /B  Note: Mention the problematic Drive letter in the place of X This command will scan the problematic Drive for bad sectors and other issues and it will repair the drive automatically. It will take some time depends on the size of the Volume.
Format the Drive:
If the above-mentioned methods doesn’t work then formatting will be the final option. Note: Before proceeding with this method, first make sure if you have any important data on the drive. If you have data try to move it to somewhere or try all other options and get to this finally.
- Go to Windows Explorer by pressing Windows + E
- And right-click on the problematic Drive.
- Choose the format
- Now click on Start.

After Formatting the Drive you can run the chkdsk command on that particular drive.