System Restore is a Windows utility, that allows users to restore their computer data to a specific former state (known as a restore point), undoing changes made since that time. The user’s personal data saved since that time (such as new files, new e-mail messages, and changes to documents) remains intact, but system changes are undone. System Restore periodically creates automatic restore points, called “system checkpoints” that protect data from unexpected problems. The utility also allows the user to create manual restore points before making any significant changes to the system, such as installing new programs or making changes to the registry. So, if you are installing or uninstalling any updates or program, your system will automatically create a system checkpoint using System Restore Utility. Restore points or checkpoints are saved in the hidden protected OS system volume Information folder in the root directory. If you want to view the system checkpoints then you need to make few configuration changes from the Admin account. This article will guide you to View System Restore Points using PowerShell\CMD in Windows 10.
View System Restore Points using PowerShell\CMD:
To View Stored System Restore Points in Windows 10, you can use the following three easy methods. Let’s see the methods in detail.
Using System Restore Utility:
This is a very straightforward method, using the Restore Point utility you can easily view the system checkpoints.
Open Run command by pressing Windows + R and type rstrui command and hit enter. This command will open the System Restore utility.
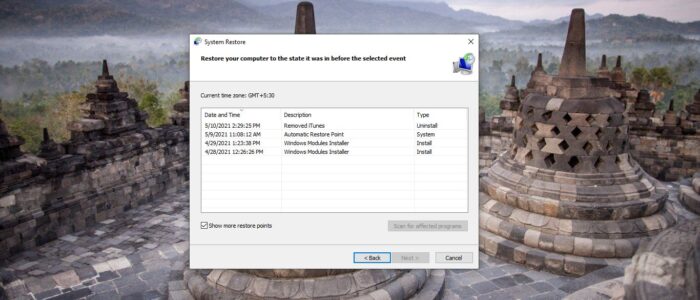
On the System Restore Wizard just click on Next.
Next window will list all the stored restore points with a Date and Time created, Description, and Type of restore points for each.
To view more restore points, check the Show more restore points.

Choose any checkpoints which you want to restore, and click on Next.
Using Command Prompt:
Open Command Prompt in elevated mode and change the drive letter where the actual restore point is stored. Usually, it’s in C drive so just type (C:) to point the command prompt to C drive.
Next type the following commands to View the Restore Points.
To View all available, restore points for all drives and partitions then run the following command.
vssadmin list shadows
If you want to view all restore points for specific partitions or drive then type the following command.
vssadmin list shadows /For=<drive letter>:
To export all the checkpoints to a text file then type the following command.
vssadmin list shadows >"%userprofile%\Desktop\Restore Points.txt"change the location as per your wish to save it on any other specific location.
vssadmin list shadows /For=<drive letter>: >"%userprofile%\Desktop\Restore Points.txt"
This command will save the list on the desktop for restore points of specific partitions or drive.
View System Restore Points using PowerShell:
Open PowerShell in elevated mode and type the following command to view Restore points.
To View all available, restore points for all drives and partitions then run the following command.
Get-ComputerRestorePoint | Format-Table -AutoSize

If you want more details on each restore point, then type the following command.
Get-ComputerRestorePoint | Format-List
To export the detailed list, type the following command, change the location if you want.
Get-ComputerRestorePoint | Format-List | Out-File -filepath "$Env:userprofile\Desktop\Restore Points.txt"
If you want to export less detailed restore point list, then use the following command, change the location if you want.
Get-ComputerRestorePoint | Format-Table -AutoSize | Out-File -filepath "$Env:userprofile\Desktop\Restore Points.txt"
Close the PowerShell, once you done.
Read Also:
How to Delete all Restore Points using cmd in Windows 11?