The narrator is a free screen reader Windows utility, that is included with all the versions of Microsoft Windows. It Provides audio feedback about everything that is displayed on your PC’s screen. It can read dialog boxes and windows controls in most Windows applications. You can turn on Windows Narrator by pressing Windows + Ctrl + Enter keyboard shortcut. The narrator is very useful to the user those have visual impairments. But for other users, this tool is very annoying. In Windows 10 you can easily customize Narrator options, you can change its keyboard shortcuts, Personalize Narrator’s voice, speaking rate, pitch, volume, and other settings. This article will guide you to Change Narrator Default Audio Output in Windows 10.
Change Narrator Default Audio Output:
By default, Narrator will automatically choose the system default audio device, Follow the recommended methods to change the default Narrator audio output.
Using Windows Settings:
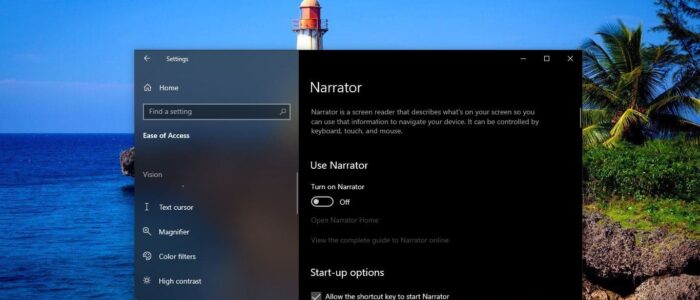
Open Windows Settings by Pressing Windows + I and click on Ease of Access.
From the Left-hand side click on the Narrator and from the right-hand side under Use Narrator, Turn on the toggle button to Turn on Narrator.
Next under Personalize Narrator’s voice, scroll down and look for the option select where you hear Narrator’s voice.
Click on the Drop-down menu and choose your Audio output device, if you are using a headset then choose to headset.

If you are using single audio device then you are not able to choose different device using this option.
Using Registry Editor:
Note: Modifying the Registry is risky, and it causes irreversible damage to your OS Installation Follow the steps correctly. Friendly advice Before Modifying Registry Creating Restore Point is recommended.
Open the Run command by pressing Windows + R and type Regedit and hit enter. This command will open Registry Editor Console.
Now Navigate to the following path.
Computer\HKEY_CURRENT_USER\SOFTWARE\Microsoft\Narrator\NoRoam
From the left-hand side click on the NoRoam registry key and from the right-hand side modify the two string values.
DesiredAudioChannel
DisplayedAudioChannel
You can get the string values from the specific audio device properties. Go to Device manager and expand the Sound and Video game controllers. And right-click on the audio device and choose Properties.
And Under Properties, click on the Events tab and copy the Class Guid and paste it in the string value after the following text.
{0.0.0.00000000}.GUID

Click on Ok and Close the Registry Editor.