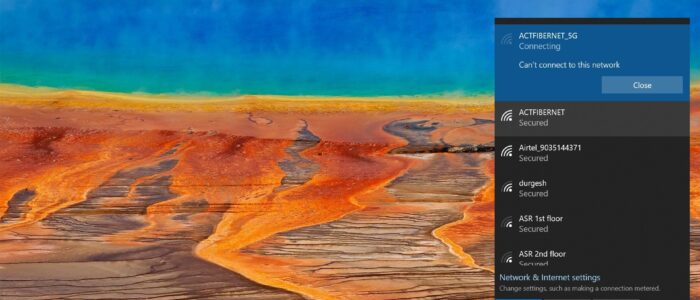
Can’t connect to this network is the common error in Windows 10, Mostly this issues occurs while connected to Wi-Fi network, This error clearly states that you are not able to connect to the network, there is no particular description or root cause for this error, but don’t worry there are few basic network troubleshooting that can fix this issue. Once you receive this error first check that you are not able to access any of your work-related sites or the entire internet. Open any browser and check you are able to access google.com to confirm that. Then make sure you are not connected to VPN or check if there is any proxy is enabled. If you are no idea about anything then just follow the solutions one by one, this article will guide to Fix can’t connect to this network error on Windows 10.
Table of Contents
- Restart your Computer
- Restart your Wi-Fi Router
- Connectivity Checking
- Forget and Add your Wi-Fi Network
- Reset Network Adapter
- Run Windows 10 Network troubleshooter
- Check Network Drivers
- Disable IPv6
- Check IPv4 Properties
- Change the Wireless connection Mode
- Use Command Prompt to fix the issue
- Check Proxy
- Reset Wi-Fi Router
These are the basic network troubleshooting solutions, follow these solutions one by one. Let’s see it in detail
Restart your Computer
Once you got this error first step is to Restarting your computer, you may think this solution little odd but restarting have lot of benefits like flushes RAM, speeds up performance, Stops Memory leaks, Bug fixes and Fixes Internet Connection. So restart your computer first and then proceed to the next solution.
Restart your Wi-Fi Router
Wi-Fi Router or Wi-Fi Modem is an electronic device, like other electronic devices Wi-Fi router is not build to run constantly, if it run for a long time day and night without any break it may lose its performance and sometime it may cause network issues, Rebooting your modem can fix Internet connection problems, improve slow moving connections and resolve wireless issues, also when your modem is on all day, every day, it is slowly desynchronizing from the Internet Service Provider (ISP). This desynchronization causes the packets you are sending and receiving to become corrupt, requiring them to be resentful, and thus, lowering your speed. So Unplug the Power Cable from the Wi-Fi Router and wait for a minute and connect it back, make sure all the lights are blinking.
Connectivity Checking
So the next step of troubleshooting is that to check the connectivity, in-network troubleshooting this is the very crucial part, once you receive this error take any other devices like laptop, mobile or computer then connect to the same Wi-Fi network and check the internet connectivity. If you are getting the same error then the issue is with the router only follow the last solution or contact your Network Operator, if you are not getting any error on that device then proceed to the further solution.
Forget and Add your Wi-Fi Network
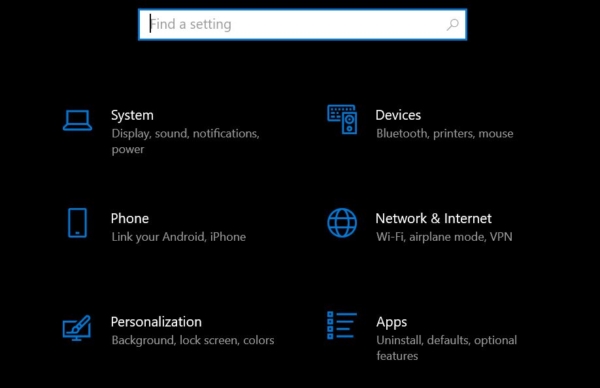
If you are using windows 10 laptop then go to the Windows settings by pressing Windows + I. Then click on the Network & Internet
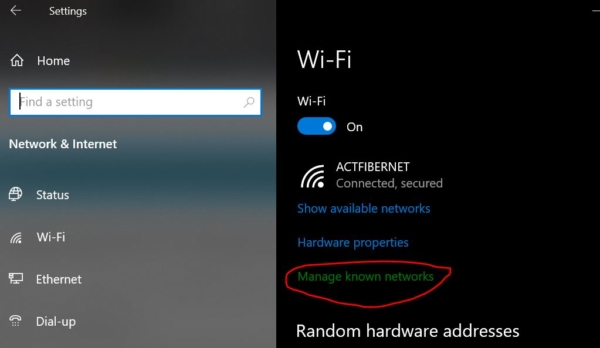
Next click on the Wi-Fi tab and click on Mange Known Networks
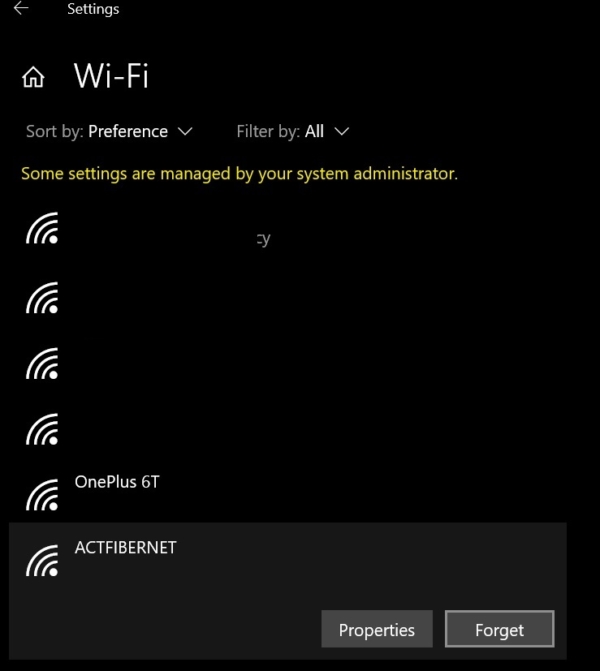
Choose the Network name that you are trying to connect to Then click on the Forget button.
Once the Network is forgotten then click on the Wi-Fi icon on the system tray and choose the network to connect back. If you are still facing the issue proceed to the next solution.
Reset Network Adapter
Network Adapter is an electronic device that is connected or integrated to a computer or laptop that allows to connect to the network from the wireless or wired routers. Restarting the computer sometimes won’t restart the network adapters so we have to reset them manually. In windows 10 we can check the list of network adapters and reset them,
Open windows settings by pressing windows + I and click on the Network & Internet.
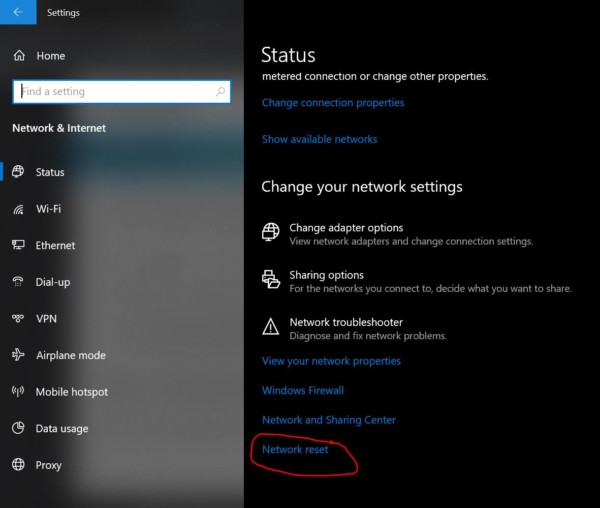
From the left-hand side click on the Status and now choose the Network reset.
Under Network reset click on Reset now, this will remove then reinstall all your network adapters, and set other networking components back to their original settings.
Run Windows 10 Network troubleshooter
Windows Troubleshooter is a wonderful tool that comes with all the versions of Windows 10, it helps users to troubleshoot various windows components. Under troubleshoot you can see a lot of windows components like audio, Printer, windows update, Bluetooth, keyboard, Power, etc. in that the Network adapter is one of the windows components. Using troubleshooter it’s very easy to troubleshoot.
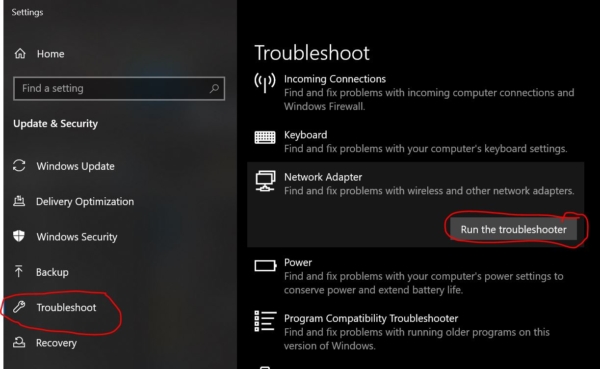
Open windows settings by pressing Windows + I and click on Update and Security, Next click on Troubleshoot. Under Troubleshoot click on the Network Adapter and Run the Troubleshooter.
Once you start the Troubleshooting then it will find and fix problems with wireless and other Network adapters.
Check Network Drivers
If you are facing can’t connect to this network error then there might be the chance of network driver issue, or sometimes if the network driver won’t update automatically so it often causes network issue.
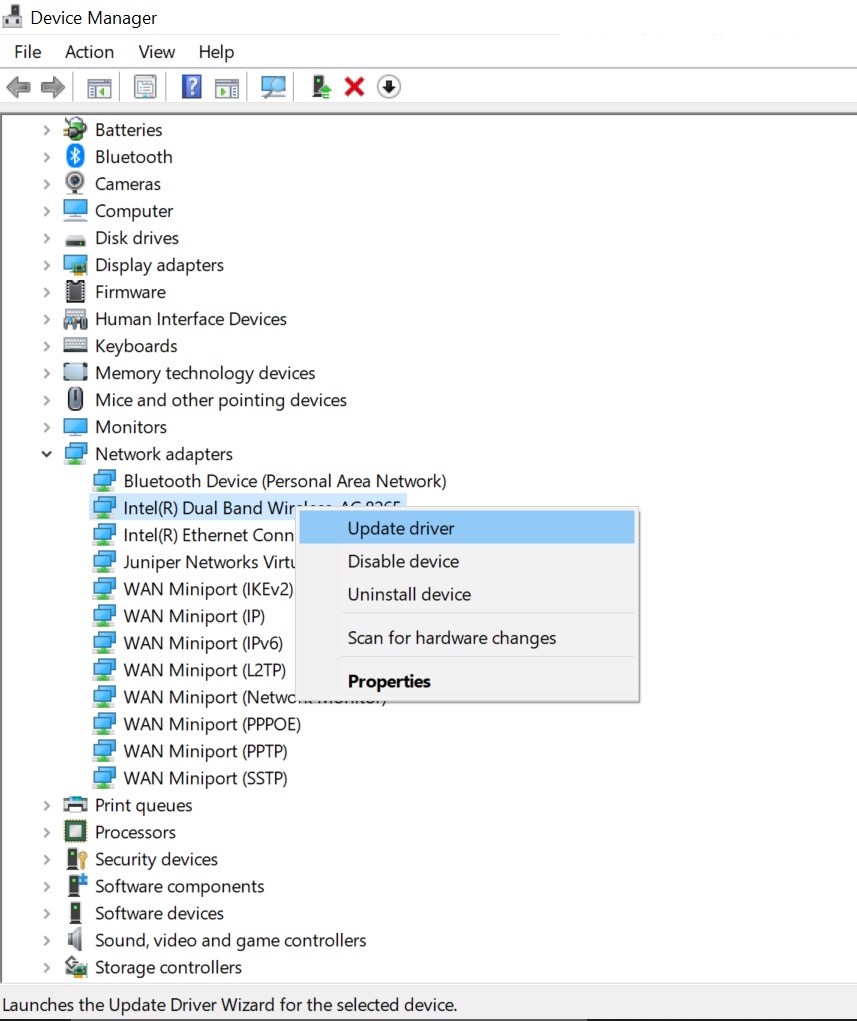
Open Run command by pressing Windows + R and type Devmgmt.msc this will open the device manager.
Look for Network adapters and expand it, Update all the network adapters.
Also, reinstall the Wi-Fi network adapter. Mostly this will fix the issue if not follow the next solution.
Disable IPv6
IPv6 or Internet Protocol Version 6 is the latest version of internet protocol, IPv6 use 128-bit addressing support and IPv6 protocol can handle packets more efficiently, improve performance and increase security. It enables internet service providers to reduce the size of their routing tables by making them more hierarchical. Some organizations moved to IPv6 still most of the old sites and companies are still in IPv4, so if you are facing this issue then you can disable the IPv6 in Wi-Fi properties and check.
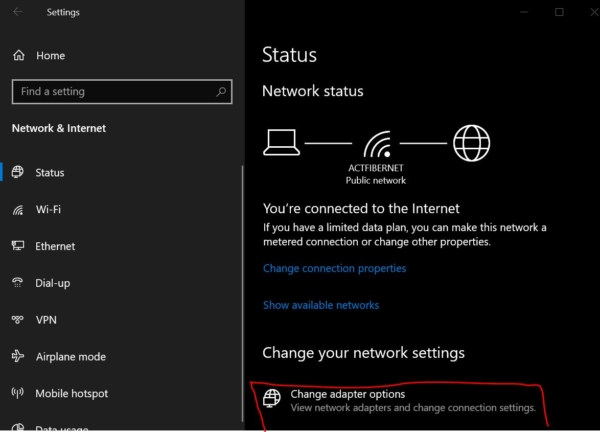
Open Windows Settings by pressing Windows + I and click on Network & Internet. click on status.
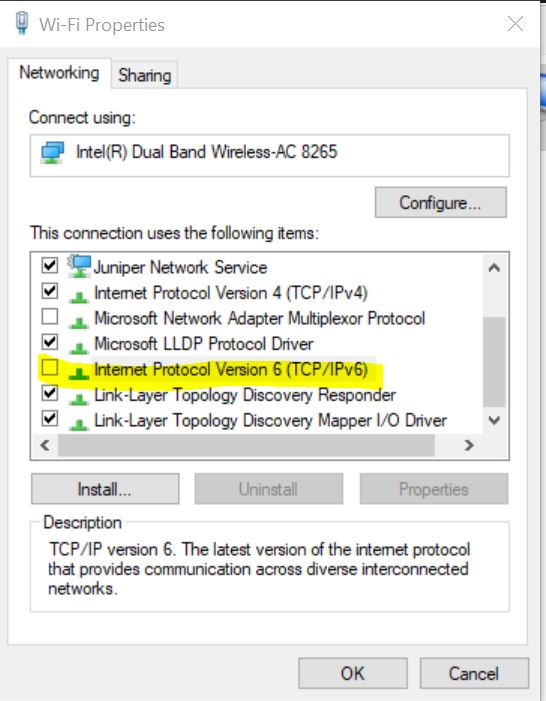
Open Change adapter options then Right-click on the Wi-Fi adapter and choose Properties.
Uncheck the Internet Protocol Version 6(TCP/IPv6) and click ok.
Check IPv4 Properties
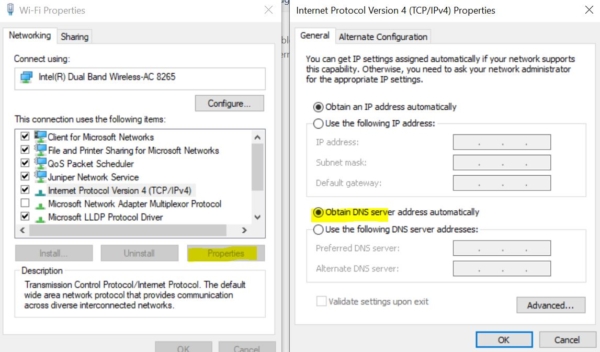
Check whether any static IP or DNS is set in Wireless network adapter properties.
Open Windows Settings by pressing Windows + I and click on Network & Internet. Under status click on change adapter options,
Right-click on the Wi-Fi adapter and choose properties.
In Ethernet properties under the networking, tab click on the Internet Protocol Version 4 and choose properties.
In General tab check any entries for DNS or IP address. If any remove the entries and give Ok.
Change the Wireless connection Mode
Check both your Wireless router and windows wireless adapter are in same connection mode if you want to change the wireless connection mode in windows 10 then follow the steps below.
From the Taskbar right-click on the network icon and choose Network and Sharing Center.
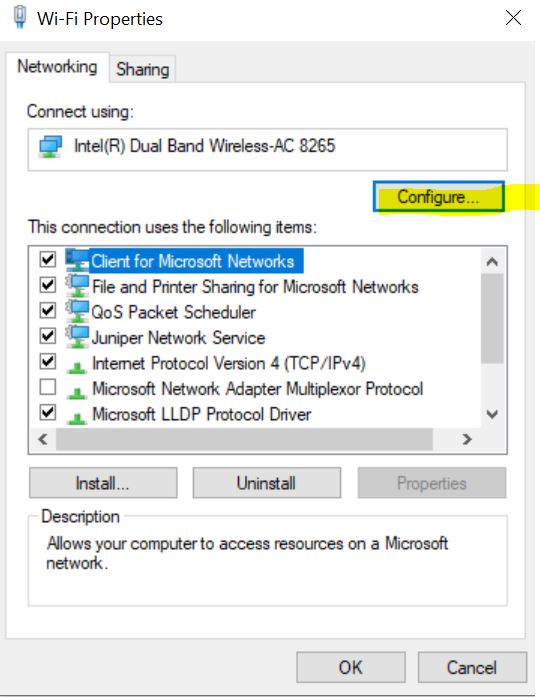
Click on change adapter settings and choose your wireless network adapter. Right-click on Wireless Network adapter and choose properties, click on Configure.
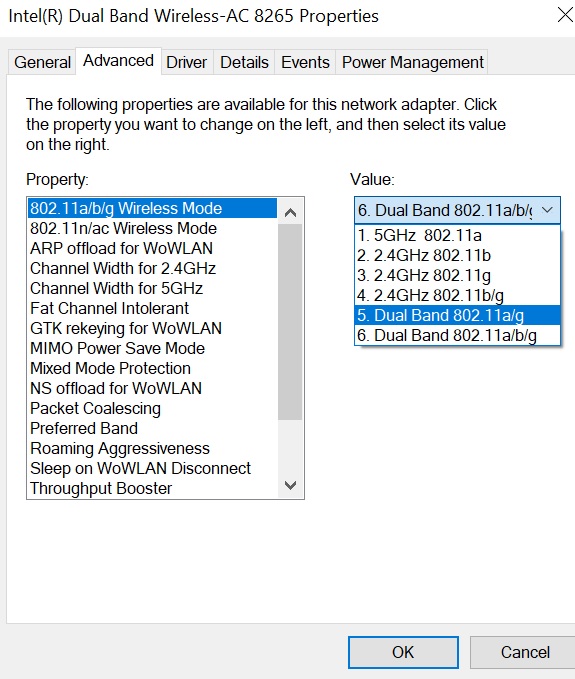
Go to Advanced tab and from the list select Wireless mode
Now change the value of Wireless mode so it matches the value of Wireless mode on your router. In most cases 802.11b (or 802.11g) should work, but if it doesn’t, try experimenting with different options.
Use Command Prompt to fix the issue
Command prompt helps us to fix many windows and network-related issues, Open the command prompt in administrative mode and run the following commands, mostly this will fix the issue.
- netsh winsock reset
- netsh int ip reset
- ipconfig /release
- ipconfig /renew
- ipconfig /flushdns
Check Proxy
Sometimes if there is any proxy servers choose automatically by VPN, if you are using a proxy server, internet traffic flows through the proxy server on its way to the address you requested. The request then comes back through that same proxy server (there are exceptions to this rule), and then the proxy server forwards the data received from the website to you. Sometimes the Proxy server blocks the internet.
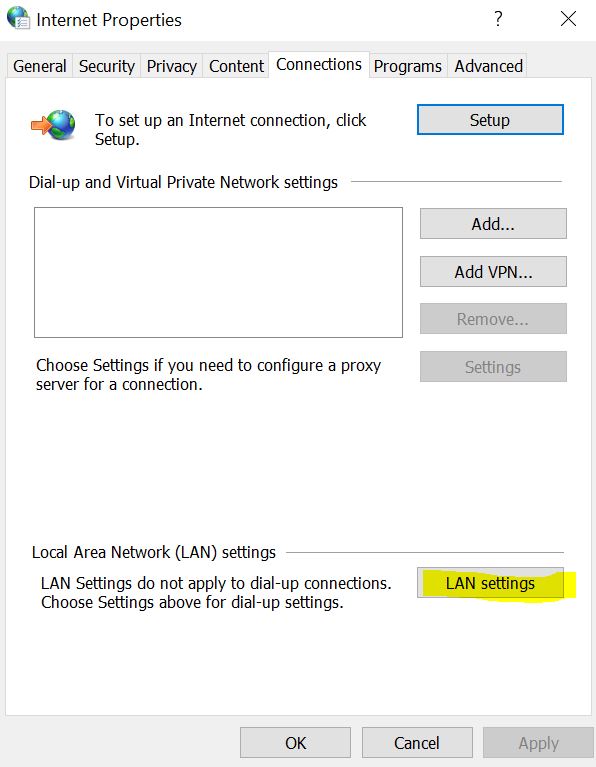
Open Internet Option, click on the connection tab. In connections tab click on LAN settings.
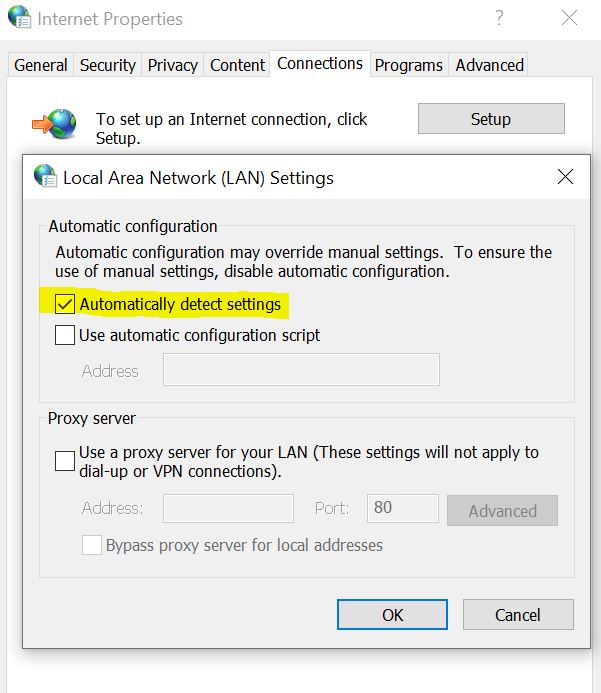
Under LAN Settings, uncheck Use automatic configuration script, and check Automatically detect settings.
Click on Ok and restart the system and check for can’t connect to this network issue.
Reset Wi-Fi Router
According to many users reported, reset their routers help them fix can’t connect to this network error. Thus make sure to reset your router to try to fix the error. You can use the reset button on your router or unplug and reconnect your router to reset it.

