In Windows environment, a user profile is a record of user-specific data that defines the user’s working environment. The record can include display settings, application settings, and network connections. And also, Windows 10 include a user profile folder in the OS partition drive, and this folder contains files and folders, like Desktop, Documents, Favorites, Downloads, Searches, Pictures, and more. By default, this folder is located at C:\Users\<username>. You can access this folder using file explorer or by using the run command but this article will guide you to access this folder using the Navigation pane by adding the user profile folder to the Navigation pane.
Add User Profile folder to Navigation Pane:
You can add the user profile folder to the File Explorer using Registry editor.
Using Registry Editor:
Note: Modifying the Registry is risky, and it causes irreversible damage to your OS Installation Follow the steps correctly. Friendly advice Before Modifying Registry Creating Restore Point is recommended.
Open Run command by pressing Windows + R and type Regedit and hit enter. This command will open Registry Editor.
Now navigate to the following path.
HKEY_CURRENT_USER\SOFTWARE\Classes\CLSID
From the right-hand side, right-click on the CLSID and choose New > Key and name it as mentioned below.

{59031a47-3f72-44a7-89c5-5595fe6b30ee}
If you want a different CLSID name, then you can generate CLSID online from the link.
Next right click on the newly created registry key and choose New > DWORD (32-bit) Value and name it as System.IsPinnedToNameSpaceTree.
Now Double click on the System.IsPinnedToNameSpaceTree DWORD and modify the value to 1 and click on OK.

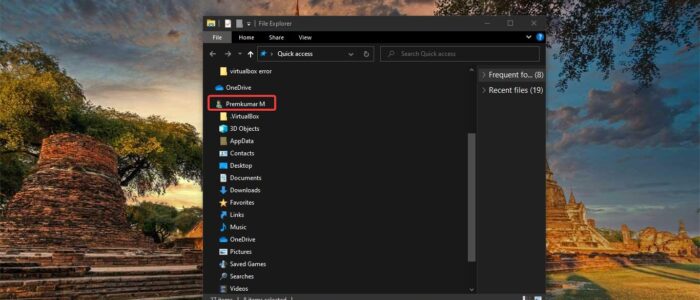
Now close the Registry Editor and restart the file explorer once, now you can see the user profile folder in the Navigation panel.
To Remove the User Profile folder from the Navigation Panel just follow the below-mentioned steps.
Open Registry editor and navigate to the following path.
Computer\HKEY_CURRENT_USER\SOFTWARE\Classes\CLSID\{59031a47-3f72-44a7-89c5-5595fe6b30ee}
And from the right-hand side double click on the System.IsPinnedToNameSpaceTree DWORD and modify the value to 0 and click on OK.
Restart the file explorer once.
Read Also:
How to Change User Profile Folder Name in Windows 11/10?