In Windows Password Protected Sharing is a Windows feature that allows you to protect shared files and folders on a network with a password. Once you enabled this feature, when you share files or folders on a network, it enabled other users on the same network to access those resources, with password protection. You need a particular system username and password before accessing the shared content. In Windows 11/10 by default Password protected sharing is enabled, this article will guide you to disable Password Protected Sharing in Windows 11/10.
Disable Password Protected Sharing in Windows 11/10:
As I mentioned before Password Protected Sharing is enabled by default in Windows, follow the below-mentioned methods to Disable Password Protected Sharing in Windows 11/10.
Method 1: Using Windows Settings
Open Windows settings by pressing Windows + I and from the left-hand side click on Network & internet and from the right-hand side click on Advanced network settings.

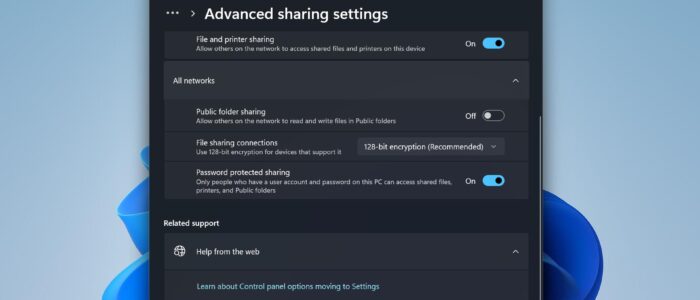
Under More settings click on Advanced sharing settings.

Under Advanced sharing settings, expand All networks and turn off the Password protected sharing toggle button.

This will disable the Password Protected sharing, now you can access the PC without username and password.
Note: If you are using Windows 10, then you can access the Network and sharing center on the Control panel, on Windows 11 these settings were moved to Windows Settings.
Method 2: Using Registry Editor
Open Run command by pressing Windows + R and type regedit and hit enter, this command will open the Registry Editor console.
Now navigate to the following registry path.
HKEY_LOCAL_MACHINE\SYSTEM\CurrentControlSet\Control\LsaFrom the left-hand side click on Lsa and from the right-hand side look for the DWORD named everyoneincludesanonymous, double click on the DWORD and modify the value data from 0 to 1, and click on OK.

Next, proceed to the following registry path.
HKEY_LOCAL_MACHINE\SYSTEM\CurrentControlSet\Services\LanmanServer\ParametersFrom the left-hand side click on Parameters registry key and from the right-hand side look for the DWORD named RestrictNullSessAccess, double-click on it and modify the value data from 1 to 0, and click on OK.

Close the registry editor and restart the system once.
To make the following methods to work, make sure you have set your user account password not to expire. Follow the below-mentioned steps to disable the password expiry.
Open Run command and type lusrmgr.msc and hit enter, this will open the Local Users and Groups. Double-click on the Users.
And right click on your user account and choose Properties.
Under User Properties, click on the General tab and check the Password never expires option. This will disable the Password expiry.
Do the same for Guest user account, check the Password never expires option.
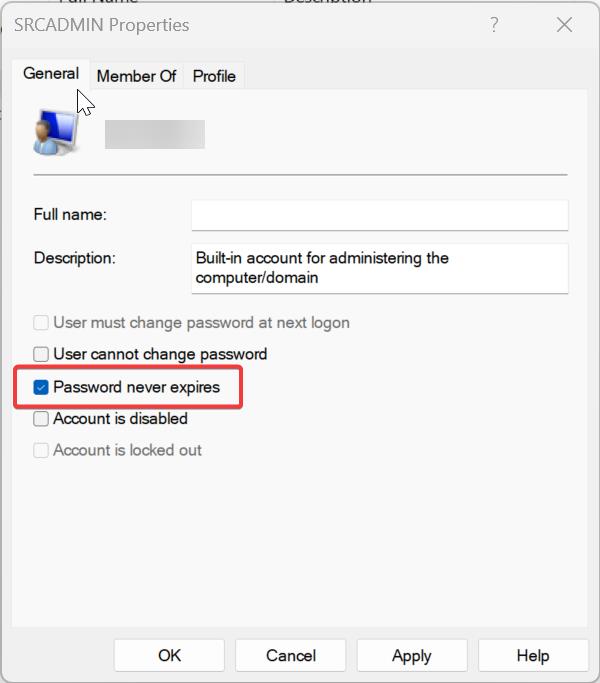
Click on Apply and OK.
Read Also:
Internet Connection Sharing Not Working in Windows 10
Enable Clipboard Sharing with Sandbox in Windows 11
How to Find the Last Password Change using CMD in Windows 11?