In Microsoft Outlook, read receipt is a feature that allows the sender of an email to be notified when the recipient opens and reads the message. When you enable read receipts for an email you’re sending, Outlook will track and notify you of the read status. Basically, it works by Enabling Read receipts, this read receipt feature is available in Outlook app, by composing an email just select the “Request a Read Receipt” option. Once you sent an email with Read Receipt request, next you’ll receive the Recipient confirmation. When the recipient opens the email and allows read receipts, Outlook will automatically send a notification back to the sender, indicating that the email has been opened and read. This process will work fine when Receipt settings is enabled on both sides, because some email clients or users might have disabled the read receipt settings. Next, you’ll get a receipt notification, when the recipient agrees to send a read receipt, the send will receive a notification informing then the email was opened and read. The final process, Read receipt confirmation, when the recipient opens the email, they might see a prompt asking if they want to send a read receipt. The recipient can choose to allow or deny the read-receipt request. Read receipts is not supported by all email clients or there may be subjected to various settings or limitations. And by default, read receipts is disabled in most of the email clients, this article will guide you to enable Read Receipts for mail in Outlook.
Enable Read Receipts for Mail in Outlook:
Follow the below-mentioned steps to enable read receipts on Microsoft Outlook.
Enable Read Receipts in Outlook online:
First, Open any Web browser and log in to your Microsoft account, Go to office.com and choose Outlook.
Once you launch Outlook online version, click on the Settings icon from the top right corner.
Under Settings go to Mail > Message handling > Read receipts, under Read receipts choose Always send a response option.

Next, click on Save.
That’s it, now you can get read receipts and determine whether the recipient has opened your email or not.
Enable Read receipts in Outlook app:
If you installed Outlook app on any Windows or Mac PC then you can request read receipts in Outlook for a single mail.
Launch the Outlook app on your Windows or Mac and click on Compose a new Mail.
Under the New Mail window, click on the “Options” tab, click on the three dots options, and choose Request a Read Receipt checkbox.

Then compose a new mail and send the message.
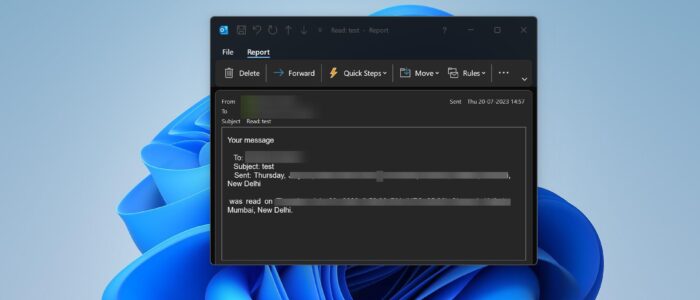
Now, every time the recipient opens the sent email, you’ll receive an automatic reply.
Request Read Receipts for All Sent Emails in Outlook app:
By changing a simple setting you can request read receipts for each mail you send in Outlook on Windows or Mac. Follow the below-mentioned steps enable Read Receipts for all messages.
Launch Outlook, and click on File > Options. Under Outlook options click on the Mail tab.
From the right-hand side under the Tracking section, locate For all message sent, request section, and check the following option.
Read receipt confirming the recipient viewed the message, and then click on OK.

That’s it now, you’ll get a read receipt for every email you send.
Read Also:
How to Enable or Disable Read Receipts in Microsoft Teams?
Enable Dark Mode in new Outlook app on Windows 11
How to Enable Delivery Receipt in Outlook new?