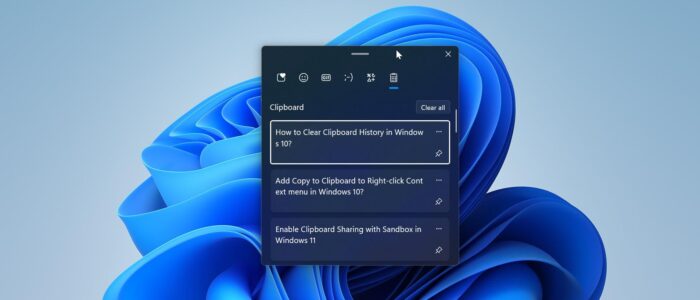
Generally, a Clipboard is a section of RAM where your computer stores the copied data. This data can be images, files, folders, text, or any other type of data. This data will be stored in a place called a clipboard whenever you use the copy command. Data from the clipboard can be pasted into any document or program using the paste command. In Windows 10 you can copy-paste only one Piece of content like text and images for a long time. Also, you can’t view what text or images you copied. To overcome these limitations Microsoft introduced a new feature called Clipboard starting with October 2018 Update. Using the Clipboard feature you can track the text and images that you copy. When you copy or cut any item like text or images in Windows it’s copied to the clipboard to paste. Most of the users use Ctrl + C to copy any data, and this data will be stored in the clipboard immediately. This new and improved clipboard feature allows you to access the history of the items you’ve copied to the clipboard and paste them again later. You can access the Clipboard history by pressing Windows Key + V keyboard shortcut. By default, Clipboard history is enabled in Windows 11, if you want you can disable Clipboard history, this article will guide you to disable Clipboard in Windows 11.
Disable Clipboard in Windows 11:
Clipboard history has some of the key features like cloud sync, the ability to pin items, Rich text support, and Enhanced layout. But still, if you want to disable the Clipboard history, then follow the below-mentioned methods.
Method 1: Using Windows Settings
Open Windows Settings by pressing Windows + I, from the left-hand side click on System and from the right-hand side click on Clipboard.

Under Clipboard, Turn off the Clipboard history toggle button.

Then click on Clear to clear the clipboard data.
Method 2: Using Group Policy Editor
Open Run command by pressing Windows + R and type gpedit.msc and hit enter, this command will open the Group Policy Editor console.
Navigate to the following path
Computer Configuration > Administrative Templates > System > OS Policies
From the left-hand side click on OS Policies, and from the right-hand side look for Allow Clipboard History.

Double-click on Allow Clipboard History and open Policy Settings. Choose Disabled and click on Apply and OK.

Method 3: Using Registry Editor
Open Run command by pressing Windows + R and regedit and hit enter, this command will open the Registry Editor.
Now navigate to the following Registry path.
HKEY_LOCAL_MACHINE\SOFTWARE\Policies\Microsoft\Windows\System
From the left-hand side, right-click on the System registry key and choose New > DWORD (32-bit) Value, and name the DWORD as AllowClipboardHistory.
Double-click on the AllowClipboardHistory DWORD and set the value as 0 to disable the Clipboard History.

To enable back set the value as 1 and click on OK.
Close the registry editor and restart the system once.
Read Also:
Enable Clipboard Sharing with Sandbox in Windows 11
Add Copy to Clipboard to Right-click Context menu in Windows 10?
How to Clear Clipboard History in Windows 10?