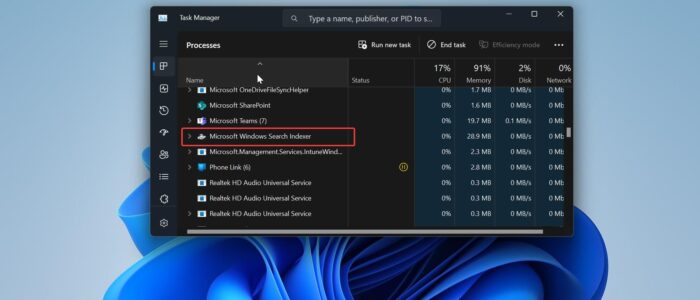
In Windows operating system, Windows Search works by creating and maintaining an index of the files and other content on the computer, this index is known as Search Index. Windows Search is one of the main features that involves Indexing is the process of collecting the information of the files, email messages, and other content on your PC and cataloging it in order. Indexing helps computers to search faster, when you search for any file on your PC, windows search will look into the search and get the results faster. By default, Indexing will collect all the information about files on your PC, like file names, file path, their contents, and Metadata. Indexing also collects information about the application that you installed on your PC. Windows constantly tracks changes to files and updates the index with the latest information. It automatically opens recently changed files, looks for the changes, and stores the new information in the index. All the data gathered from the indexing is stored locally on your PC. Whenever you search for any file, windows look into the Search Index and give you the results quickly, to keep the Windows Search operating correctly, the search indexer process will run in the background. Sometimes, SearchIndexer.exe may utilize more disk usage. If you encounter a similar issue, then this article will guide you to fix SearchIndexer high disk usage in Windows 11/10.
Fix SearchIndexer high disk usage in Windows 11/10:
Follow the below-mentioned recommended Resolution methods to fix SearchIndexer’s high disk usage issue in Windows 11/10.
Solution 1: Run Search and Indexing Troubleshooter
Search and Indexing Troubleshooter is the inbuilt tool that is used to scan for issues on your Cortana and windows search Indexing.
Open Windows Settings by pressing Windows + I and from the left-hand side click on System and from the right-hand side pane look for Troubleshoot.
Under Troubleshoot click on Other troubleshooters
Next, under Other troubleshooters, look for Search and Indexing and click on Run. Follow the on-screen instructions to Run the troubleshooters.
The troubleshooter will scan for issues on your PC that are related to Windows Search. Click on Yes if anything prompts for an apply fix. Once the fix has been successfully applied, restart the system once.
Solution 2: Restart Windows Search Services
Open Run command by pressing Windows + R and type services.msc and hit enter, this command will open the Windows Services console.
Look for the Windows Search service and click on Restart the service.

Restarting the service will mostly fix issues with Windows Search.
Solution 3: Rebuilt Search Index
Open Run command by Pressing Windows + R and type Control and hit enter. This command will open the Control Panel.
From the top right corner, set the view by the option to Large icons. Then look for the Indexing Options and Click on it.
Next under Indexing Options click on Advanced, now you will get the Advanced options window.
Click on the Index settings tab and under troubleshooting, click on Rebuild.

This will rebuild the search index, it will take some time depending on your computer speed and the number of files on your system.
Find More about the Rebuilding Search Index.