Bitlocker is a feature that protects your hard disk from external attacks or from offline attacks. It is a full volume encryption feature included with Microsoft Windows (Pro and Enterprise only) versions starting with Windows Vista. It is designed to protect data by providing encryption for entire volumes. By default, it uses the AES encryption algorithm in cipher block chaining (CBC) or XTS mode with a 128-bit or 256-bit key. This encryption algorithm is strong enough to protect your HDD and your data. For example, if your HDD is encrypted and you lost your HDD and if someone tries to access your data without the Recovery key then they can’t get anything.
BitLocker also protects your data if malicious user boots from an alternate Operating System. With either attack method, BitLocker encrypts the hard drive so that when someone has physical access to the drive, the drive is unreadable. There is one more feature Microsoft includes along with the Bitlocker, that is Bitlocker PIN or Pre-Boot Pin Pre-boot authentication with full-disk encryption products (including BitLocker) is a process that requires a user to authenticate prior to making the contents of the system drive accessible. In the case of BitLocker, BitLocker encrypts the entire drive, including all system files. BitLocker accesses and stores the encryption key in memory only after a user provides a specific PIN or USB startup key.
To enable Bitlocker PIN, first thing you must Encrypt the HDD, then you can enable the Bitlocker PIN from the Control panel. Basically, Bitlocker allowed from 4 to 20 characters for a PIN. The Bitlocker PIN length is associated with TPM and Windows Version. Starting from Windows 10 version 1703 and TPM 2.0 the Bitlocker PIN length was increased to 6 Characters. Also, the TPM 2.0 lockout period is greater than the default when a PIN is changed. There are number of ways to Reset a Bitlocker PIN, This article will guide you to Reset BitLocker Pin Using PowerShell, Command Prompt and GUI method.
Steps Reset BitLocker Pin Using PowerShell
Table of Contents
Reset BitLocker Pin Using Control panel
Reset BitLocker Pin Using Command Prompt
Reset BitLocker Pin Using PowerShell
You can Reset Bitlocker Pin in three different Methods, Let’s see the Methods in detail.
Using Control panel
Open Run command and type Control and hit enter this will open the Control Panel.
Now set the panel view to large icon, the search for Bitlocker Drive Encryption. Now click on Change PIN.
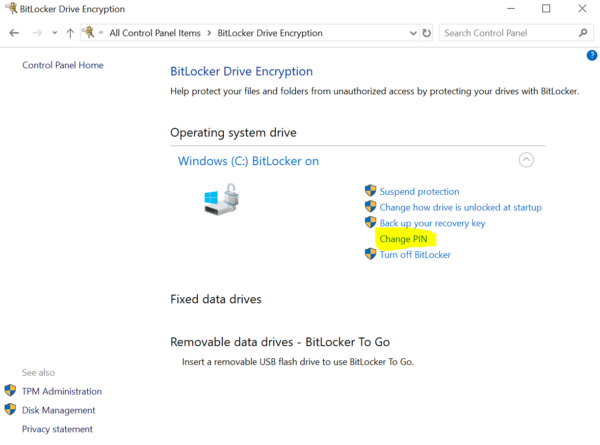
If you Know the Old PIN then you can enter the Old PIN then enter New PIN.
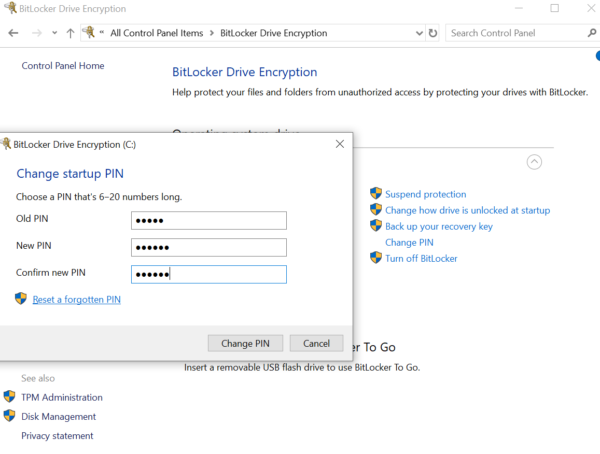
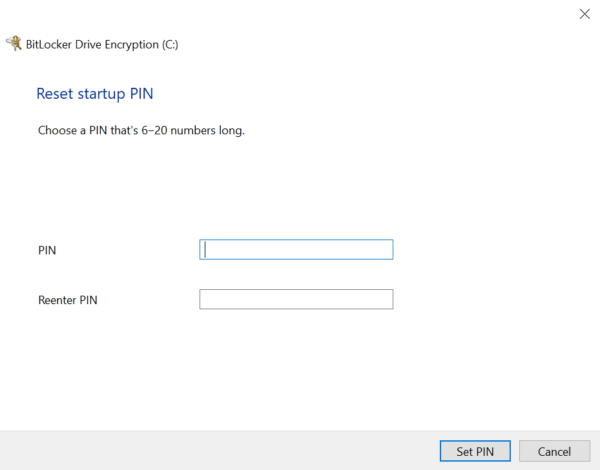
If you don’t know the Old PIN, then click on the Reset a Forgotten PIN. Enter the PIN and Confirm It.
Click on Set PIN and Restart the system once and check.
Using Command Prompt
Press Windows + X and click on Open Command (Admin). And Enter the following Command.
manage-bde -changepin (Drive Letter):
Replace the Encrypted Driver Letter that is appropriate for your system, In my System C drive is encrypted so my Command will be, manage-bde -changepin C:
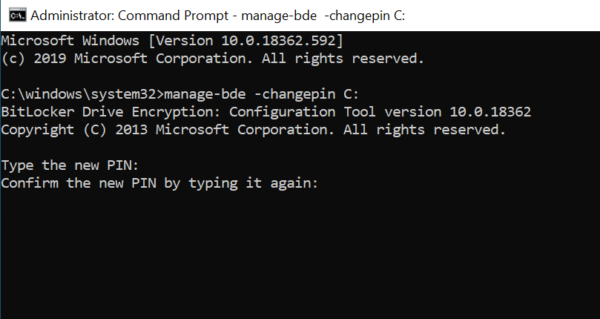
Enter the command and Hit enter, Type the new PIN When prompted and press Enter. Confirm the new PIN and Enter.
That’s is your Bitlocker PIN has been successfully Updated. Restart the system and check.
Reset BitLocker Pin Using PowerShell
Open PowerShell in admin Mode And Enter the following Command.
manage-bde -changepin (Drive Letter):
Replace the Encrypted Driver Letter that is appropriate for your system, In my System C drive is encrypted so my Command will be, manage-bde -changepin C:
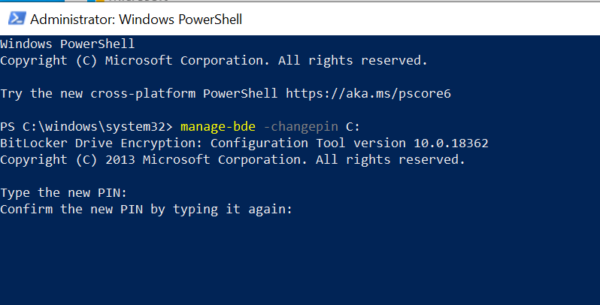
Enter the command and Hit enter, Type the new PIN When prompted and press Enter. Confirm the new PIN and Enter.
That’s is your Bitlocker PIN has been successfully Updated. Restart the system and check.
Read Also:
How to Enable Bitlocker using PowerShell in Windows 11?


