BitLocker is a full-disk encryption feature included with Windows Vista and later. It is designed to protect data by providing encryption for entire volumes. By default, it uses the AES encryption algorithm in cipher block chaining (CBC) or XTS mode with a 128-bit or 256-bit key. CBC is not used over the whole disk; it is applied to each individual sector. In Windows 11 you can enable BitLocker using different methods, we have already seen how to Enable BitLocker using Command Prompt, This article will guide you to Enable BitLocker using PowerShell.
Enable Bitlocker using PowerShell in Windows 11:
Ensure that you have administrator access, to execute the following commands you need to administrative access.
Launch PowerShell in elevated mode, click on the Start menu and search for PowerShell, right click and choose Run as Administrator.
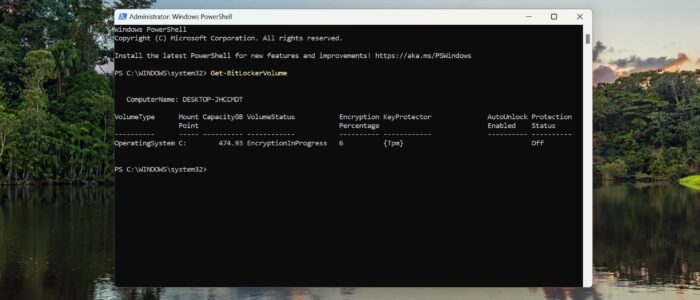
Before Proceeding, Check the drive eligibility of the drive for BitLocker Protection using the following command, this command provides the details about the drive’s status, including encryption policies, and Protection methods.
Get-BitLockerVolumeType the following command to enable BitLocker encryption on C: Drive, in case if you have multiple partitions, you can specify the Partition Drive letter. Mention the SecureString PIN value, Give 6 digit complex BitLocker PIN or you may get an error.
$SecureString = ConvertTo-SecureString "234233" -AsPlainText -Force; Enable-BitLocker -MountPoint "C:" -EncryptionMethod Aes256 -Pin $SecureString -TPMandPinProtectorEnable-BitLocker: Initiates the BitLocker encryption process.
-MountPoint “C:”: Specifies the drive letter or mount point for the drive you want to encrypt.
-EncryptionMethod AESTripleDes: Sets the encryption algorithm; you can replace AESTripleDes with other available options like AES128, AES256, etc.
This command will set BitLocker PIN and start the encryption, the encryption will take time depends on the HardDisk Size, to know the status of the Encryption you can use the Get-BitLockerVolume command.
If you got any error like the following screen shot, then you can use the next command to encrypt your drive, By default, Using BitLocker PIN at the startup is disabled by Windows Group Policy, to resolve this issue, you can enable the Local Policy Settings, or you can use different BitLocker Startup Option.

Enable-BitLocker -MountPoint "C:" -EncryptionMethod Aes256 -TpmProtector
Once you executed the encryption commands, you have to restart the system to start the encryption process. This command enables BitLocker on the C: drive with AES-256 encryption and uses TPM as the sole protector, eliminating the PIN requirement.
To Suspend and Resume BitLocker:
Suspend-BitLocker -MountPoint "C:"This Command Temporarily suspends BitLocker protection on the specified drive. This is useful when performing certain system changes.
Resume-BitLocker -MountPoint "C:"Resumes BitLocker protection after it has been suspended.
To Change the BitLocker Encryption Method:
Use the following command to change the BitLocker Encryption Method, If your drive is already encrypted, then the following command will allow you to change the encryption method.
$encryptionMethod = "AES256"
Set-BitLockerEncryptionMethod -MountPoint "C:" -EncryptionMethod $encryptionMethod
Replace $encryptionMethod with the desired method.
Read Also:
Prevent Users from Decrypting BitLocker in Windows 11
How to Reset BitLocker Pin Using PowerShell?
How to Restrict Standard Users from Changing Bitlocker PIN in Windows 10?
Fix The Group Policy Settings for BitLocker startup options are in conflict