Windows 10 get the updates automatically from Microsoft on every month the Second or sometimes the fourth Tuesday. It’s officially called Patch Tuesday. These Updates are very mandatory for every computer, these quality or cumulative Updates always download and install automatically once they reach your computer. These patches contain security patches, performance, and stability improvements. Windows 10 included Lot of features for Automatic updates to make the installation smooth. Usually, once the update is done the system will restart automatically. Sometimes this automatic restart effect the users negatively. So if you are decided to stop this automatic update, this article will guide you to Turn Off Automatic Updates Using Registry Edit.
Turn Off Automatic Updates Using Registry Edit:
Using This method, we turn off the automatic updates permanently.
Note: Modifying the Registry is risky, and it causes irreversible damage to your OS Installation Follow the steps correctly. Friendly advice Before Modifying Registry Creating Restore Point is recommended.
Open Run command by pressing Windows + R and type Regedit, hit enter, this command will open Registry Editor.
Now navigate to the following path:
HKEY_LOCAL_MACHINE\SOFTWARE\Policies\Microsoft\Windows
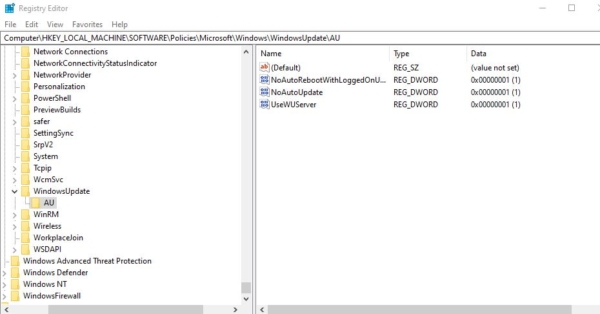
If you are using Windows Pro or Windows Enterprise edition, then you can find WindowsUpdate –>AU Registry Key.
From the right-hand pane click on the AU Registry Key. Left-hand side you can see NoAutoUpdate D-WORD,
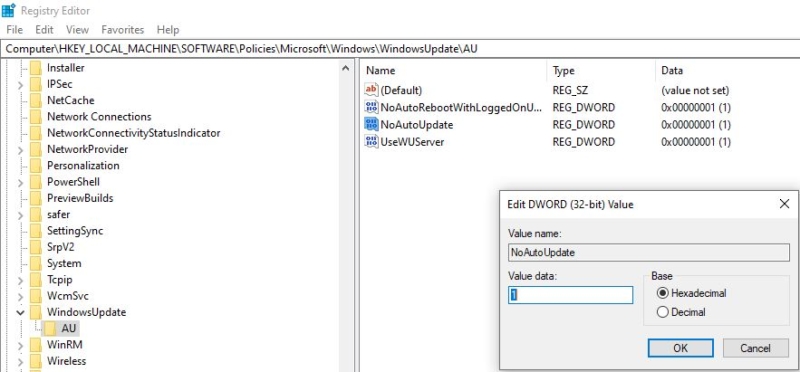
Right-click on NoAutoUpdate D-WORD and choose modify. Change the value from 0 to 1. Save the changes and restart the system once to make it effective.
If you are not able to find the AU registry Key you need to create it.
Navigate to the following path
HKEY_LOCAL_MACHINE\SOFTWARE\Policies\Microsoft\Windows
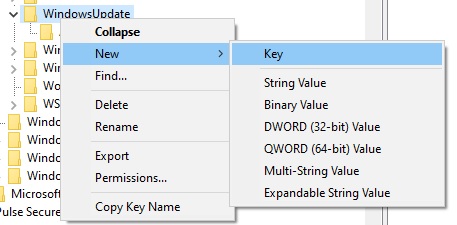
Expand WindowsUpdate folder and right-click on WindowsUpdate registry key and choose New Key and Name it as AU.
Now Right Click on the Right-hand pane and Choose New–> DWORD 32 bit. And name it as NoAutoUpdate.
Right-click on NoAutoUpdate D-WORD and choose modify. Change the value from 0 to 1. Save the changes and restart the system once to make it effective.
This will stop the automatic updates permanently, if you want to update manually go to Settings > Update & Security > Windows Update, and clicking the Check for updates button.


