Remote assistance refers to a connection that is intended to provide technical support from a distance. In this mode, a user who is sitting at his or her computer can invite a technician to see what is happening on the screen remotely. The remote user receives an invitation from the host and cannot log in without responding to it.
If allowed within the settings of the host computer, the remote user can also share control of the host computer, opening files, accessing information, and inputting data by mouse and keyboard. This is extremely helpful for an IT professional who can handle a problem from a distance by running scans or checking the registry. While this type of connection originated within the confines of a LAN, remote assistance is now possible over the internet regardless of the users’ locations.
An important distinction between remote assistance vs. remote desktop is that both the host user and the remote user are seeing the same screen. Both can take part in the process. Remote assistance is included in all current versions of Windows 10/11, and this article will guide you to Disable/Enable Remote Assistance Connections in Windows 11
Enable Remote Assistance Connections:
In Windows 11 you can enable or disable Remote Assistance using different methods, follow the below-mentioned methods to enable or disable the Remote assistance feature.
Method 1: Enable Remote Assistance Connections Using System Properties:
Open the Run command by pressing Windows + R and type SystemPropertiesRemote.exe and hit enter, this command will open System Properties.
Under System Properties windows click on the Remote tab and under the Remote Assistance section Check the option “Allow Remote Assistance connections to this computer”.

This feature allows users to take over your PC and fix a problem.
Click on the Advanced option to modify the Remote Assistance Settings, also you can set the maximum amount of time invitations can remain open.

Once you updated all the settings you can click on Apply and OK.
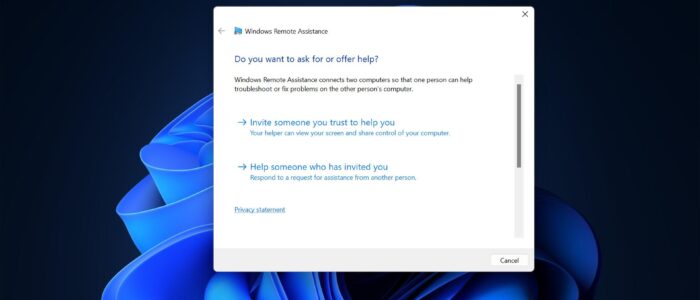
Next, click on Windows Search and type Invite someone to connect to your PC, and select Invite someone you trust to help you.
Then follow the on-screen instructions to give or take the system on remote.
Method 2: Using Registry Editor:
Open the Run command by pressing Windows + R and type Regedit and hit enter, this command will open the Registry editor console.
Now navigate to the following registry path.
HKEY_LOCAL_MACHINE\SYSTEM\CurrentControlSet\Control\Remote AssistanceFrom the left-hand side click on Remote Assistance and from the right-hand side look for the DWORD named fAllowFullControl.
Double click on the DWORD fAllowFullControl and set the value data as 1 and click on OK.

Close the Registry Editor and restart the system once.
Method 3: Using Group Policy Editor:
Open the run command by pressing Windows + R and type gpedit.msc and hit enter, this command will open the Group Policy Editor.
Now navigate to the following path.
Computer Configuration > Administrative Templates > System > Remote Assistance.From the left-hand side click on the Remote Assistance folder and from the right-hand side look for the policy named Configure Solicited Remote Assistance.

Double click on Configure Solicited Remote Assistance policy and Choose Enabled.

Click on Apply and OK, update the policy, open the command prompt, and type gpupdate /force.
Read Also:
Fix RDP Authentication Error has Occurred in Windows 11/10
Fix RDP Error Code 0x104 in Windows 10